My Git Branching Strategy
When it comes to managing a software development project, an effective Git branching strategy is akin to having a well-thought-out roadmap. For my website project, I wanted to ensure a smooth go-live at the end of March but was faced with a challenge. Several articles weren’t yet ready for publication, cluttering the Main branch. To streamline the process, I had to introduce version tracking and hide unfinished articles from the main pipeline while ensuring the ability to track them separately.
Here’s how I adapted my Git branching strategy to meet the needs of my evolving project.
Introducing Version Tracking with Git
Tracking Essential Changes in Main
Previously, every change was tracked within the Main branch. Now, I needed a more nuanced approach where only articles ready for publishing lived in Main. The rest would be tracked but remain hidden. This shift required the adoption of a more structured, multi-branch strategy, and Git’s capabilities seemed tailor-made for this mission.
Hiding Unfinished Work
The tech-for-the-layman Branch
One of the articles that wasn’t ready for publication was Tech for the Layman. To hide it, I created a separate branch. Here’s how I did it:
- Branch Out: From Main, I created a new branch specifically for the
Tech for the Laymanarticle.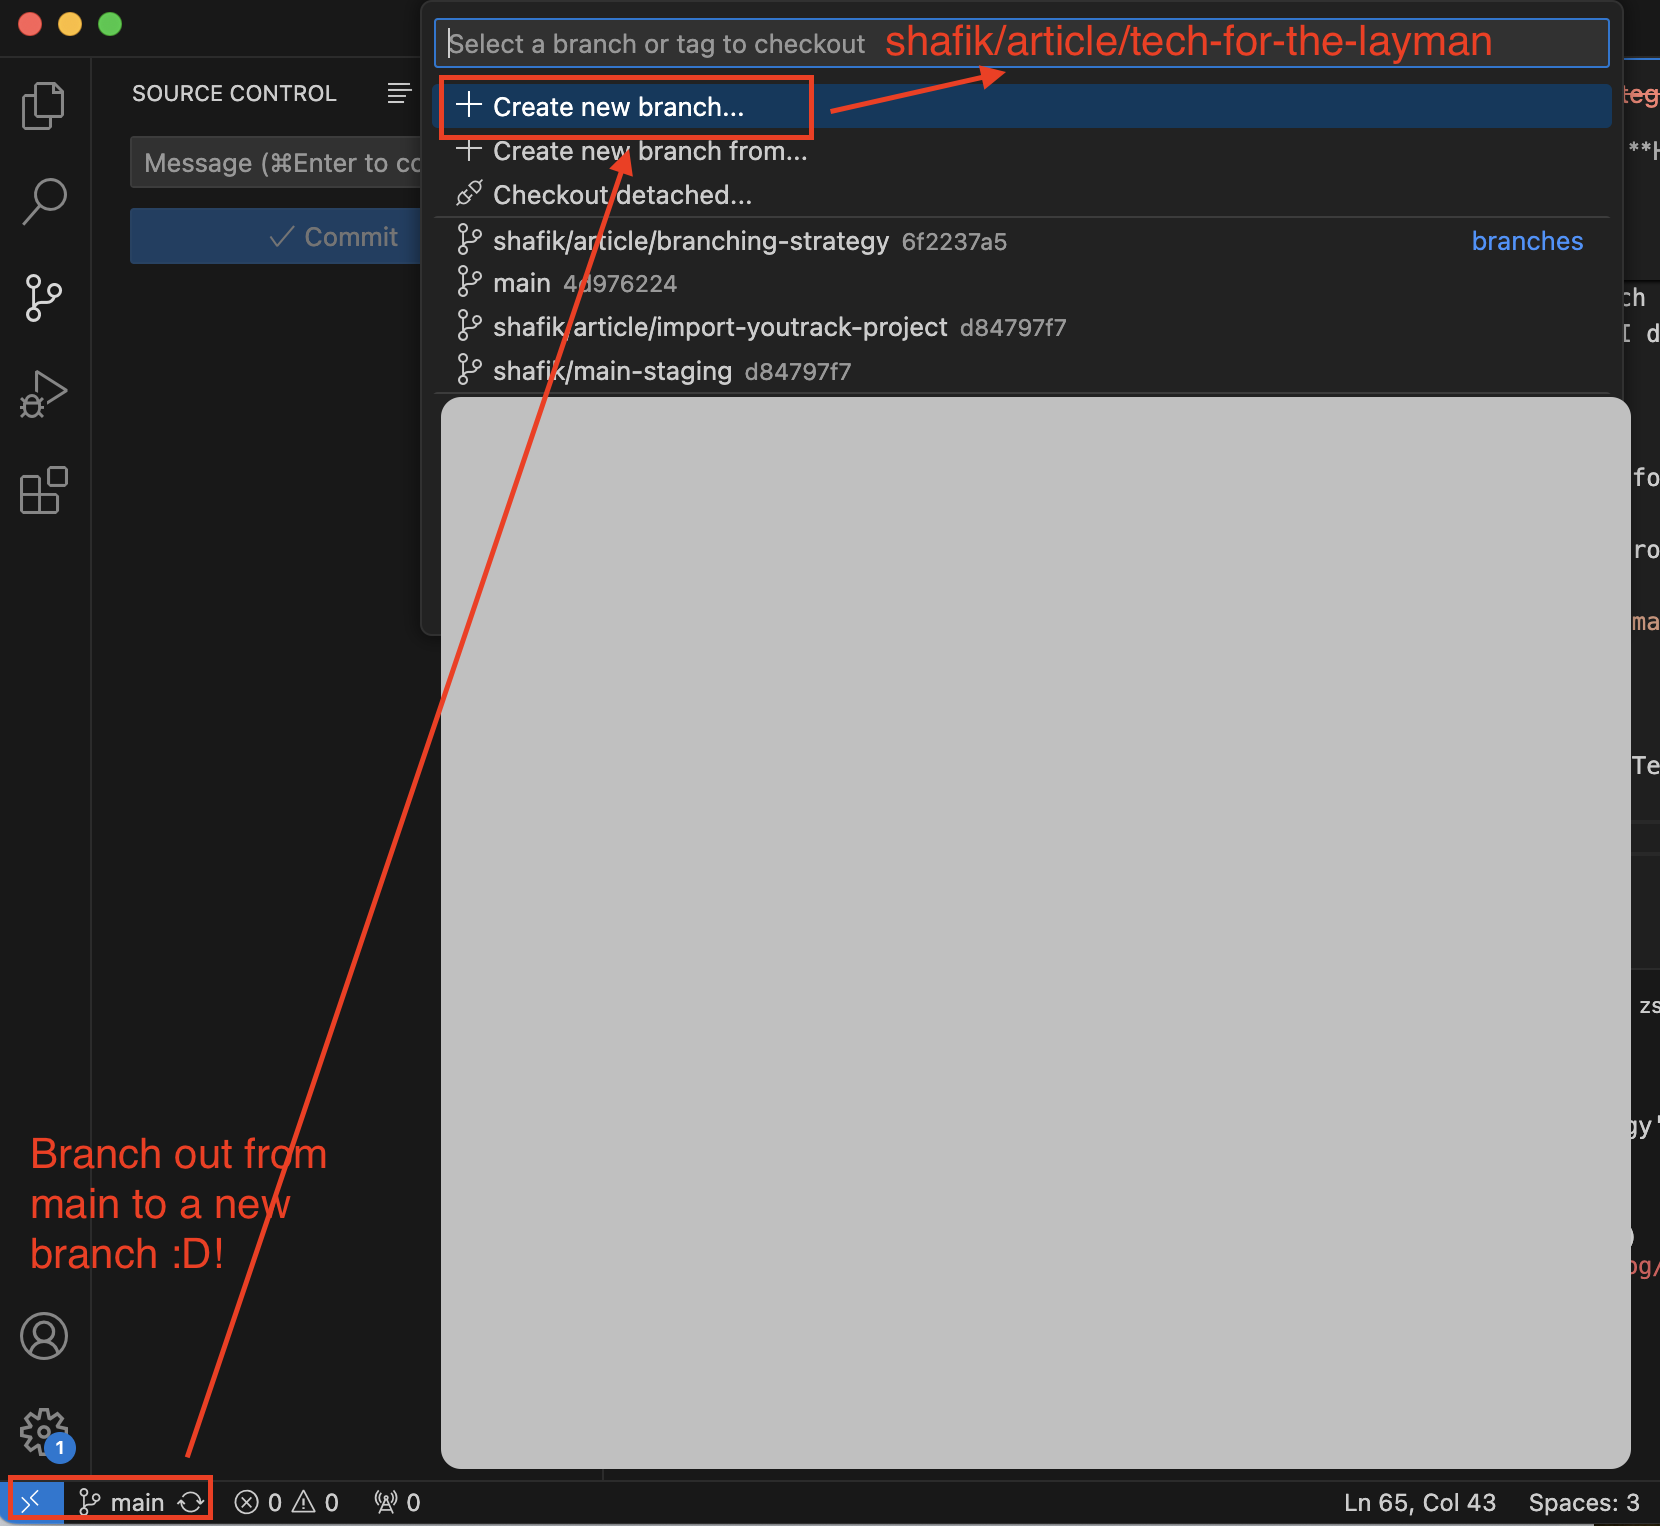
- Test Deletion: Ensuring
Tech for the Laymanarticle was removed from themain-stagingbranch and validated the change.
Note: In the screenshot below, we have referenced themain-stagingbranch. Once we have tested the deletion, we will mergemain-stagingintomain.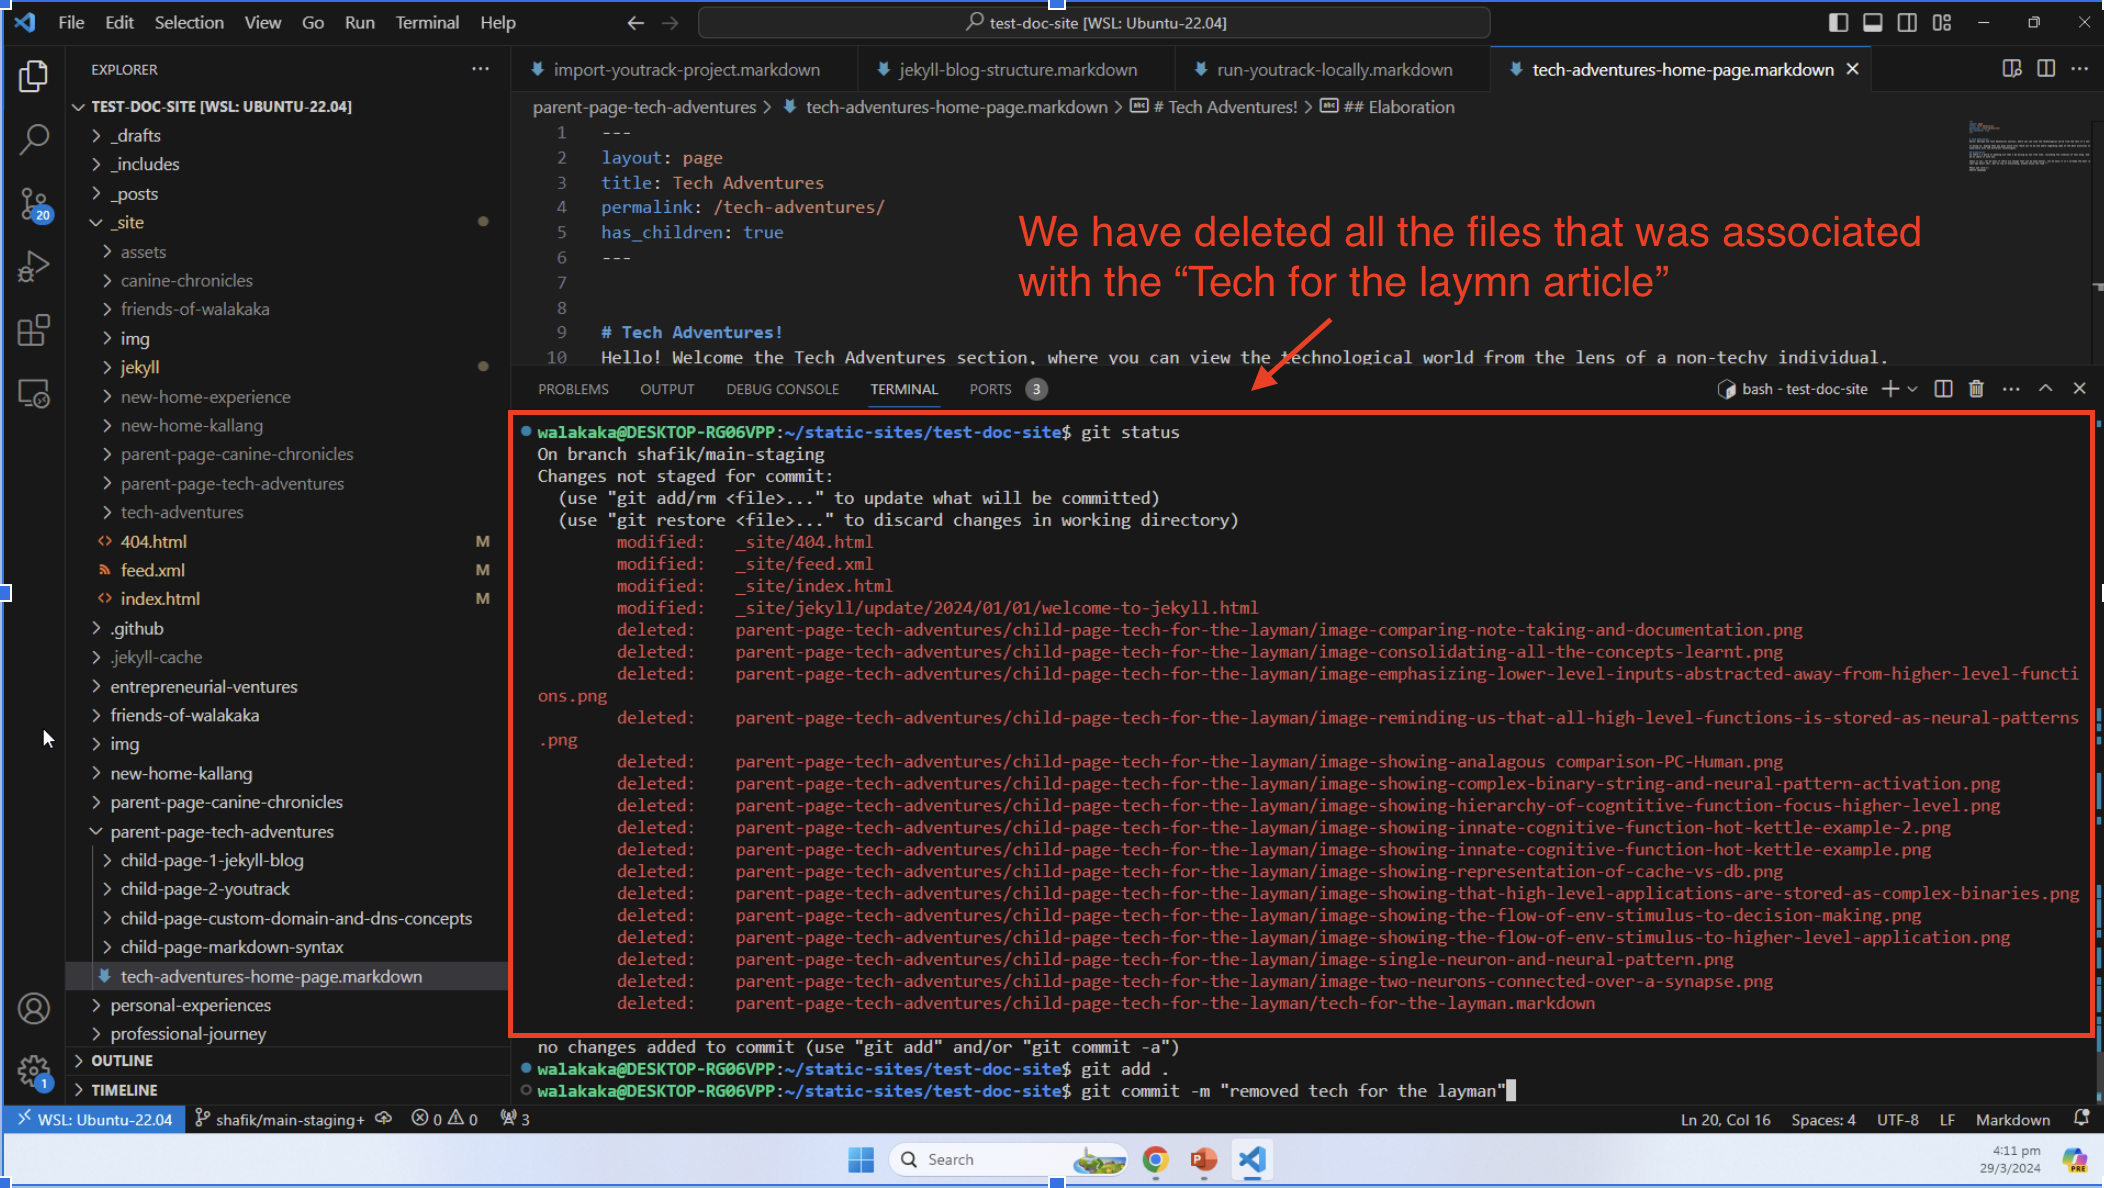
- When we access the site on our local (in
main-staging), we can see that theTech for the Laymanarticle is no longer available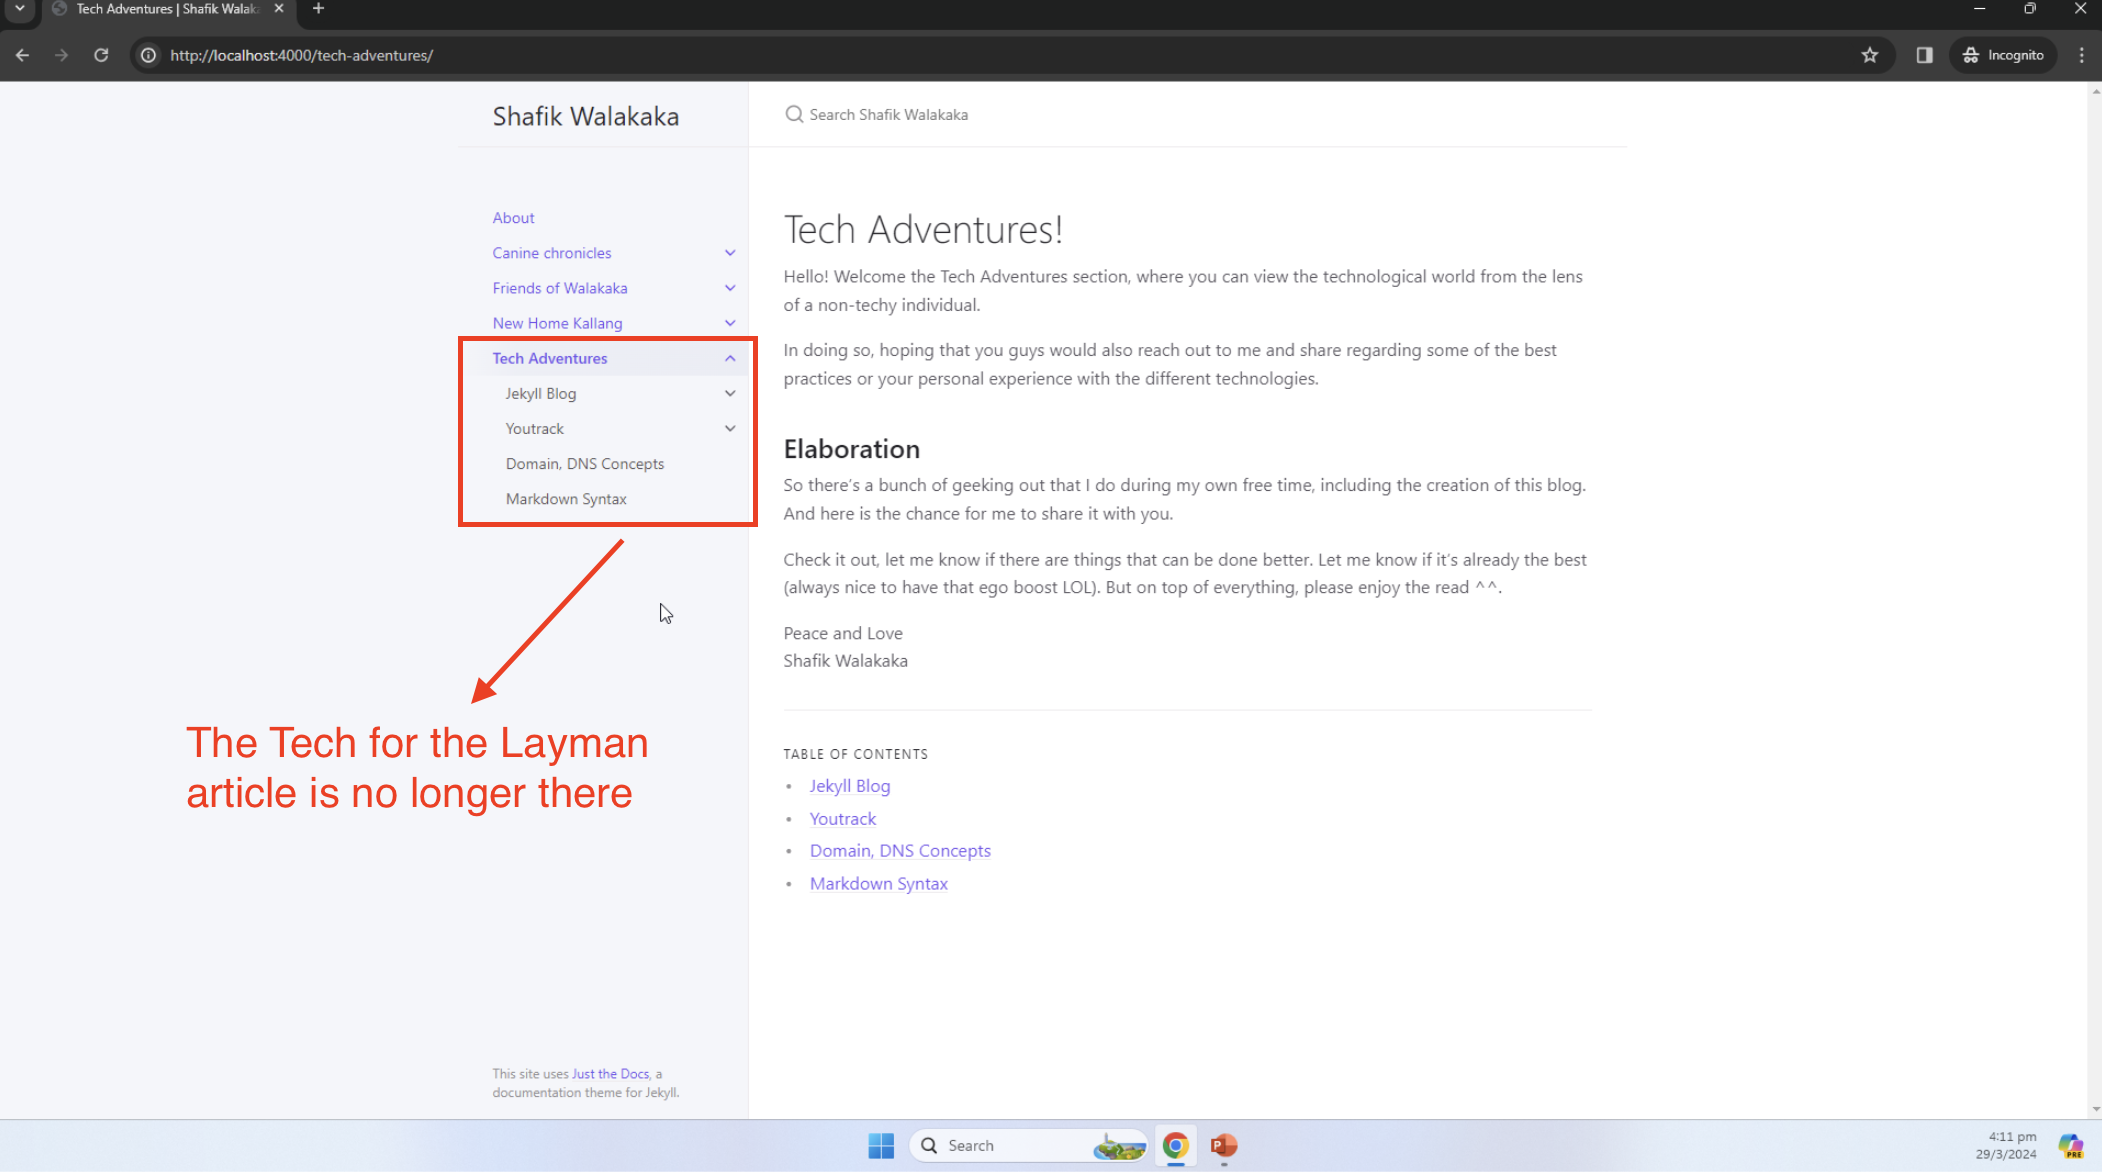
- Switch and Validate: I switched to the
tech-for-the-laymanbranch and confirmed the article appeared as it should.- Indeed, the files are available in the
tech-for-the-laymanbranch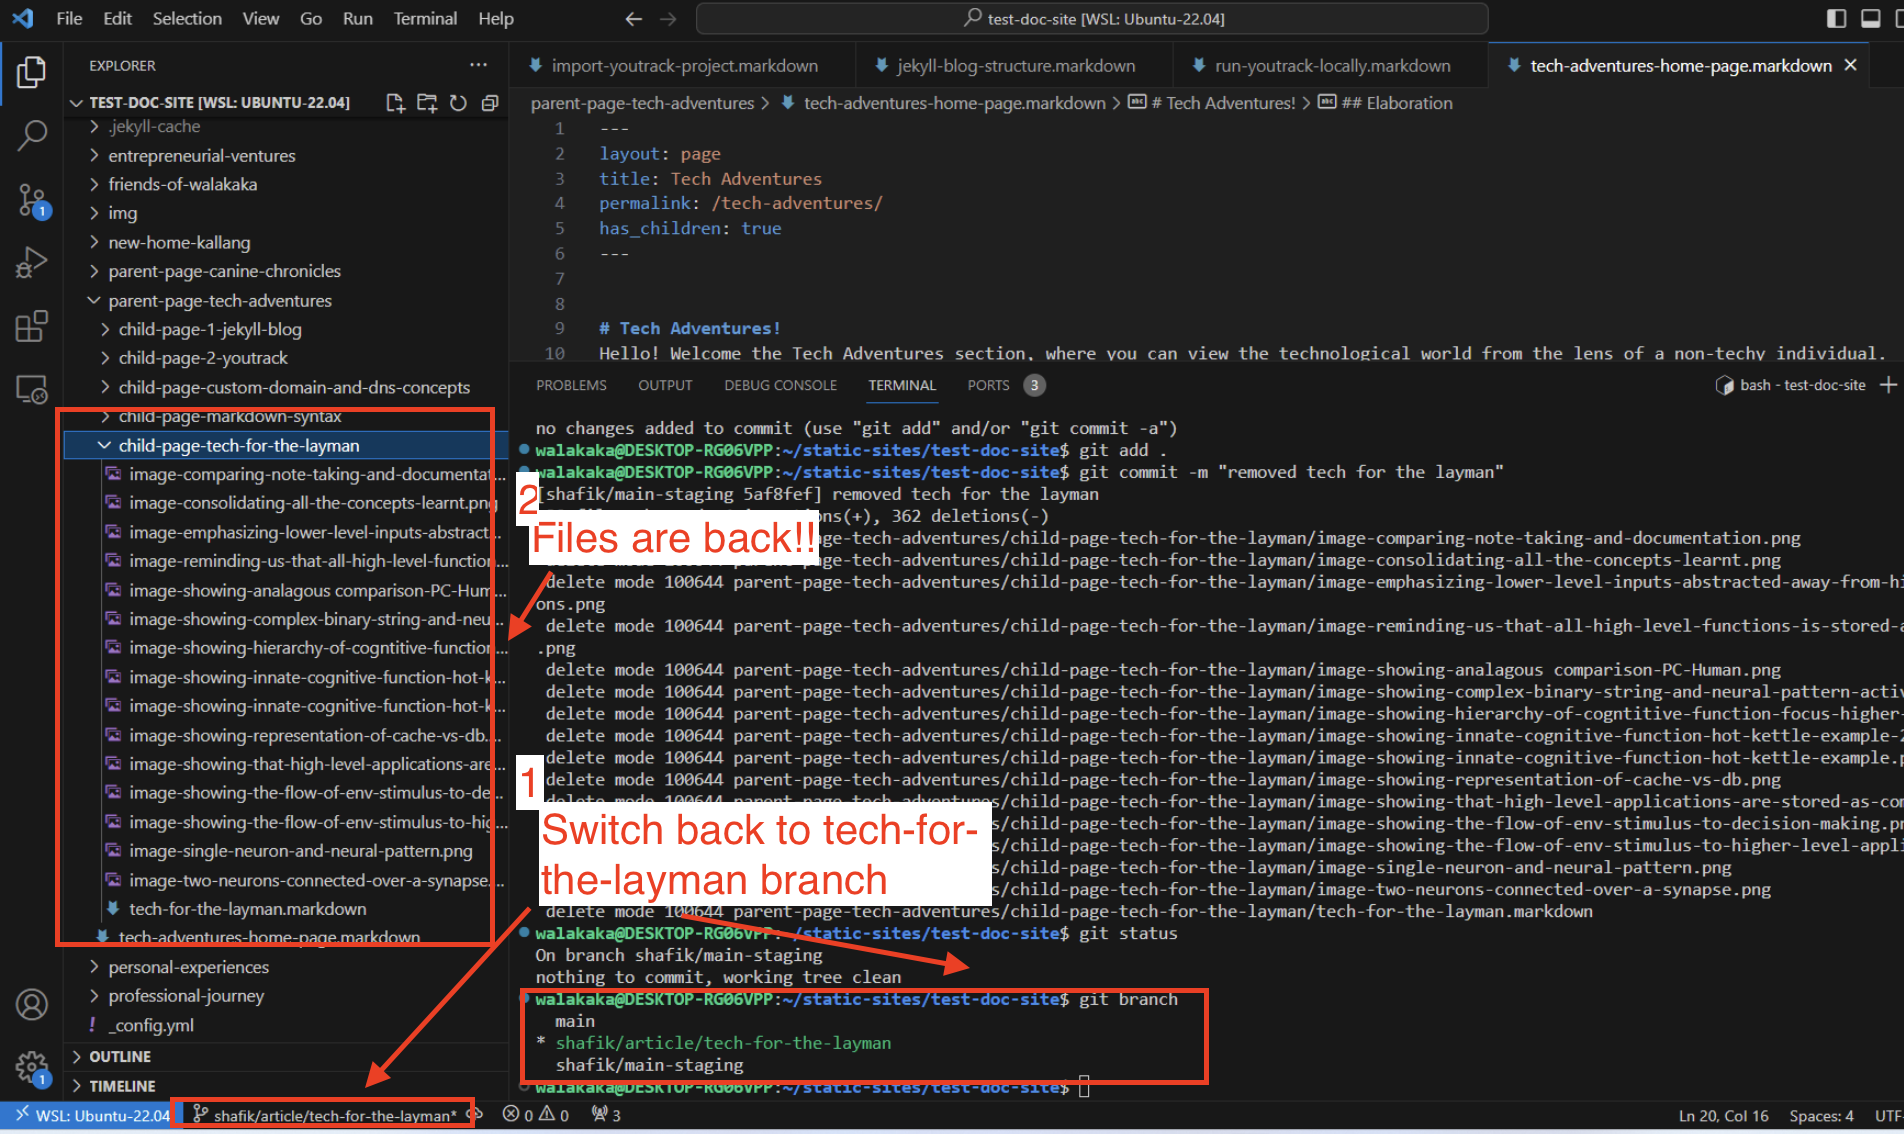
- Refreshing the site also displays the
Tech for the Laymanarticle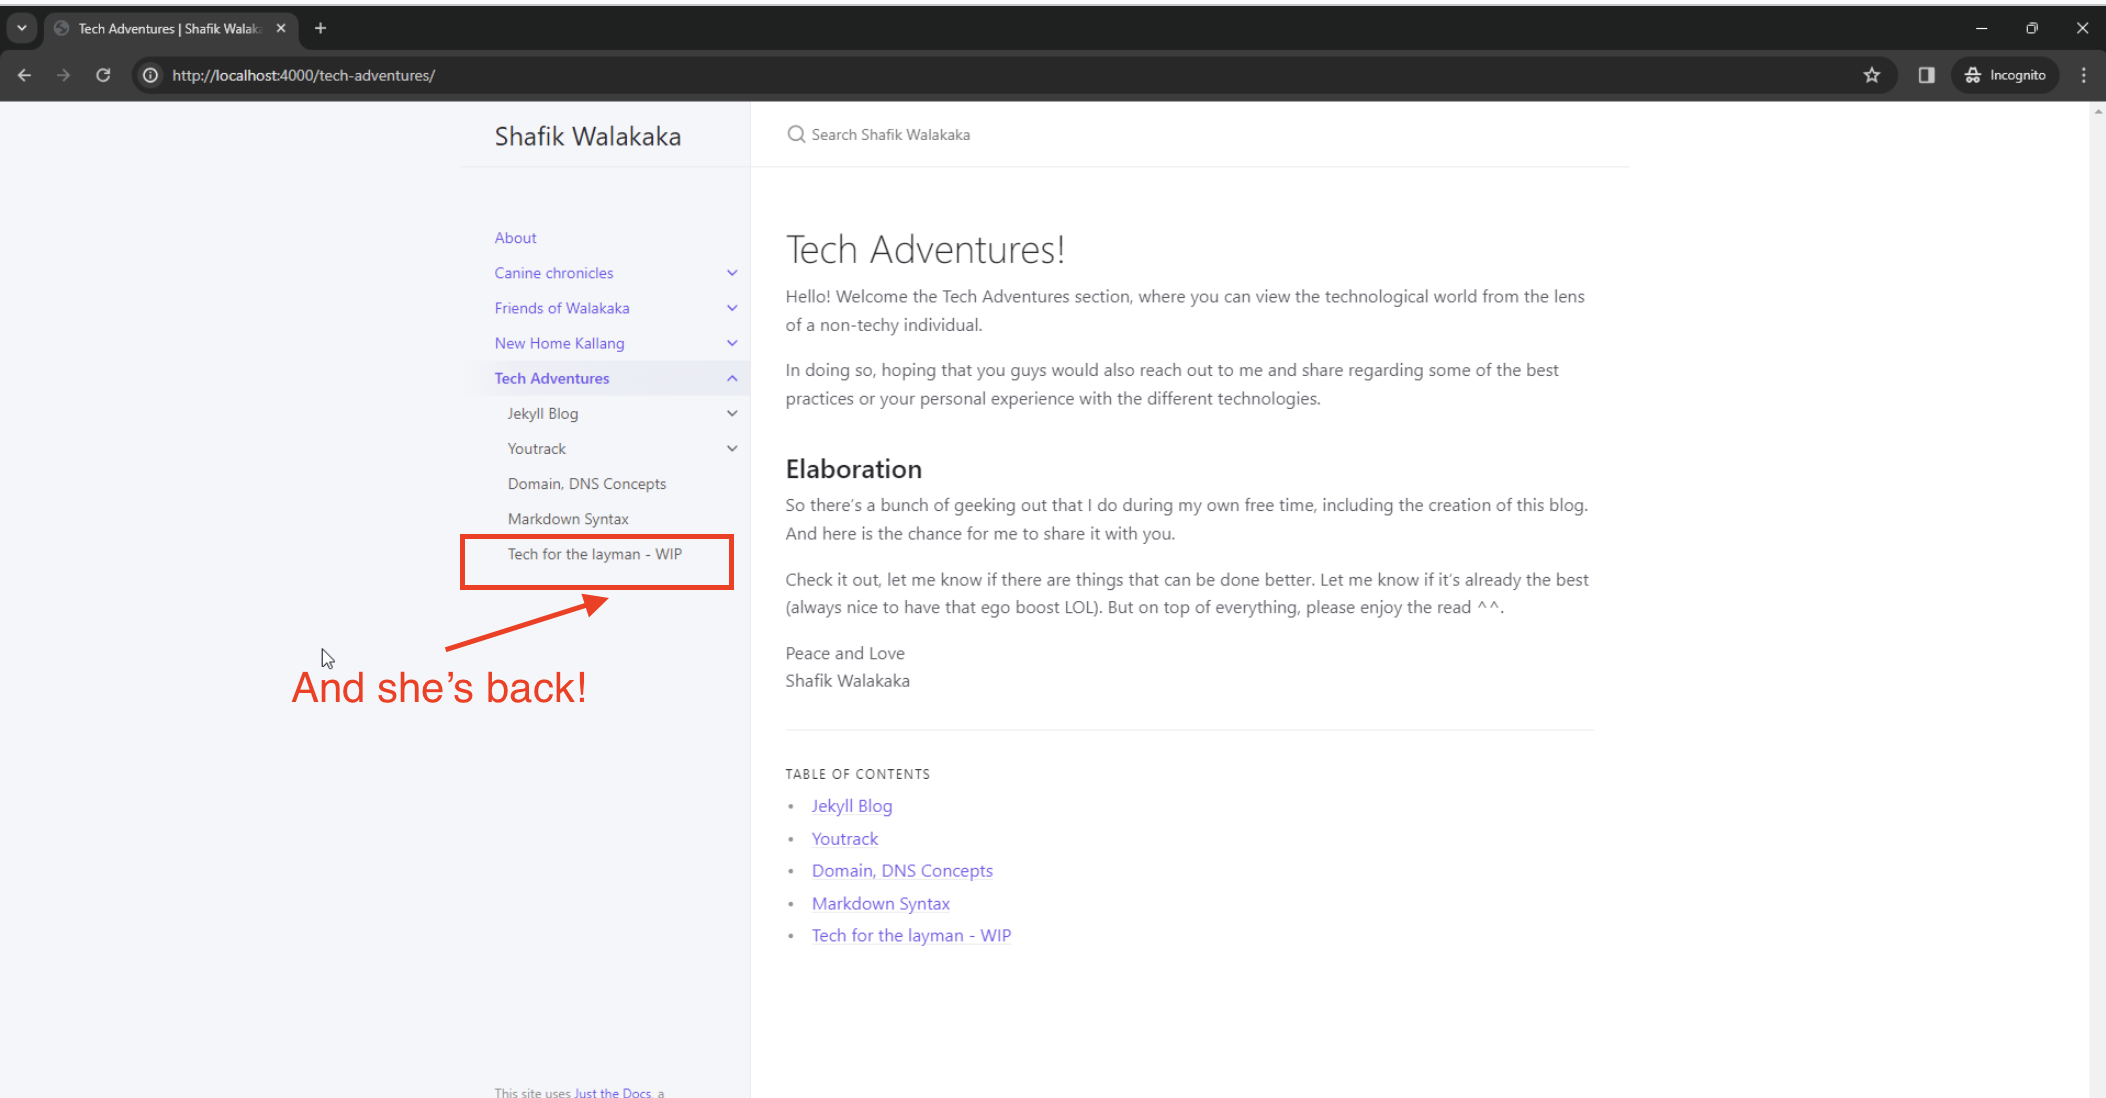
- Indeed, the files are available in the
Testing the Main-Staging Merge
Making many changes on the local machine and then integrating those into the Main branch without any validation can be risky. Hence, the introduction of the main-staging branch served as a conduit for integration testing. This was crucial for ensuring the quality of the code set to go live.
Ensuring Deployment-Ready Code
To ensure each batch of code was deployment-ready, I followed these steps:
- Test Integration: I merged code changes from feature branches (such as
tech-for-the-layman) intomain-stagingand ran a series of tests to simulate the deployment process.- In the previous example, we deleted all the files related to the
tech-for-the-laymanarticle in themain-stagingbranch. - After testing, we can merge the
main-stagingbranch into themainbranch.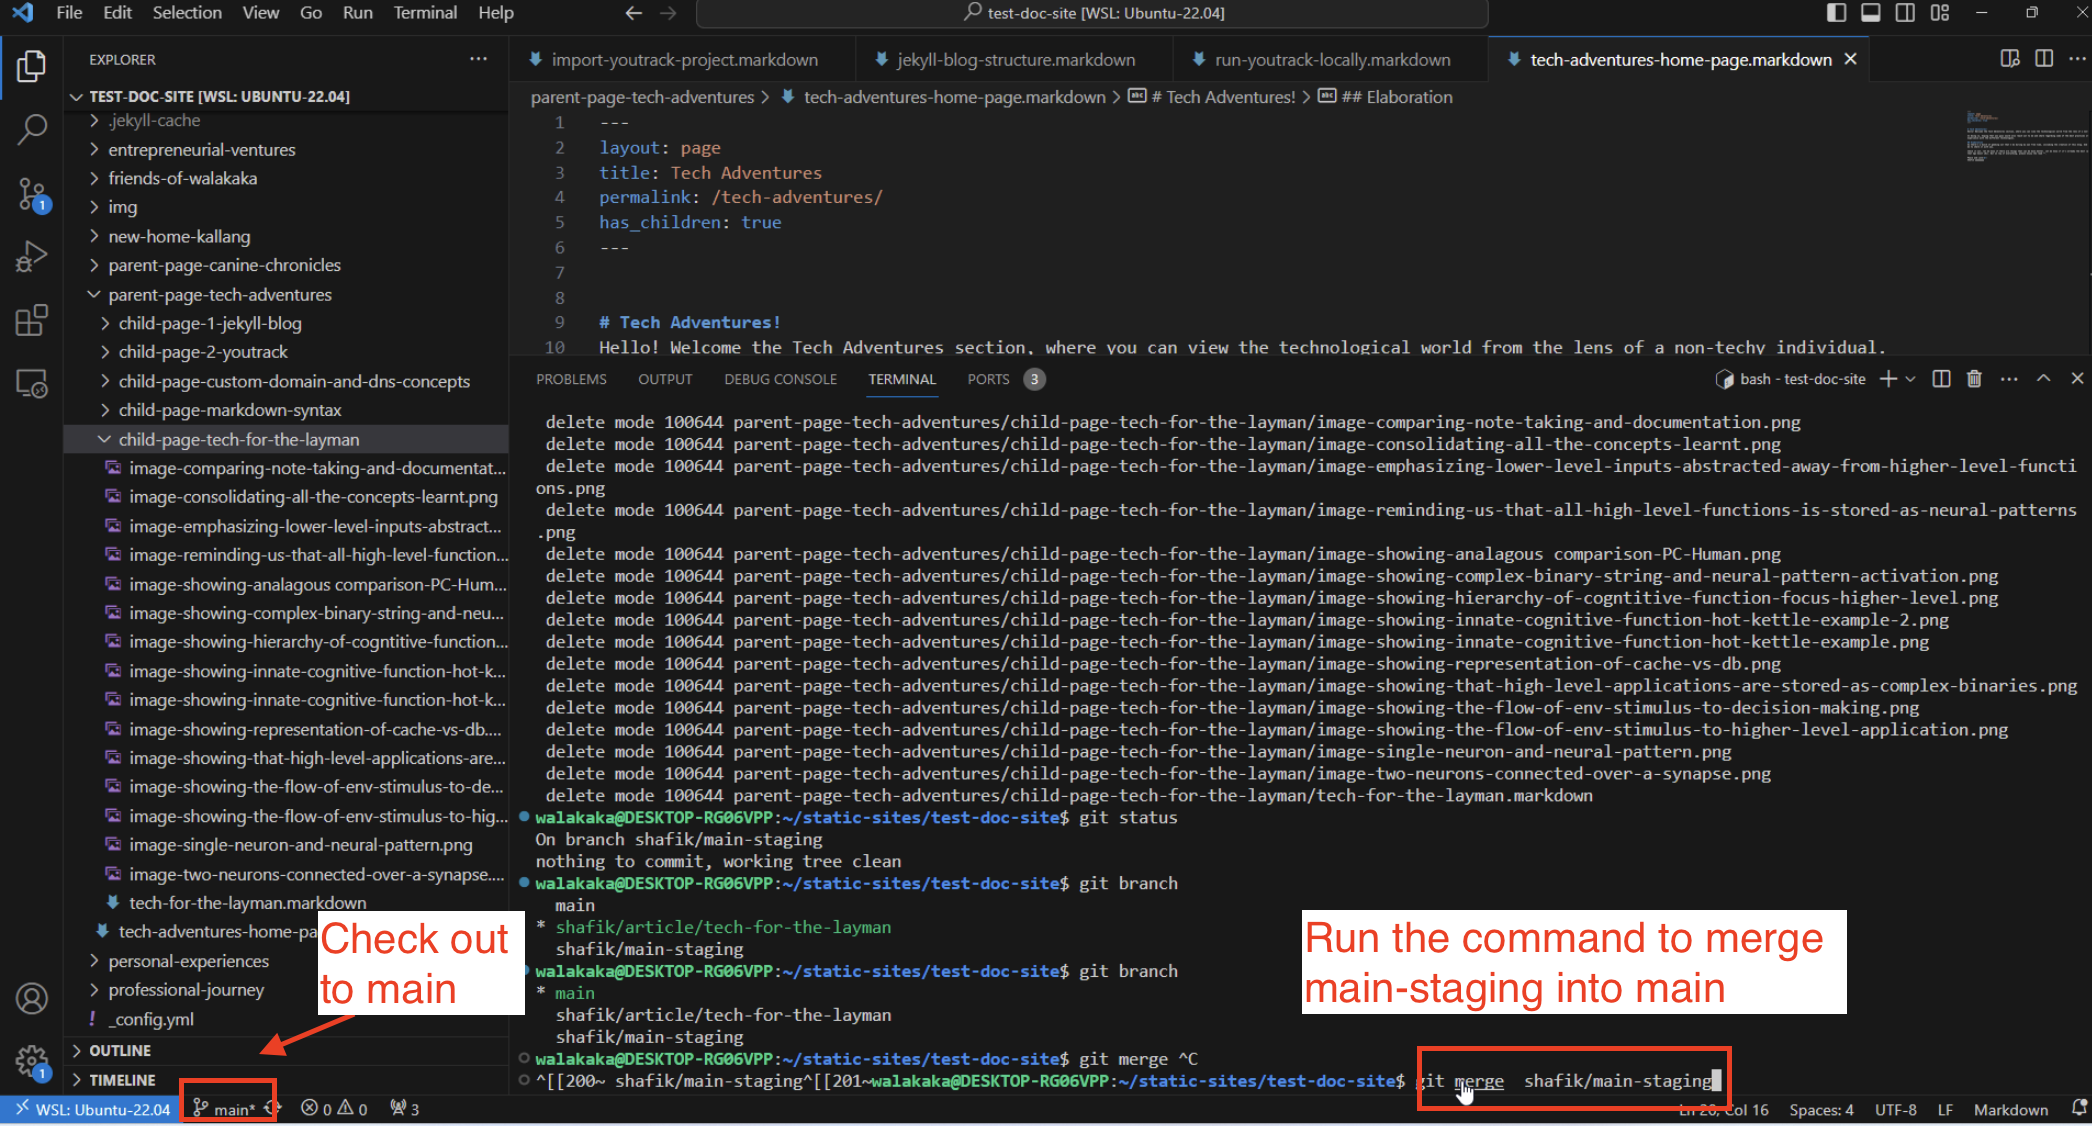
- When checked out to
main, you can run the commandgit merge <source-branch>. When successful, yourmainbranch will be updated to reflect the changes that have been made in yourmain-stagingbranch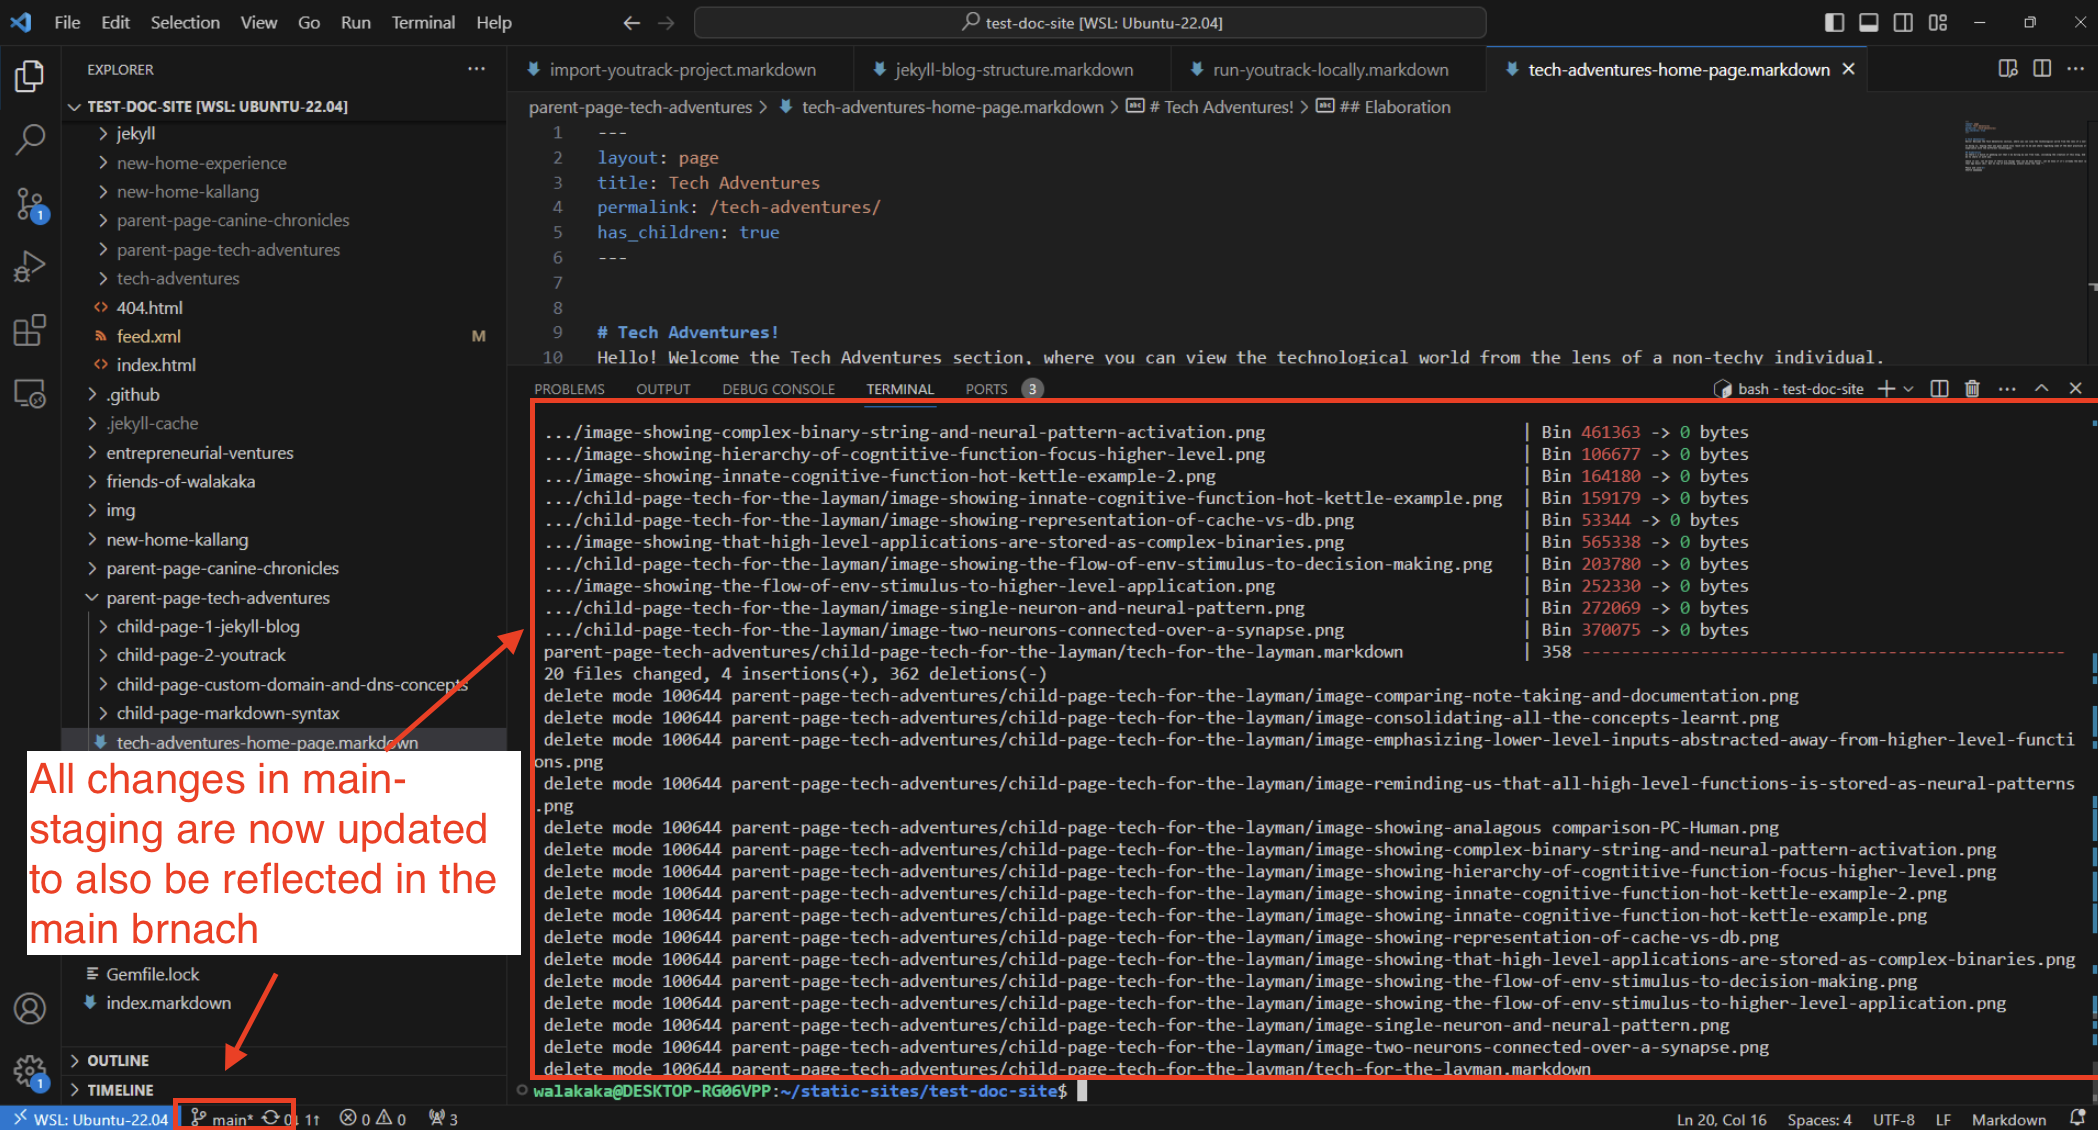
- In the previous example, we deleted all the files related to the
- Frequent Rebase: I regularly rebased
main-stagingwith Main to keep all the changes up to date and aligned with the live site’s features and design.
Note: Based on my understanding,rebaseis just a fancy word for merging back, to ensure that the code versions in both branches are in sync
Managing the Remote Repository
Keeping Track of All Changes
Maintaining a clean, up-to-date code base across all remote repositories is essential, especially when working from multiple devices. I regularly managed my remote and local branches to ensure they matched the project’s current state.
- Pushing Branches: After completing changes in a branch, I push them to the remote repository. All branches (
main,main-stagingand<feature-branches>) are pushed!- Once pushed, the different versions of the code are available in our remote github repo, and we can edit them from anywhere!
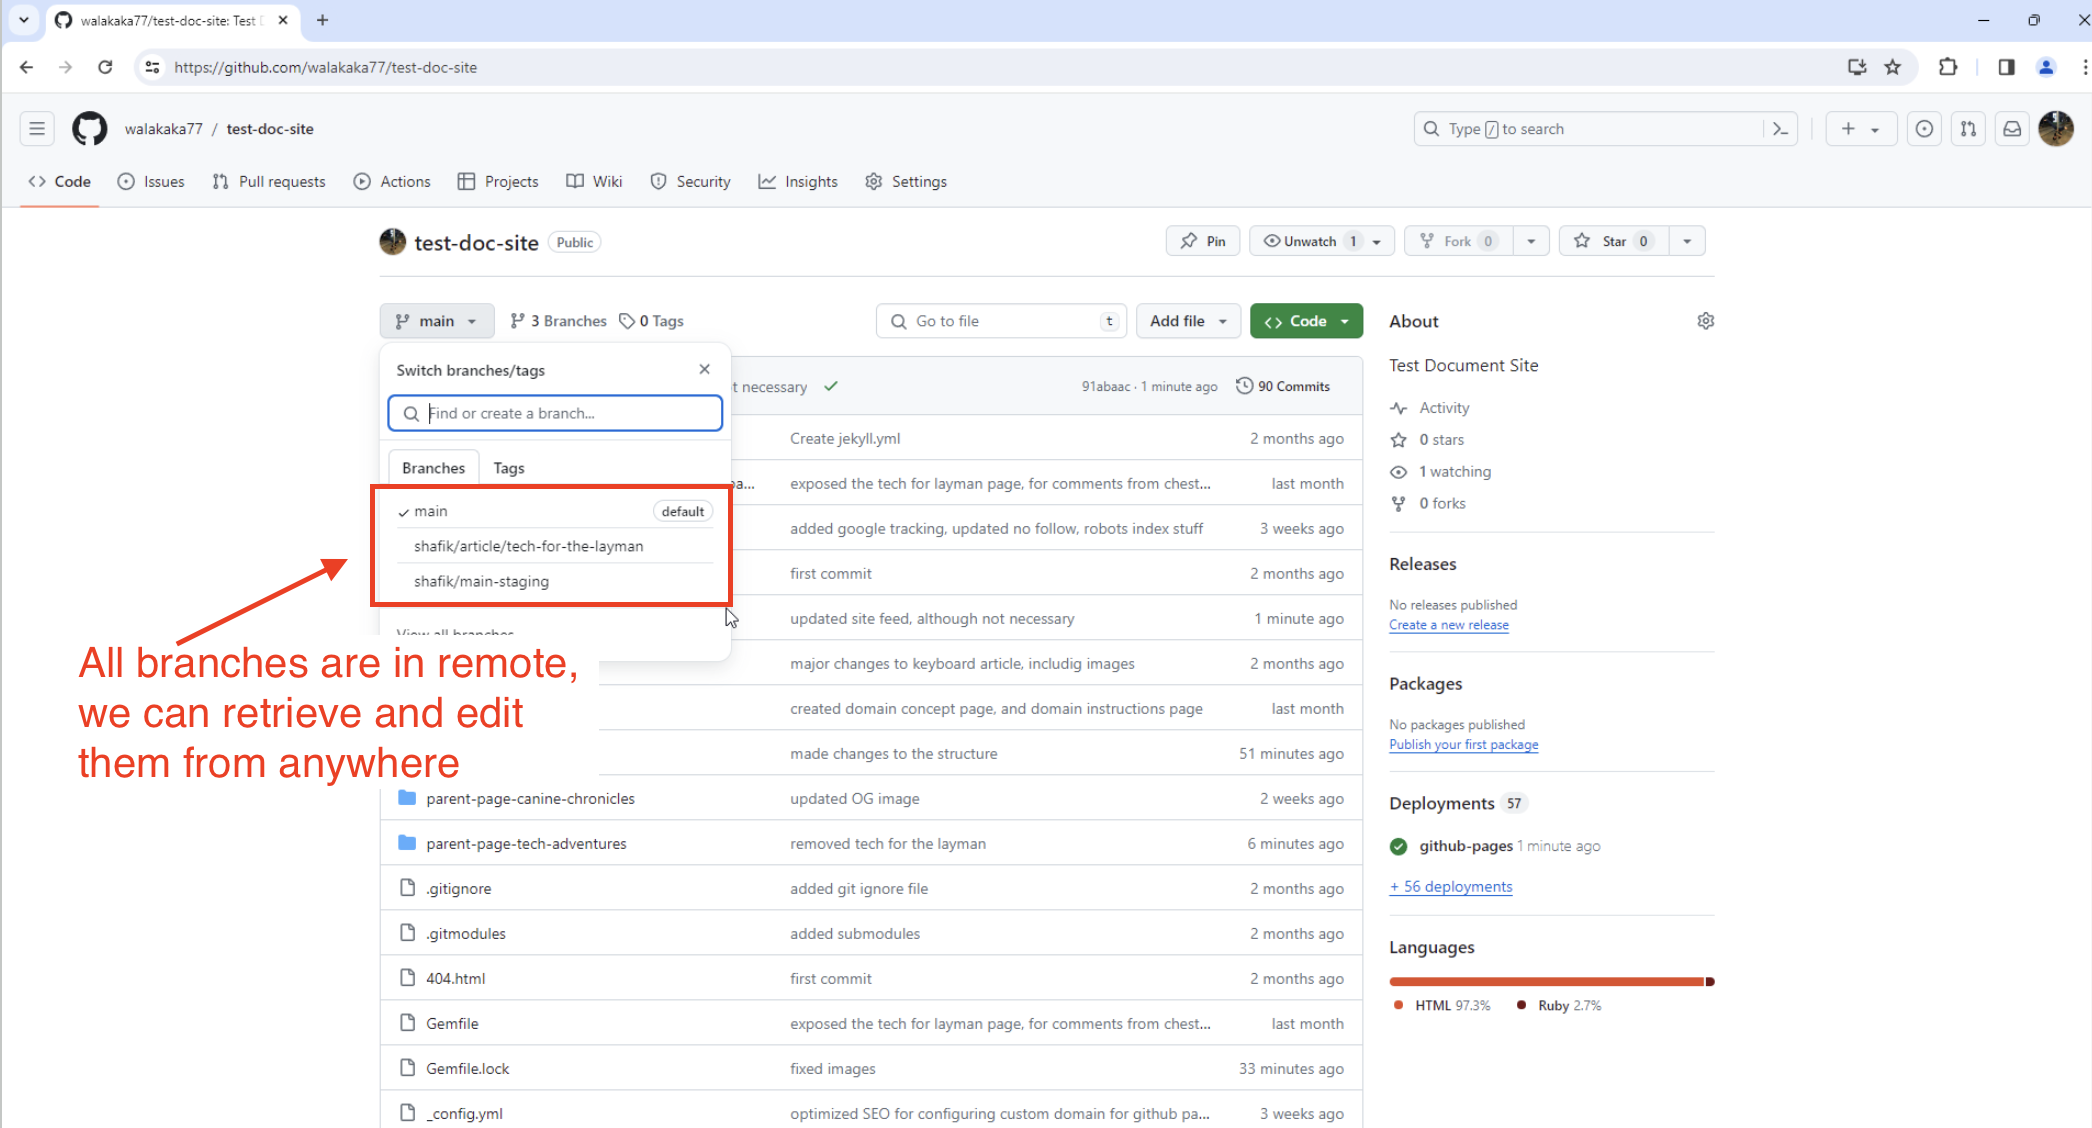
- Once pushed, the different versions of the code are available in our remote github repo, and we can edit them from anywhere!
- Merging and Deleting Branches: Once code changes were successfully tested in the main-staging branch, I merged them into Main and deleted the feature branch, subsequently removing any deleted branches from the remote repository with a single command
- This command pushes all my branches into my remote repo:
git push --all - This command deletes branches in my remote repo:
git push <remote_name> --delete <branch_name> - This command deletes local tracking branches if associated branch in remote is already deleted:
git fetch --prune - If you want to prune specific branches, you can use the following:
git fetch --prune <remote_name>
- This command pushes all my branches into my remote repo:
- Once
mainis pushed into your remote repository that is hosting your github pages. You can check and verify that your changes are applied.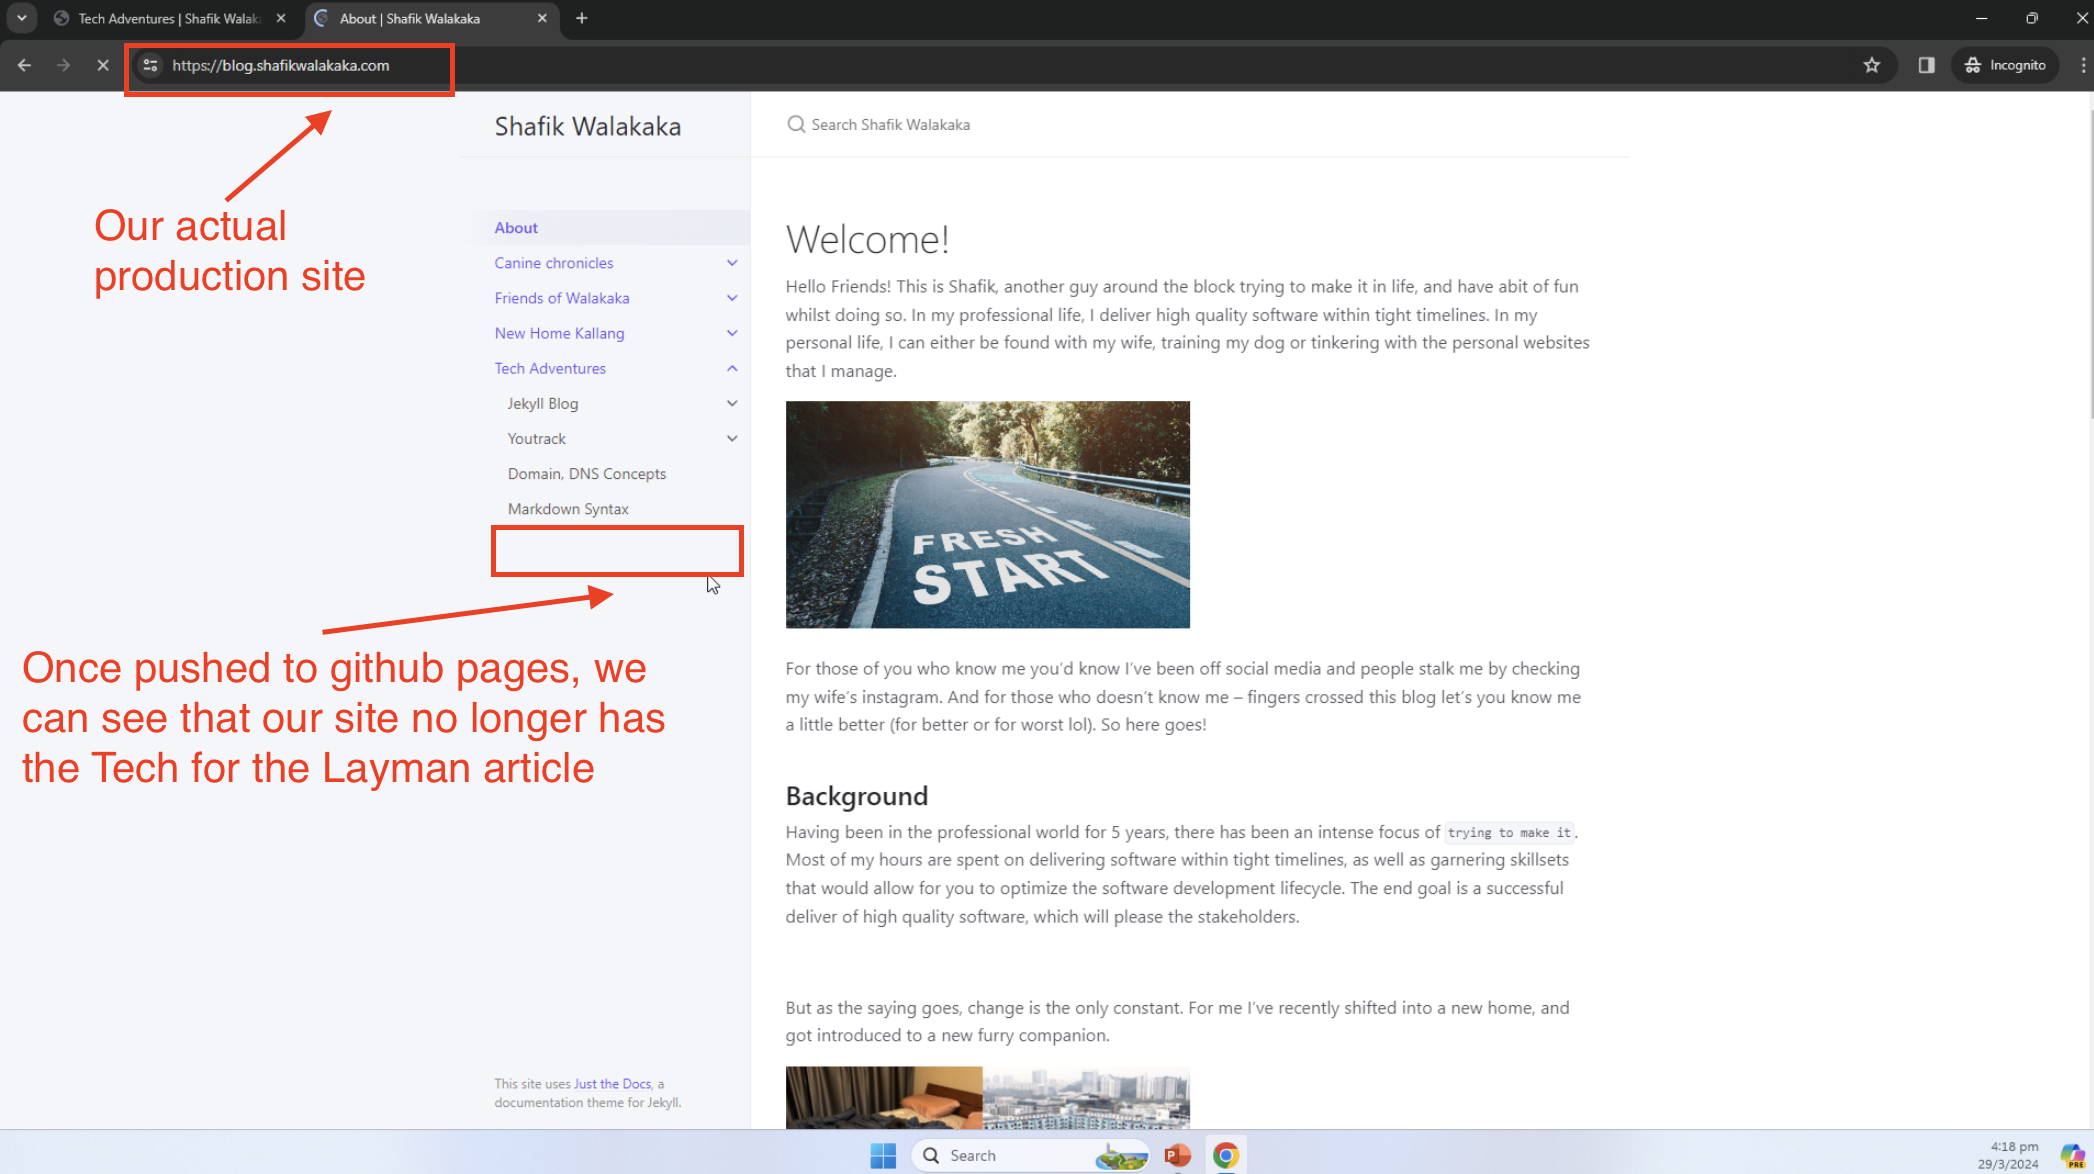
A Common Mistake with Deletion and Branching
Deleting Images During Branch Cleanup
In my eagerness to streamline the main branch, I made a notable mistake with the Tech for the Layman article. While removing the in-progress article from the Main branch, I also deleted related images, intending to track them separately in the tech-for-the-layman branch.
This refers to the step mentioned earlier in Step #2, where we initially branched out and subsequently deleted all the files related to the Tech for the Layman article.
However, since these images were not considered “changed” from the base commit in the tech-for-the-layman branch, they did not merge back into main upon completion. This oversight in understanding Git’s handling of unmodified files across branches led to a lack of visual content in the final article presentation. This example underscores the importance of a thorough review and understanding of Git’s file tracking mechanisms, especially when managing multimedia content in development projects.
Understanding Git’s Base Commit Tracking
Git’s approach to tracking changes is fundamentally rooted in its ability to monitor differences from a base commit, where a commit represents a specific snapshot of your project’s files. When you branch off from main, Git effectively takes a snapshot of all files at that point, considering it as the base commit for the new branch.
Any changes you make are tracked against this snapshot. If a file is not modified in the new branch, Git sees no difference from the base commit and thus, no “change” to track or merge back into main.
This explains why the deletion of images in the main branch, while not re-adding or modifying them in the tech-for-the-layman branch, resulted in their absence post-merge. Understanding this mechanism is crucial for managing files across branches, especially when dealing with non-text files that may not show visible changes in the way that code does.
Resolution
We had to manually re-add the image files one-by-one into the main and main-staging branch. Once this is added, we re-verified that the fix works, by testing it in the main-staging branch. Once we confirmed, functionality, we removed only the markdown file.
It’s fine to remove the markdown file because we will be performing edits in the markdown file. Hence, git will track the files as there are additional changes when compared to the base commit in the tech-for-the-layman branch. That way, the markdown files will be merged into main-staging when we execute the merge command in the future.
Taking the Next Steps
Eliciting Feedback and Continuous Improvement
I understand that my project is relatively simple, and the branching strategy I’ve described may not be suited for all scenarios, especially those complex enterprise level applications. But one thing’s for sure, getting your hands dirty and fiddling around with Git better allows me to understand the difficulties that the dev or DevOps team may face.
With regards to the branching strategy, would love to learn how others track their code base – so do reach out and feedback on alternative ways on how we can do this.
Thank you for joining me on this exploration of my Git branching strategy. It’s a critical aspect of my personal and professional development process, and I hope it serves as a springboard for your own branching efforts. By understanding and customizing Git’s extensive branching and merging capabilities to your project’s unique needs, you can significantly enhance collaboration, version control, and project management.
Enough for now then, and thanks alot for those who made it this far!
Peace and love
Shafik Walakaka