Introduction to Online Payments
In our fast-paced digital era, online card payments have become an integral part of our daily transactions. Whether booking a holiday, ordering groceries, or subscribing to a new streaming service, we rarely stop to think about what goes on behind the scenes. Today, we’ll take a deep dive into the online payments flow, using Booking.com as our case study. We’ll also explore how this process can be implemented seamlessly with Adyen, a leading payment technology company.
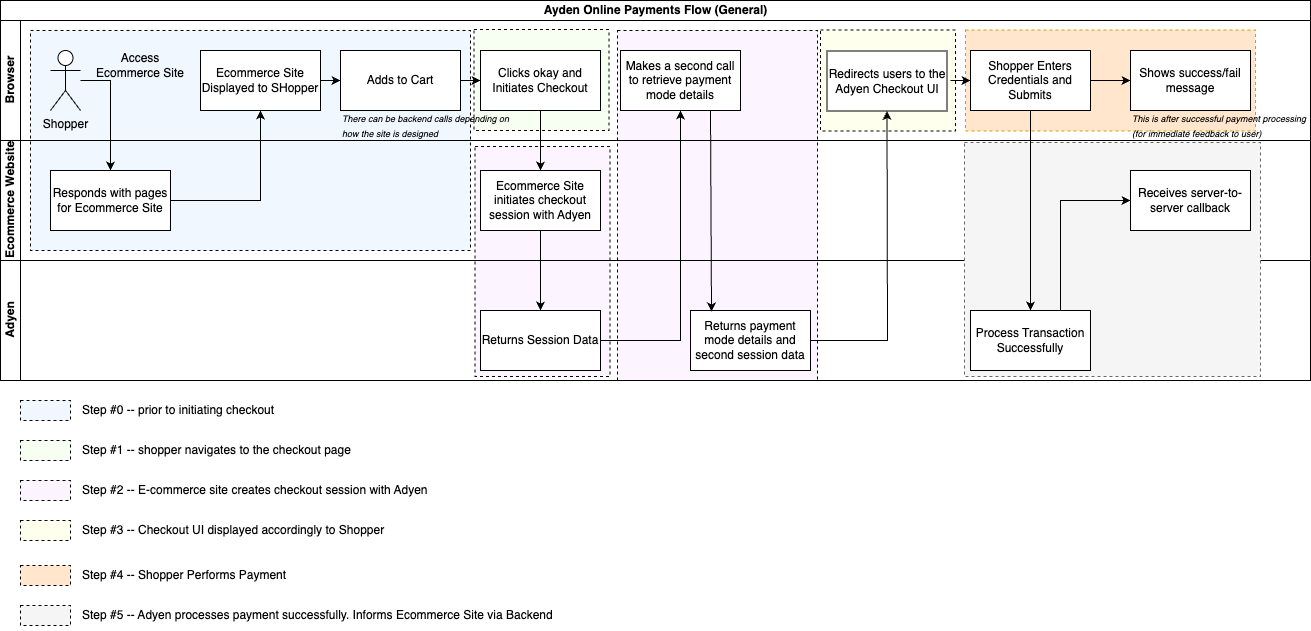
Online Payments Flow | Adyen
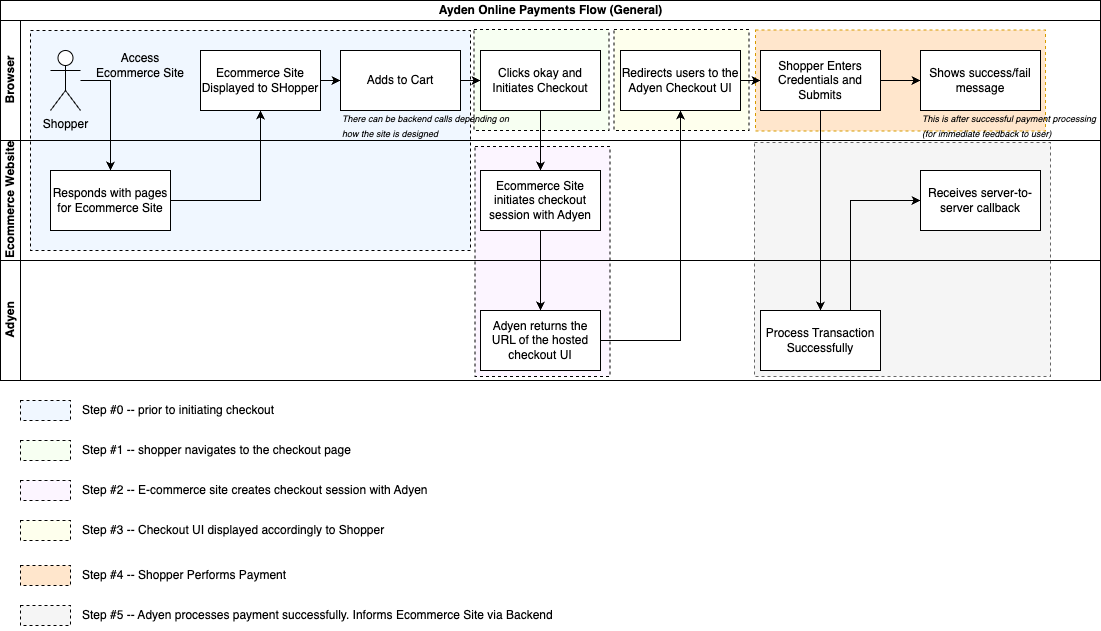
To understand the intricacies of the online payment flow, let’s break down the steps involved from the moment a shopper reaches the checkout page to when the payment is processed and confirmed.
The specifics can be found in Ayden’s Session Flow Documentation!
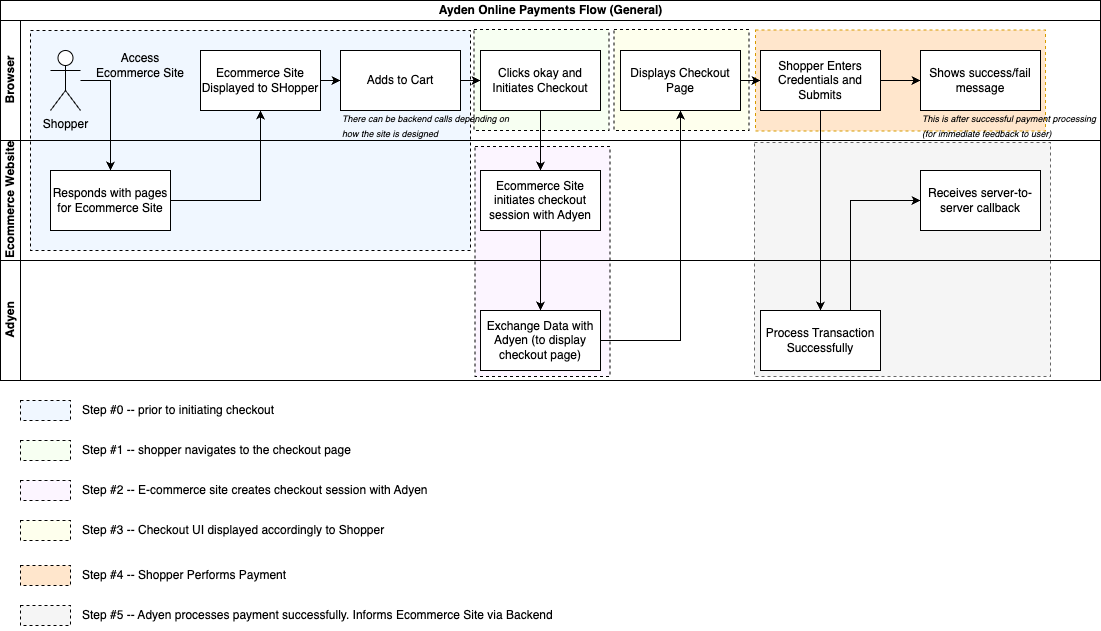
- Step 1: Shopper Navigates to Checkout Page: The journey begins when the shopper decides to purchase and navigates to the checkout page.
- Step 2: E-commerce Site Creates Checkout Session with Adyen: The e-commerce site initiates a checkout session with Adyen. This returns some details, such as session data.
- Step 3:Payment Options Displayed: Using the session details, the e-commerce site displays the available payment options and credit card UI. This can be done using Adyen’s drop-in component or a hosted page.
- Step 4:Shopper Performs Payment: The shopper enters their payment details using the provided UI and submits the payment. They are then redirected to a payment success page.
- Step 5: Adyen Processes Payment: Adyen processes the payment and informs the e-commerce site via a web hook, confirming the transaction.
We’ll reference this flow in subsequent sections to explore its implementation further.
Standard Flow (User Perspective)
From a user’s perspective, the process is straightforward and intuitive. The interface guides users seamlessly through each step, ensuring a smooth experience. We will include screenshots and flow from booking.com to supplement our understanding of the flows, providing visual aids that highlight key functionalities.
Whatever that is displayed is our assumption based on playing around with their app in the browser. Nothing was confirmed with either booking.com or adyen. These flows are described solely so that readers (and myself) have a mental model of a possible implementation for payment integration!
Step #0: Prior to Initiating Checkout
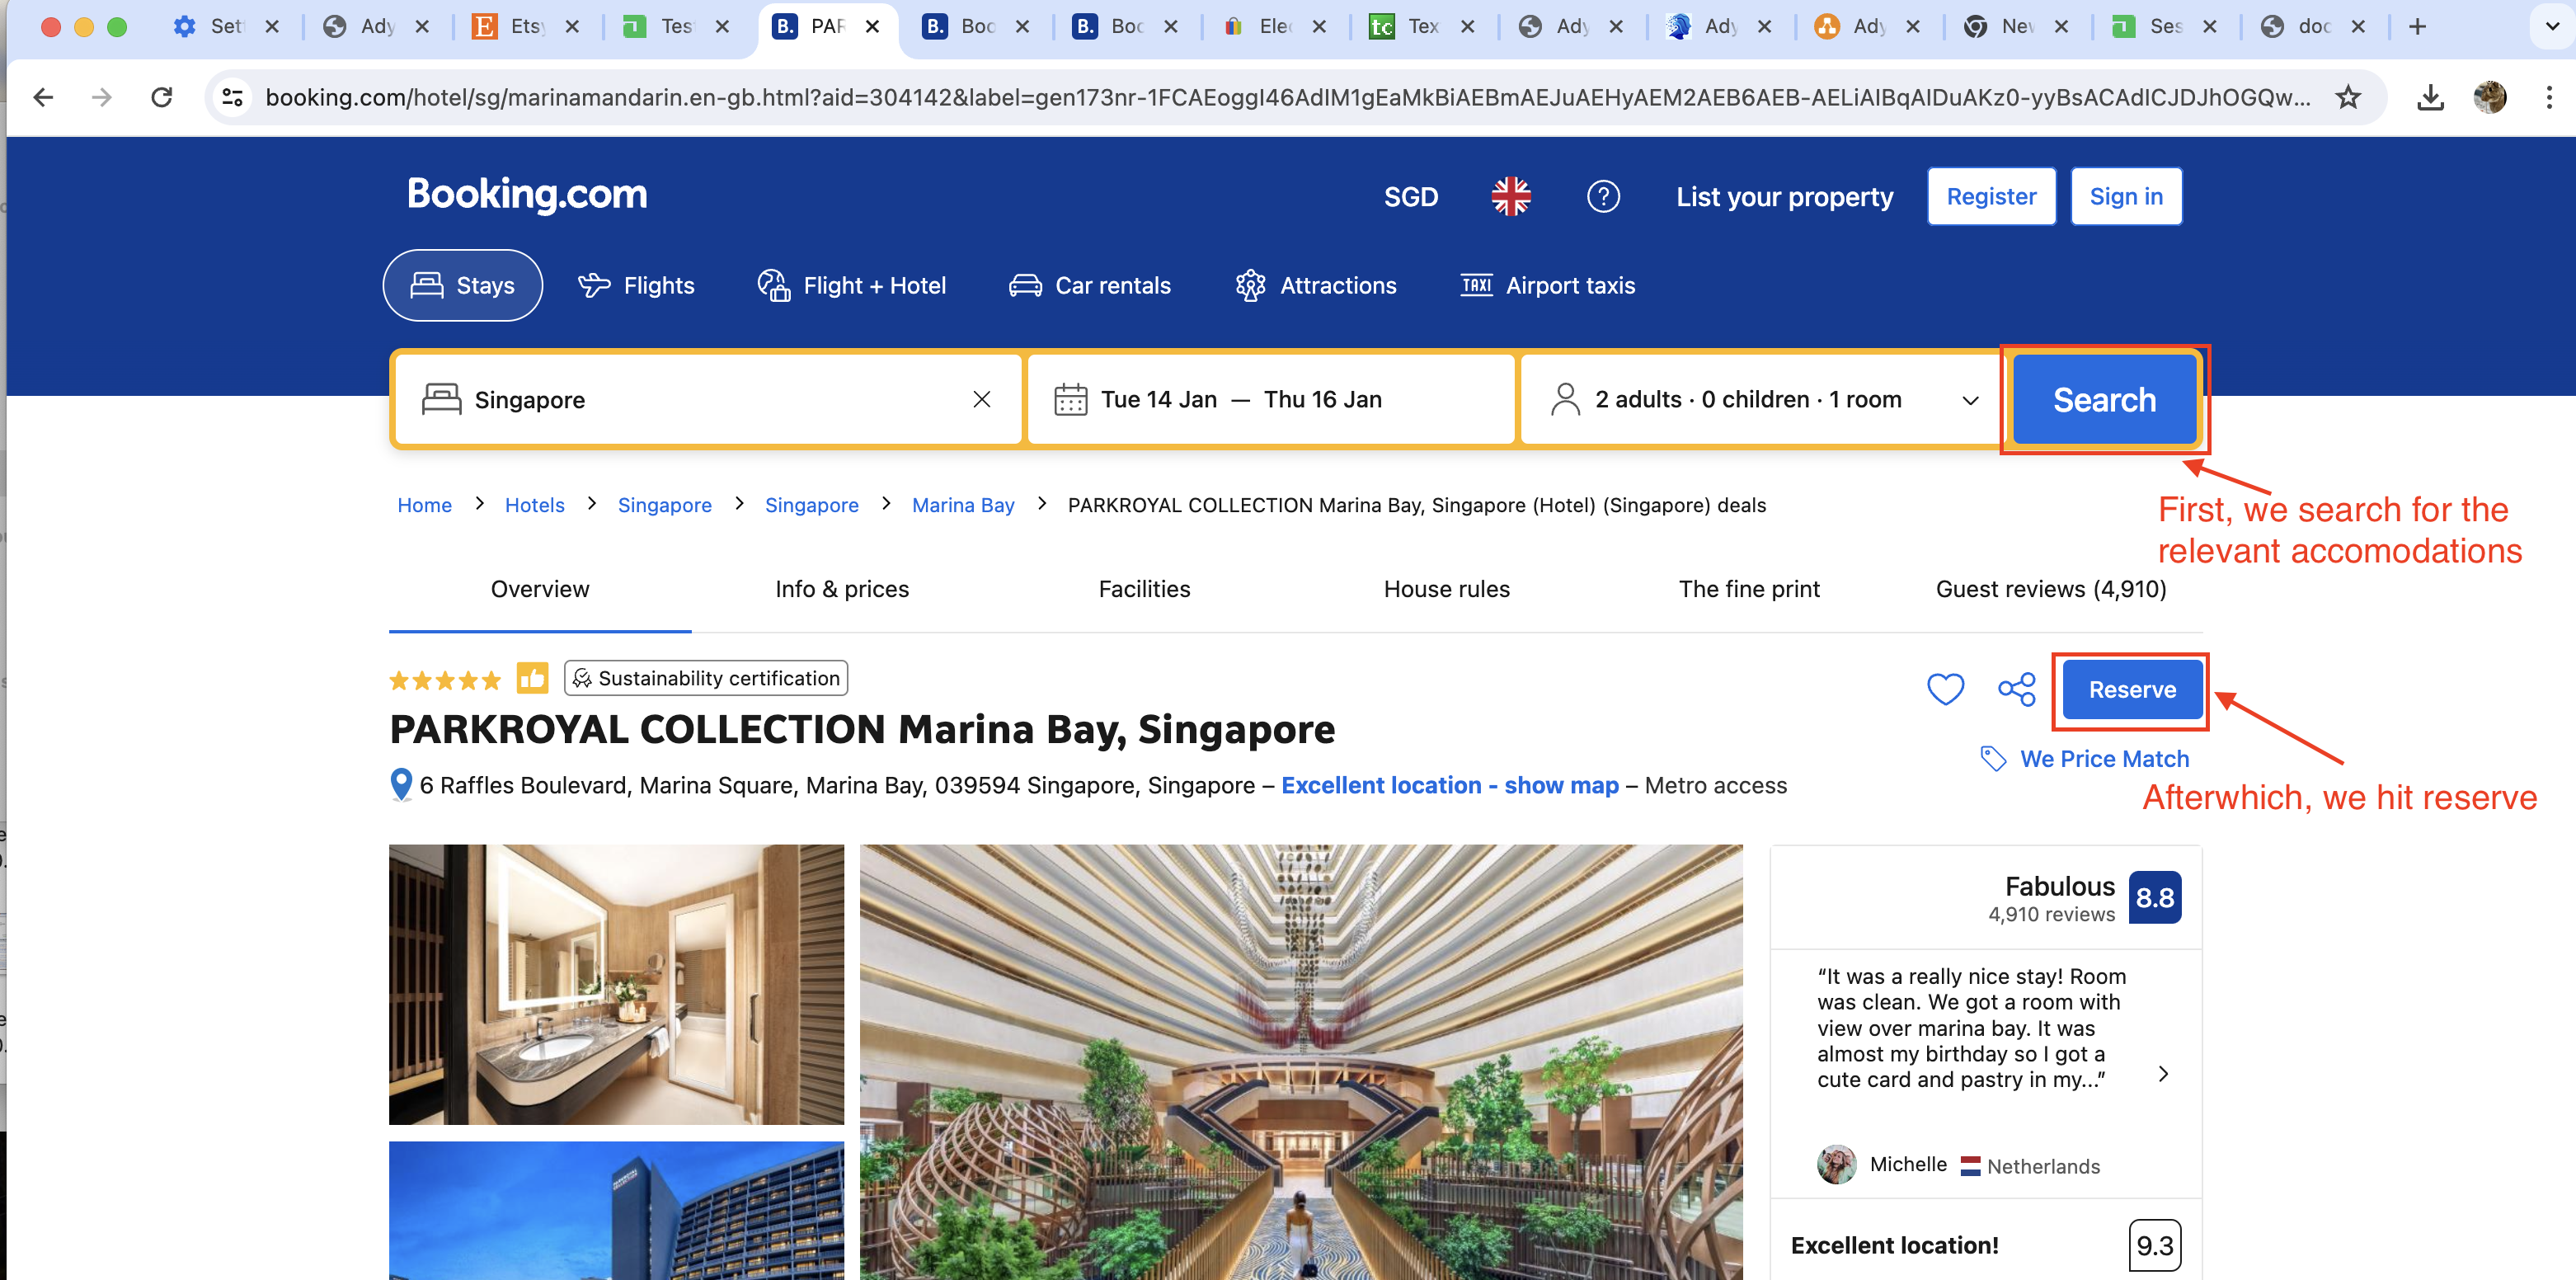
Activities before the checkout are handled in the browser and within Booking.com, with no interface to Adyen. These include browsing, selecting items, adding to the cart, and applying discounts. Users can review their cart and sign in to streamline future transactions. In our example, the activities are as follows:
- Search for Accommodation: The shopper searches for accommodation for their holiday on Booking.com.
- Click Reserve: They click the “Reserve” button, initiating the booking process.
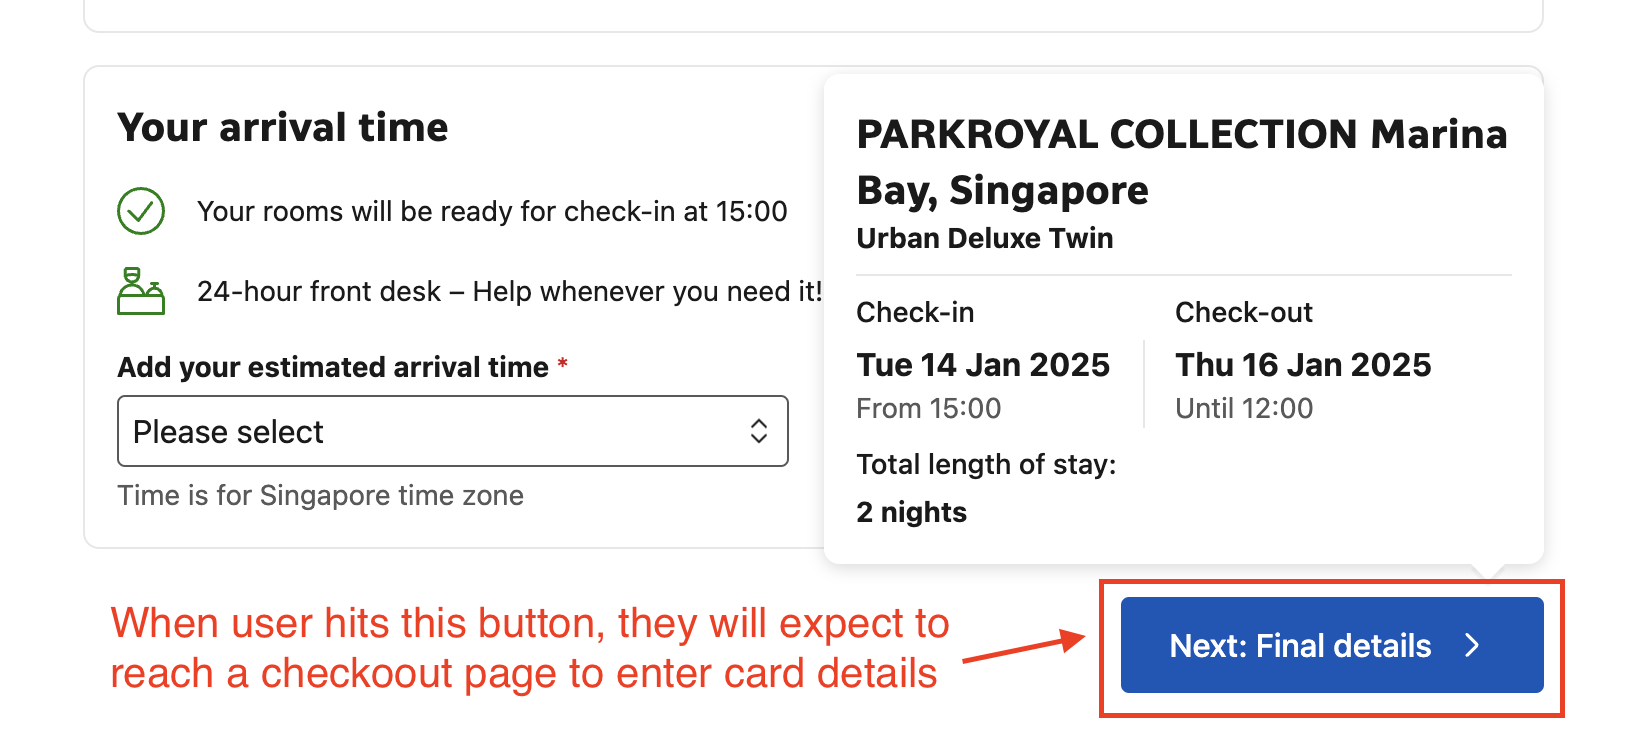
Step #1: Shopper Navigates to Checkout Page
Once the user is happy with what’s in their cart, they’ll hit up the checkout page. But before that checkout screen pops up, booking.com needs to set up a checkout session with Adyen to keep tabs on the transaction. More details coming up next!
Check out the screenshot of the button click leading to the checkout page below
Step #2: E-commerce Site Creates Checkout Session with Adyen
Booking.com initiates a checkout session with Adyen and generates the checkout UI, showcasing various payment options. This corresponds to step #2 in our payments flow. This process occurs behind the scenes, so there’s nothing visible in the browser. For more details:
- See our sandbox test for Creating a Payment Session for Adyen Hosted Checkout UI page.
- See our sandbox test for Payment Sessions using Adyen UI Components Flow
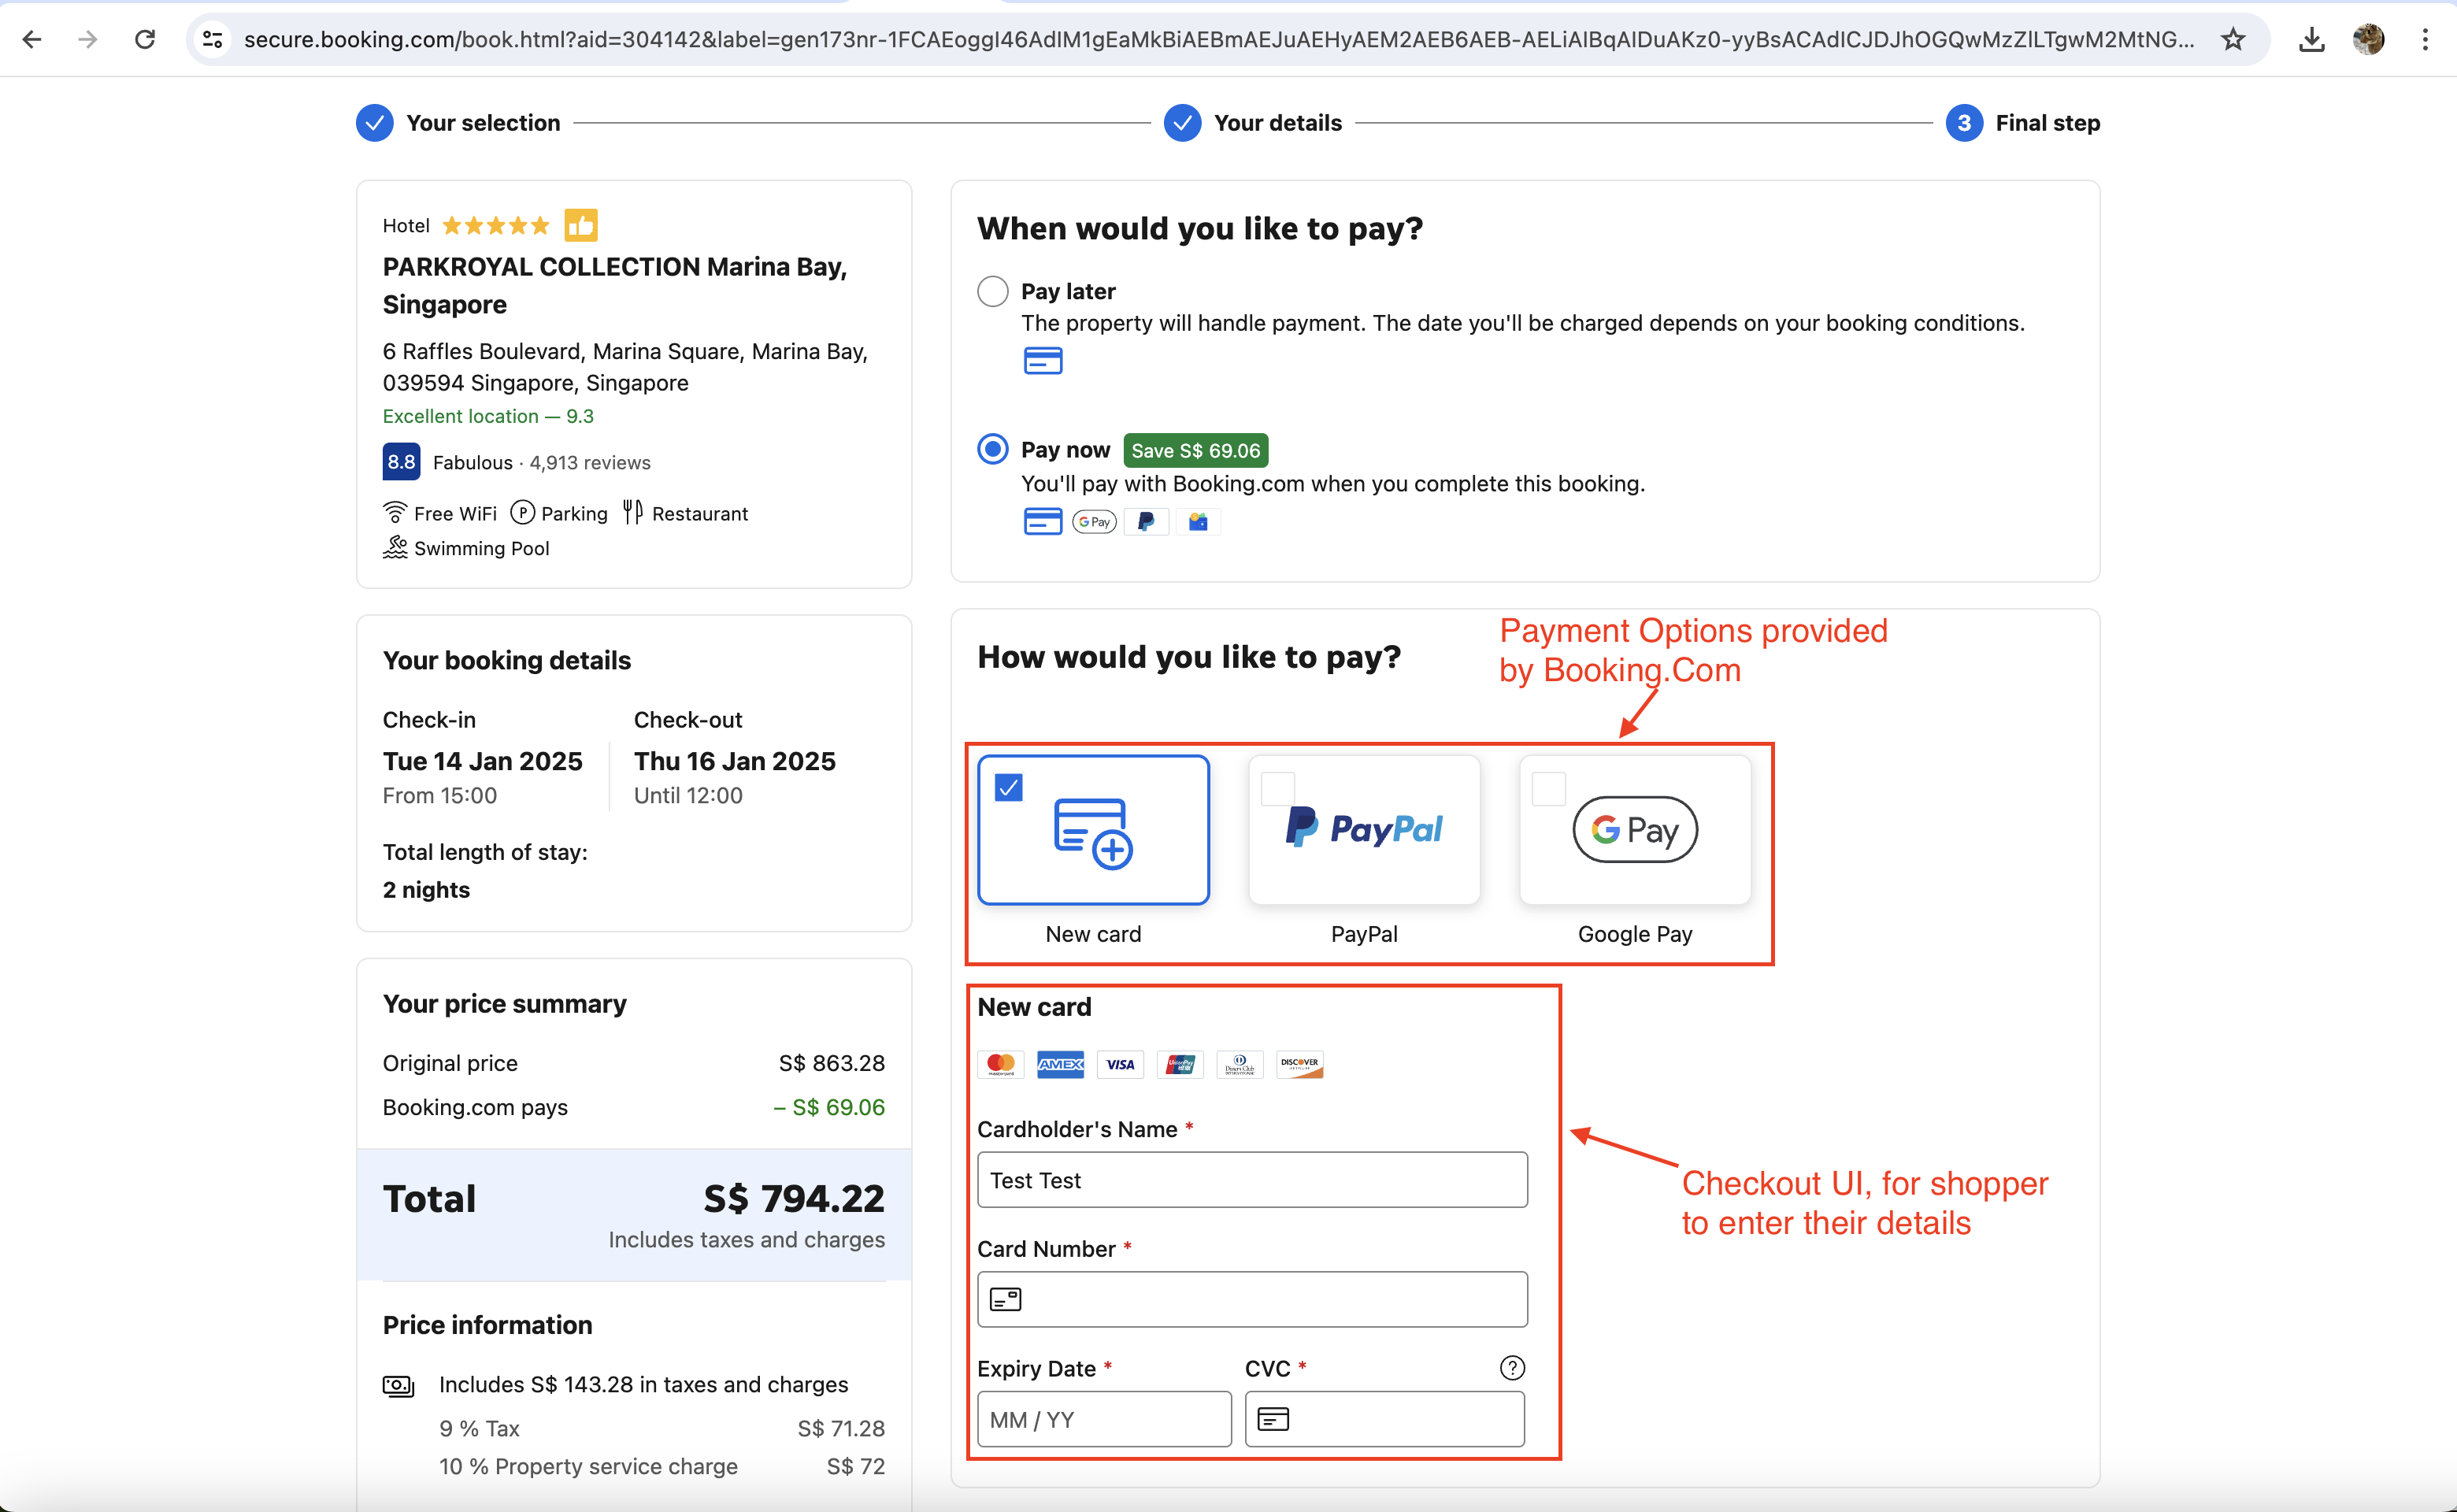
Step #3: Payment Options Displayed
The user is shown a page to enter their credit card details, corresponding to step #3 in the payments flow. This means that booking.com has successfully received information from Adyen, allowing them to display relevant details such as payment methods on the checkout page.
For more details:
- See our sandbox test for Redirecting users to Adyen’s Hosted Checkout UI page
- See our sandbox test for Adyen UI Component Checkout Page
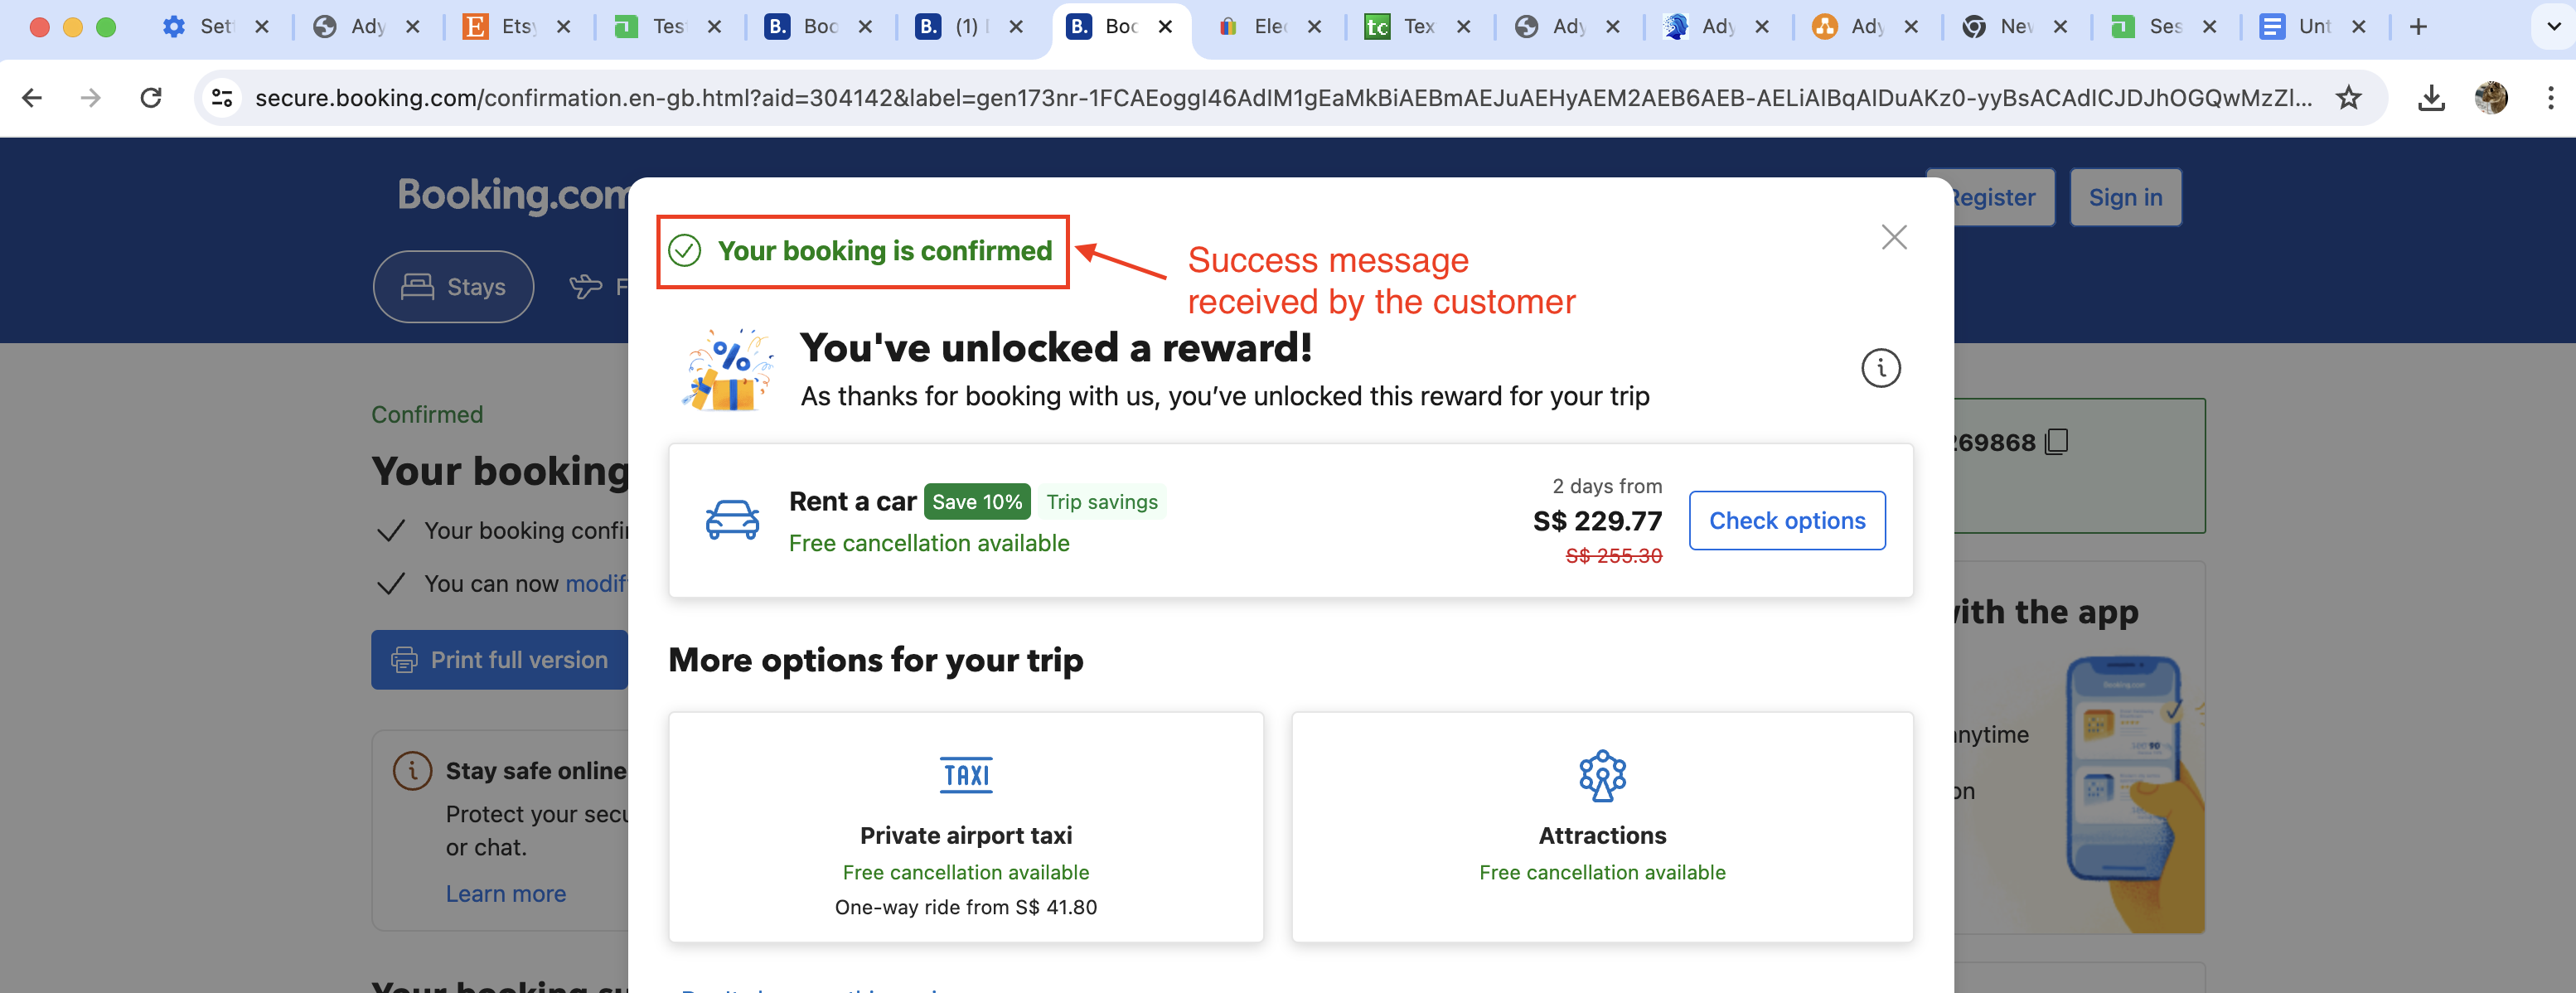
Step #4: Shopper Performs Payment
The user enters their payment details and hits “Submit.” They are then shown a success page, corresponding to step #4 in the payments flow.
For more details:
- See our sandbox test for Completing and submitting payments in the Adyen’s Hosted Checkout UI
- See our Sandbox test for Submitting payments using Adyen UI Components Flow
Step #5: Adyen Processes Payment
Behind the scenes, Adyen communicates the successful payment to Booking.com via a web hook (step #5 in the payment flow). This process ensures that fraudulent payment attempts using JavaScript from the browser are prevented.
For more details:
- See our sandbox test for Webhook callback after successful payment in the Adyen’s Hosted Checkout UI
- See our sandbox test for Webhook callback, for Adyen UI component Flow
Going Deeper into the Implementation
Let’s delve deeper into the technical implementation using Adyen’s sandbox environment. We’ll showcase two approaches: the hosted page approach and the Adyen UI drop-in component approach.
If you’d like to follow through, please ensure that you have the following already set-up:
You can see their articles on the pre-requisites before being able to fiddle around and play with their API’s.
Their Getting Started documentation is also comprehensive and simple to follow.
If you have addressed all the above, let’s proceed to the next section to familiarize with their APIs.
The Hosted Checkout Page Approach
In this approach, the checkout page is hosted by Adyen. Let’s revisit the payment flow, but specific to the hosted checkout page implementation:
We will skip the sections where there are no significant interactions betweend Adyen and the E-commerce site. As such, the first meaningful interaction, is when the E-commerce site creates the checkout session with Adyen.
Step #2: Create Checkout Session
Ayden Create a Payment Session Documentation provides specific properties that can be passed to the Adyen when creating a session:
curl https://checkout-test.adyen.com/v70/sessions \
-H "x-API-key: YOUR_X-API-KEY" \
-H "content-type: application/json" \
-d '{
  "merchantAccount": "YOUR_MERCHANT_ACCOUNT",
  "amount": {
      "value": 1000,
      "currency": "EUR"
  },
  "returnUrl": "https://your-company.com/checkout?shopperOrder=12xy..",
  "reference": "YOUR_PAYMENT_REFERENCE",
  "mode": "hosted",
  "themeId": "AZ1234567",
  "countryCode": "NL",
  "expiresAt":  "2023-05-18T10:15:30+01:00"
}'
For a hosted checkout UI implementation, ensure that the "mode:" "hosted" is specified correctly. This will ensure that Adyen returns a URL. The URL is the location of the hosted checkout UI where we will need to send users to.
See our sample postman request and the response received from Adyen: 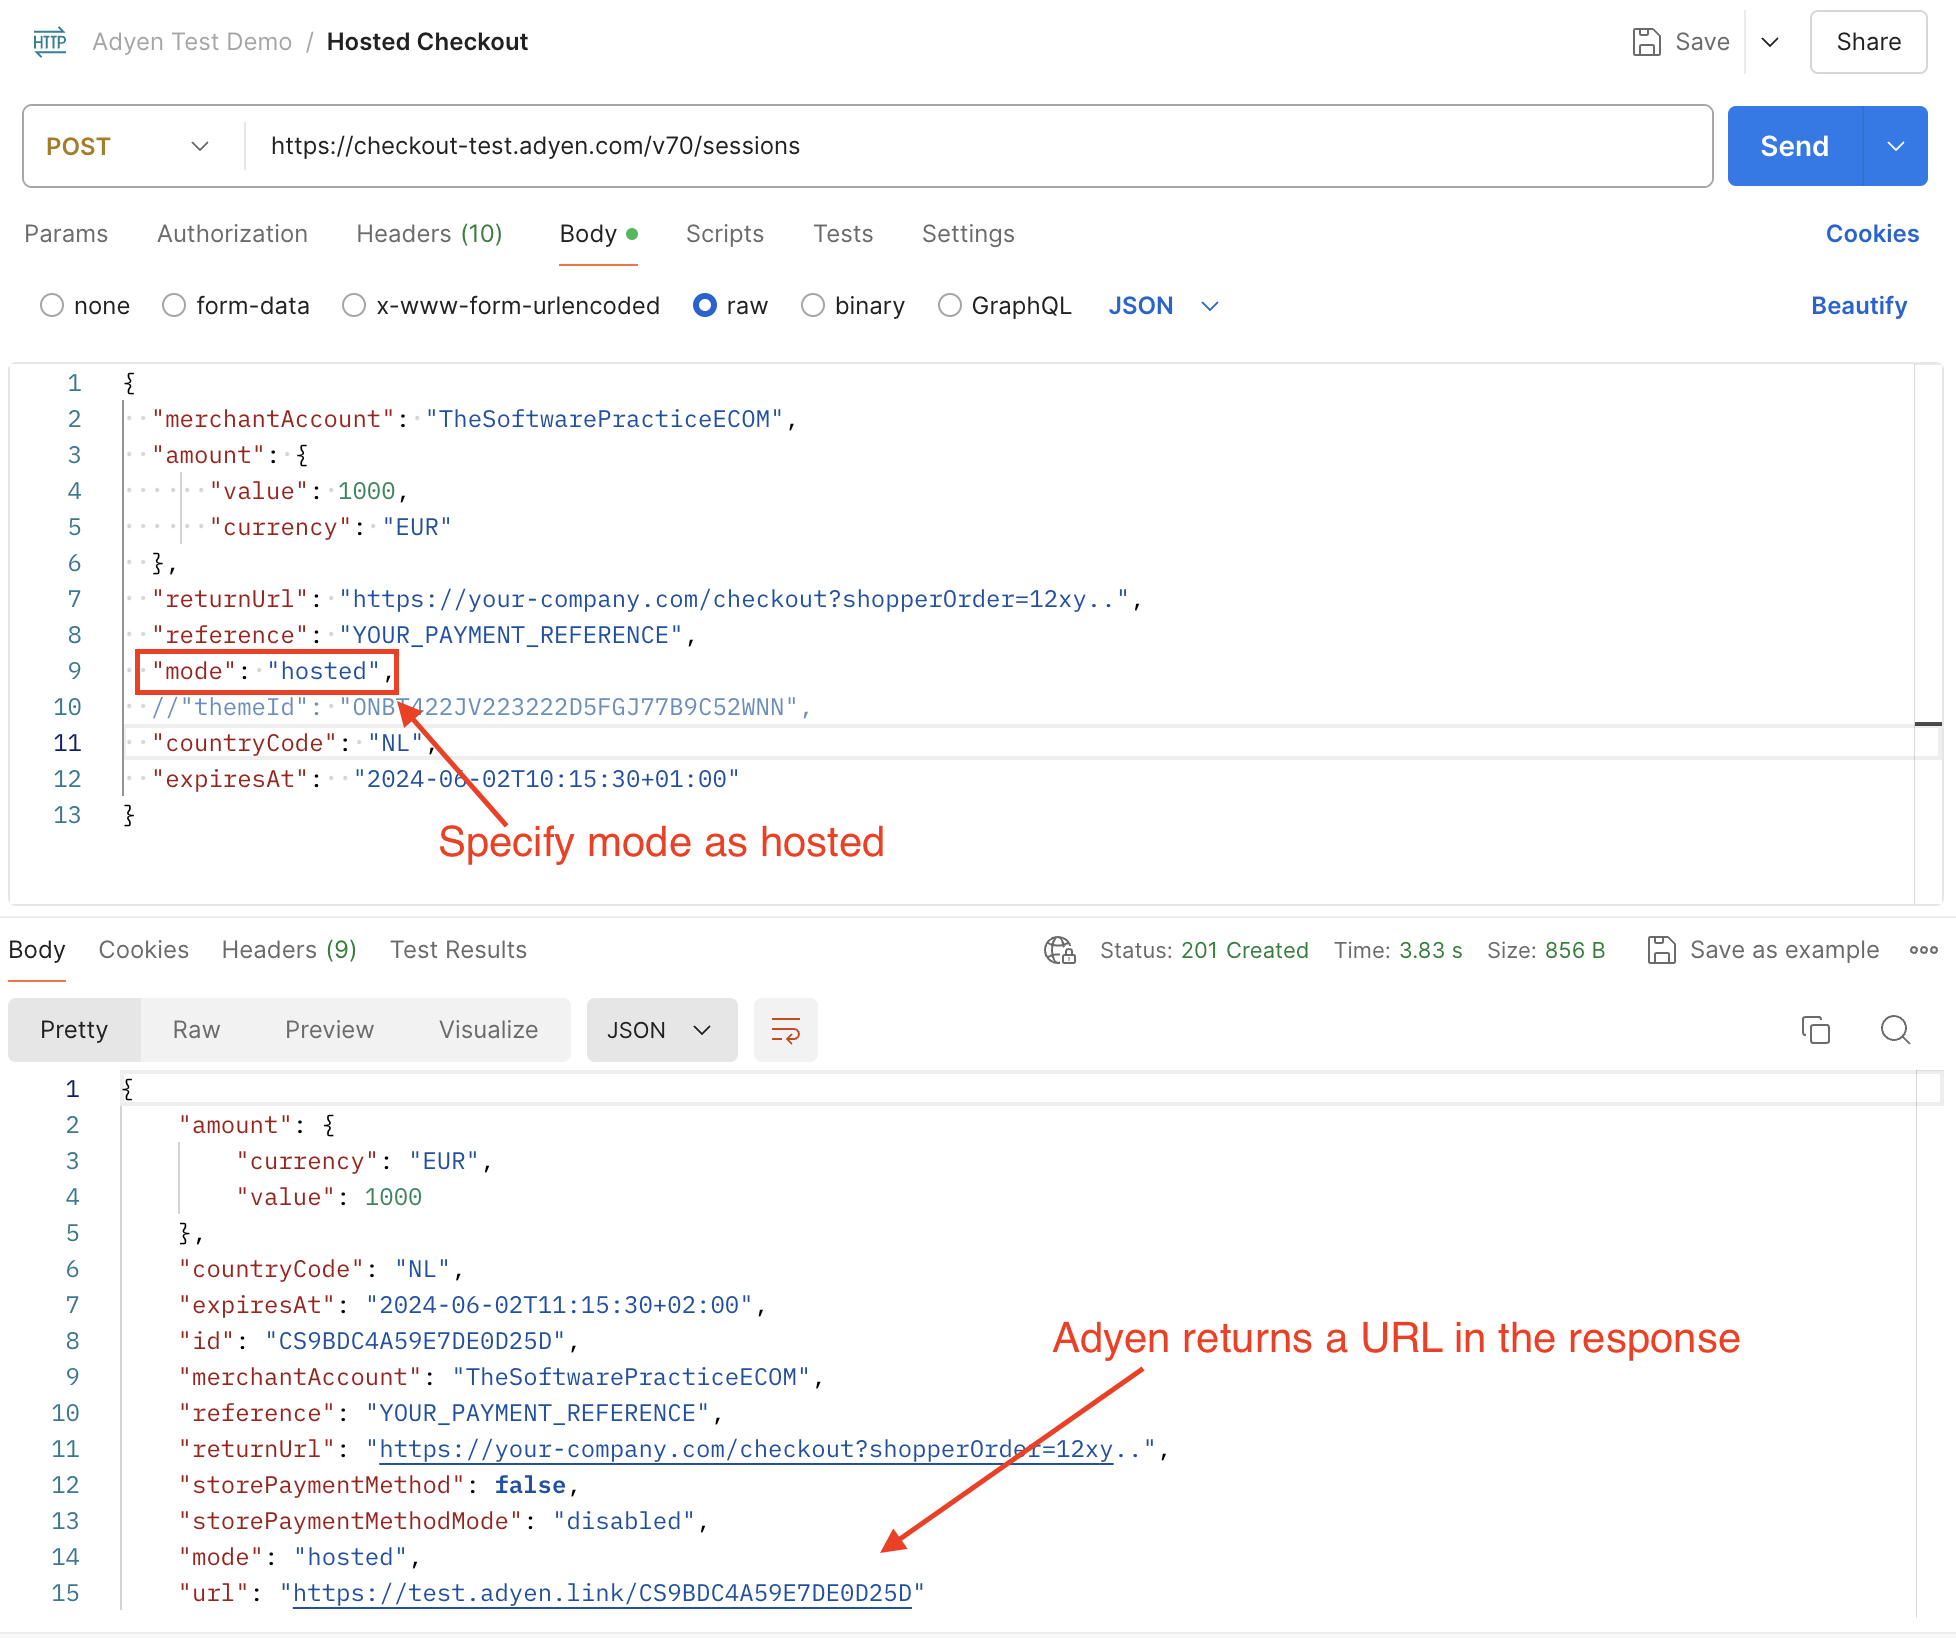
Step #3: Redirect to Hosted Page
Recall the URL returned by Adye in step #2: https://test.adyen.link/CS9BDC4A59E7DE0D25D. This is the location of the checkout UI.
In an e-commerce application, th e-commerce application is expected to redirect the users to this location. For now, we will just access it directly from the browser to see what we get: 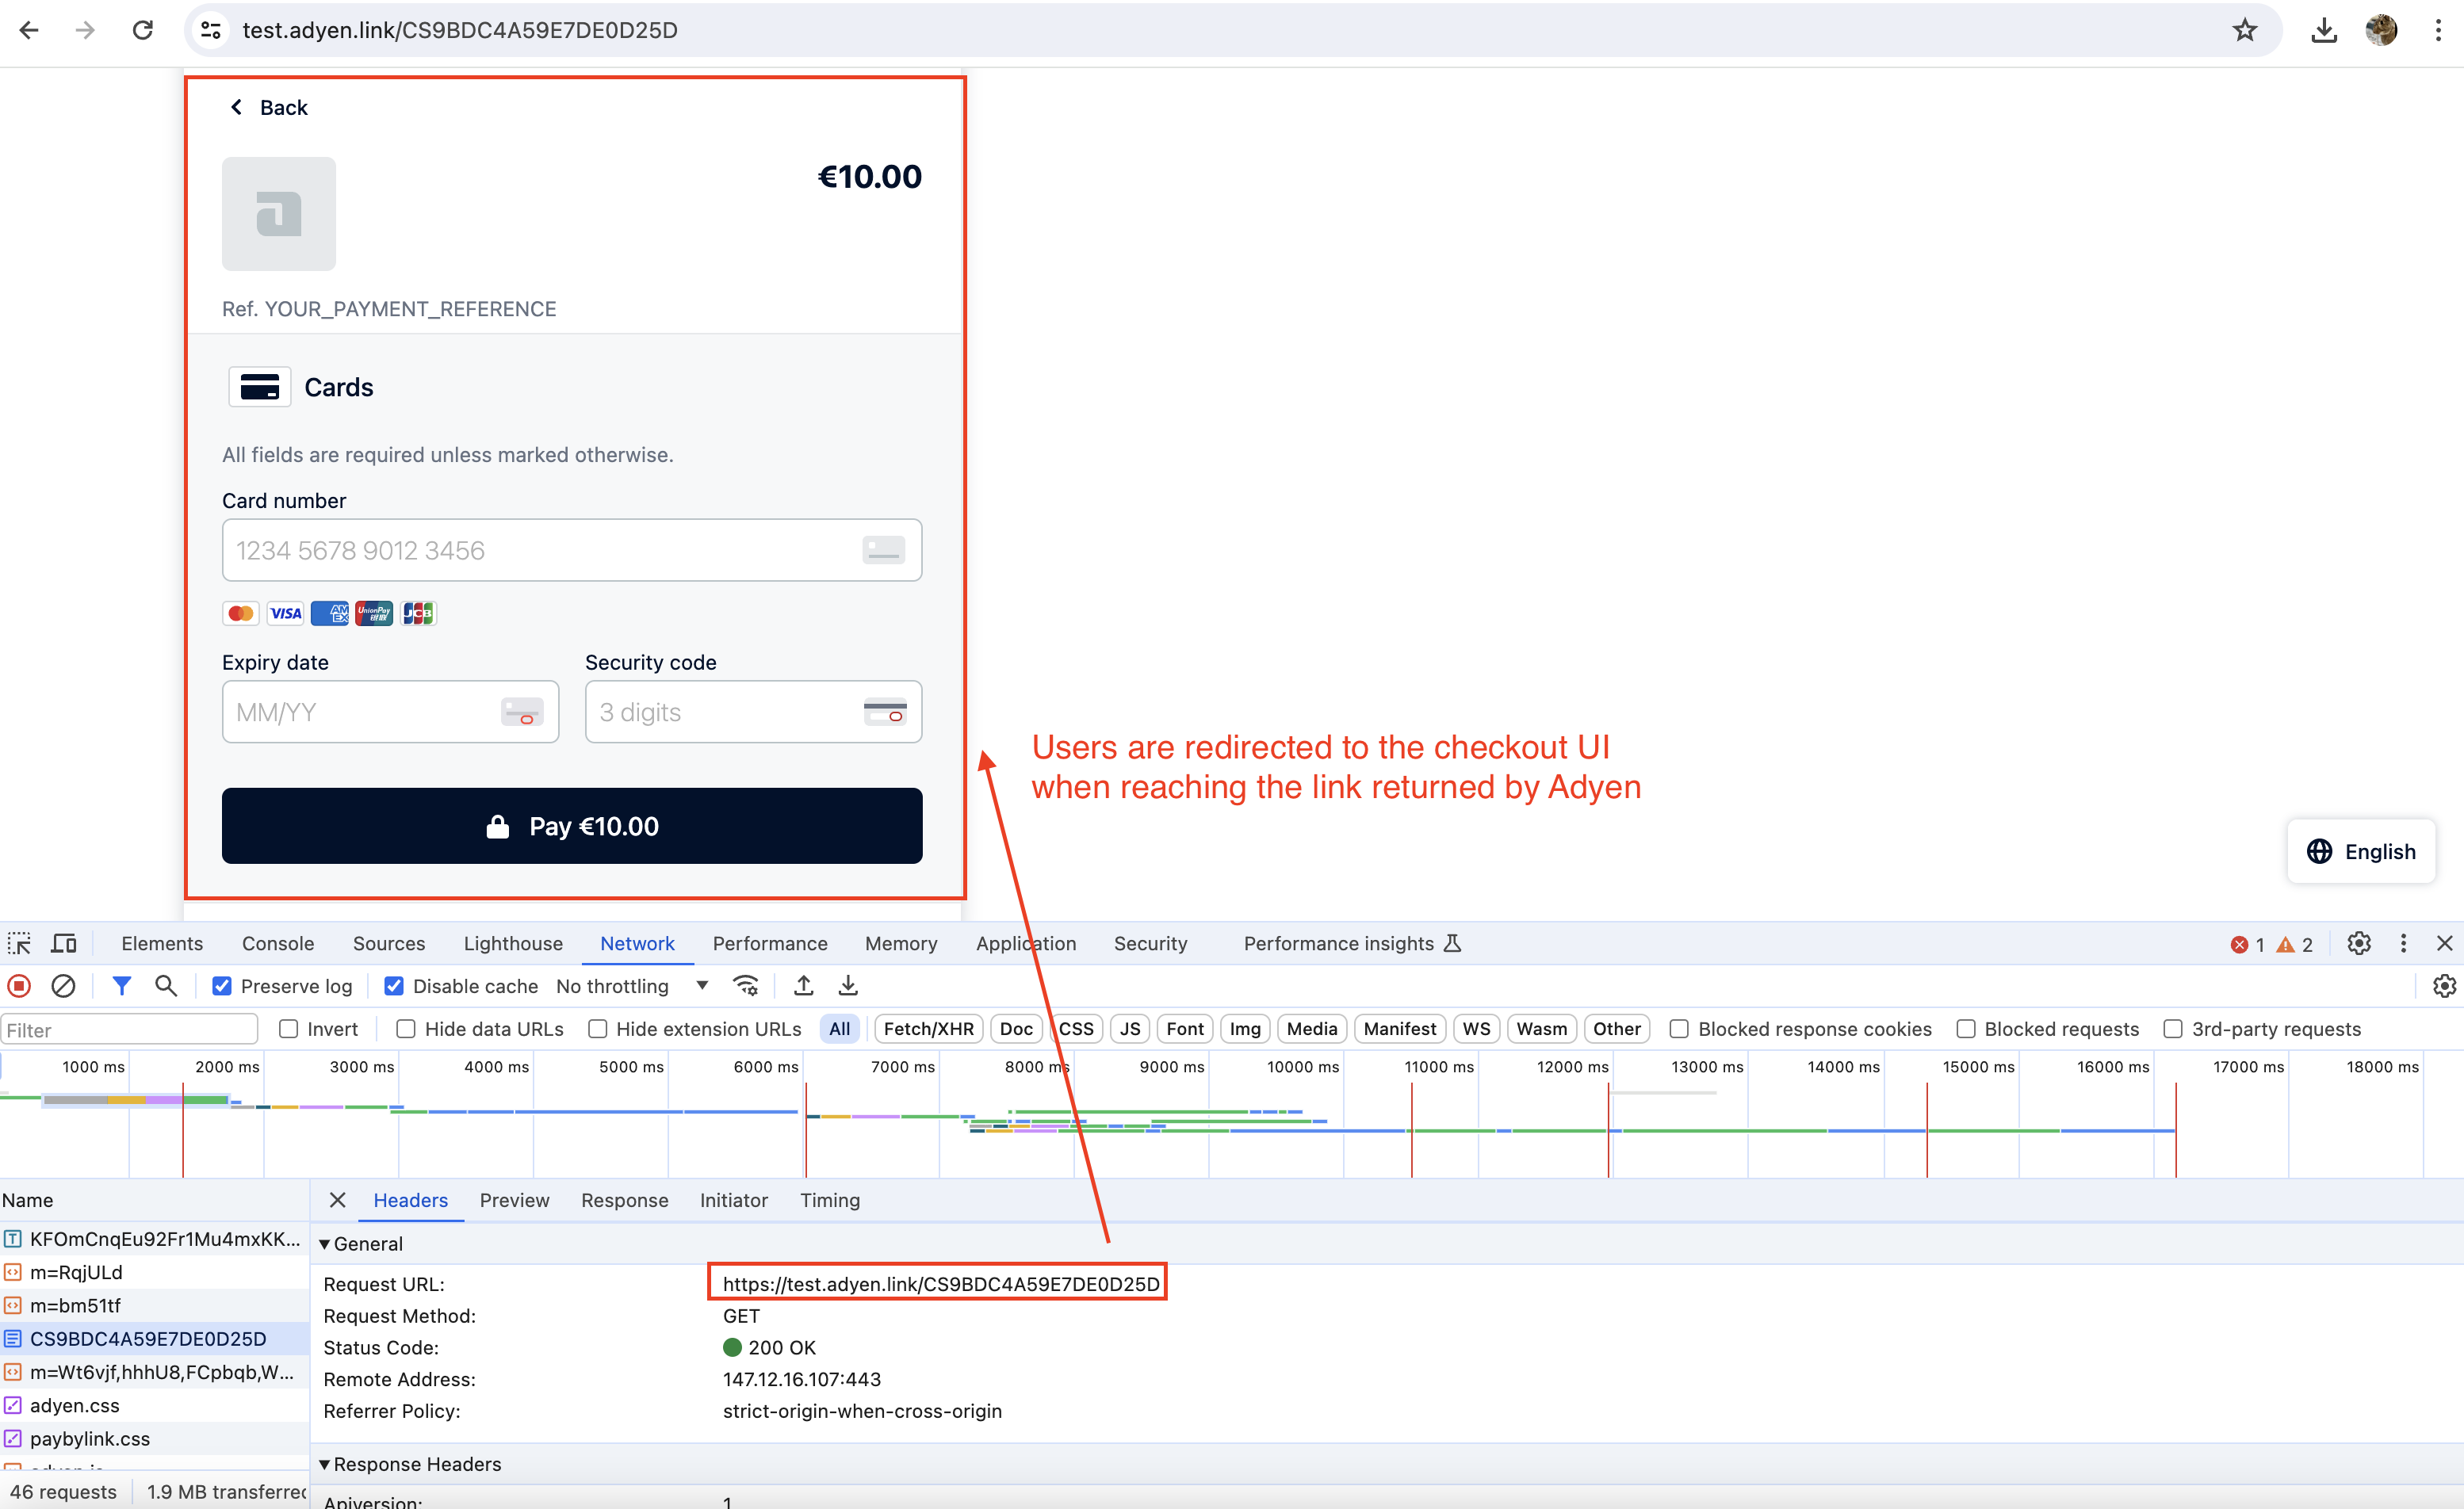
True enough, we are able to access the checkout UI. The next step is to test payment, and see whether we are able to successfully submit a payment
Step 4: Enter Payment Details
Here, we enter payment details using the test card numbers provided by Adyen.
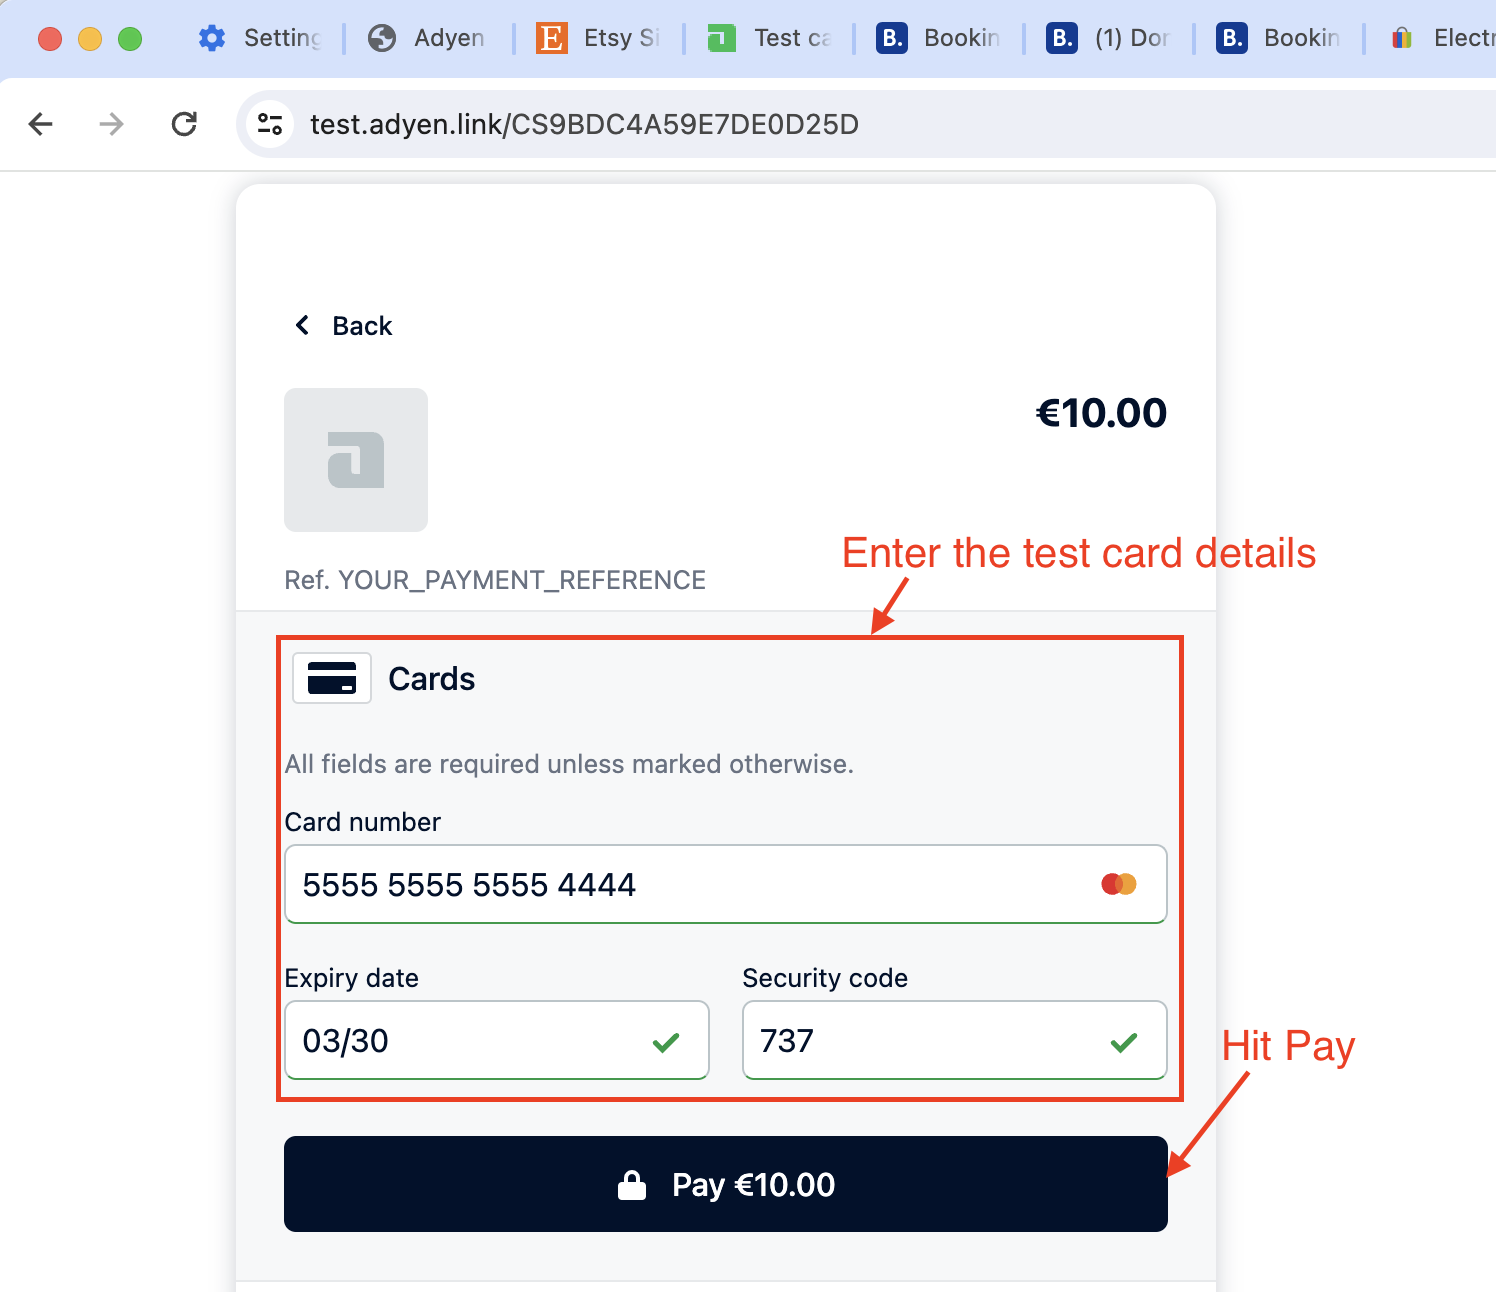
When you submit, you can see that adyen hosted checkout page posts the credit card details to their own servers: 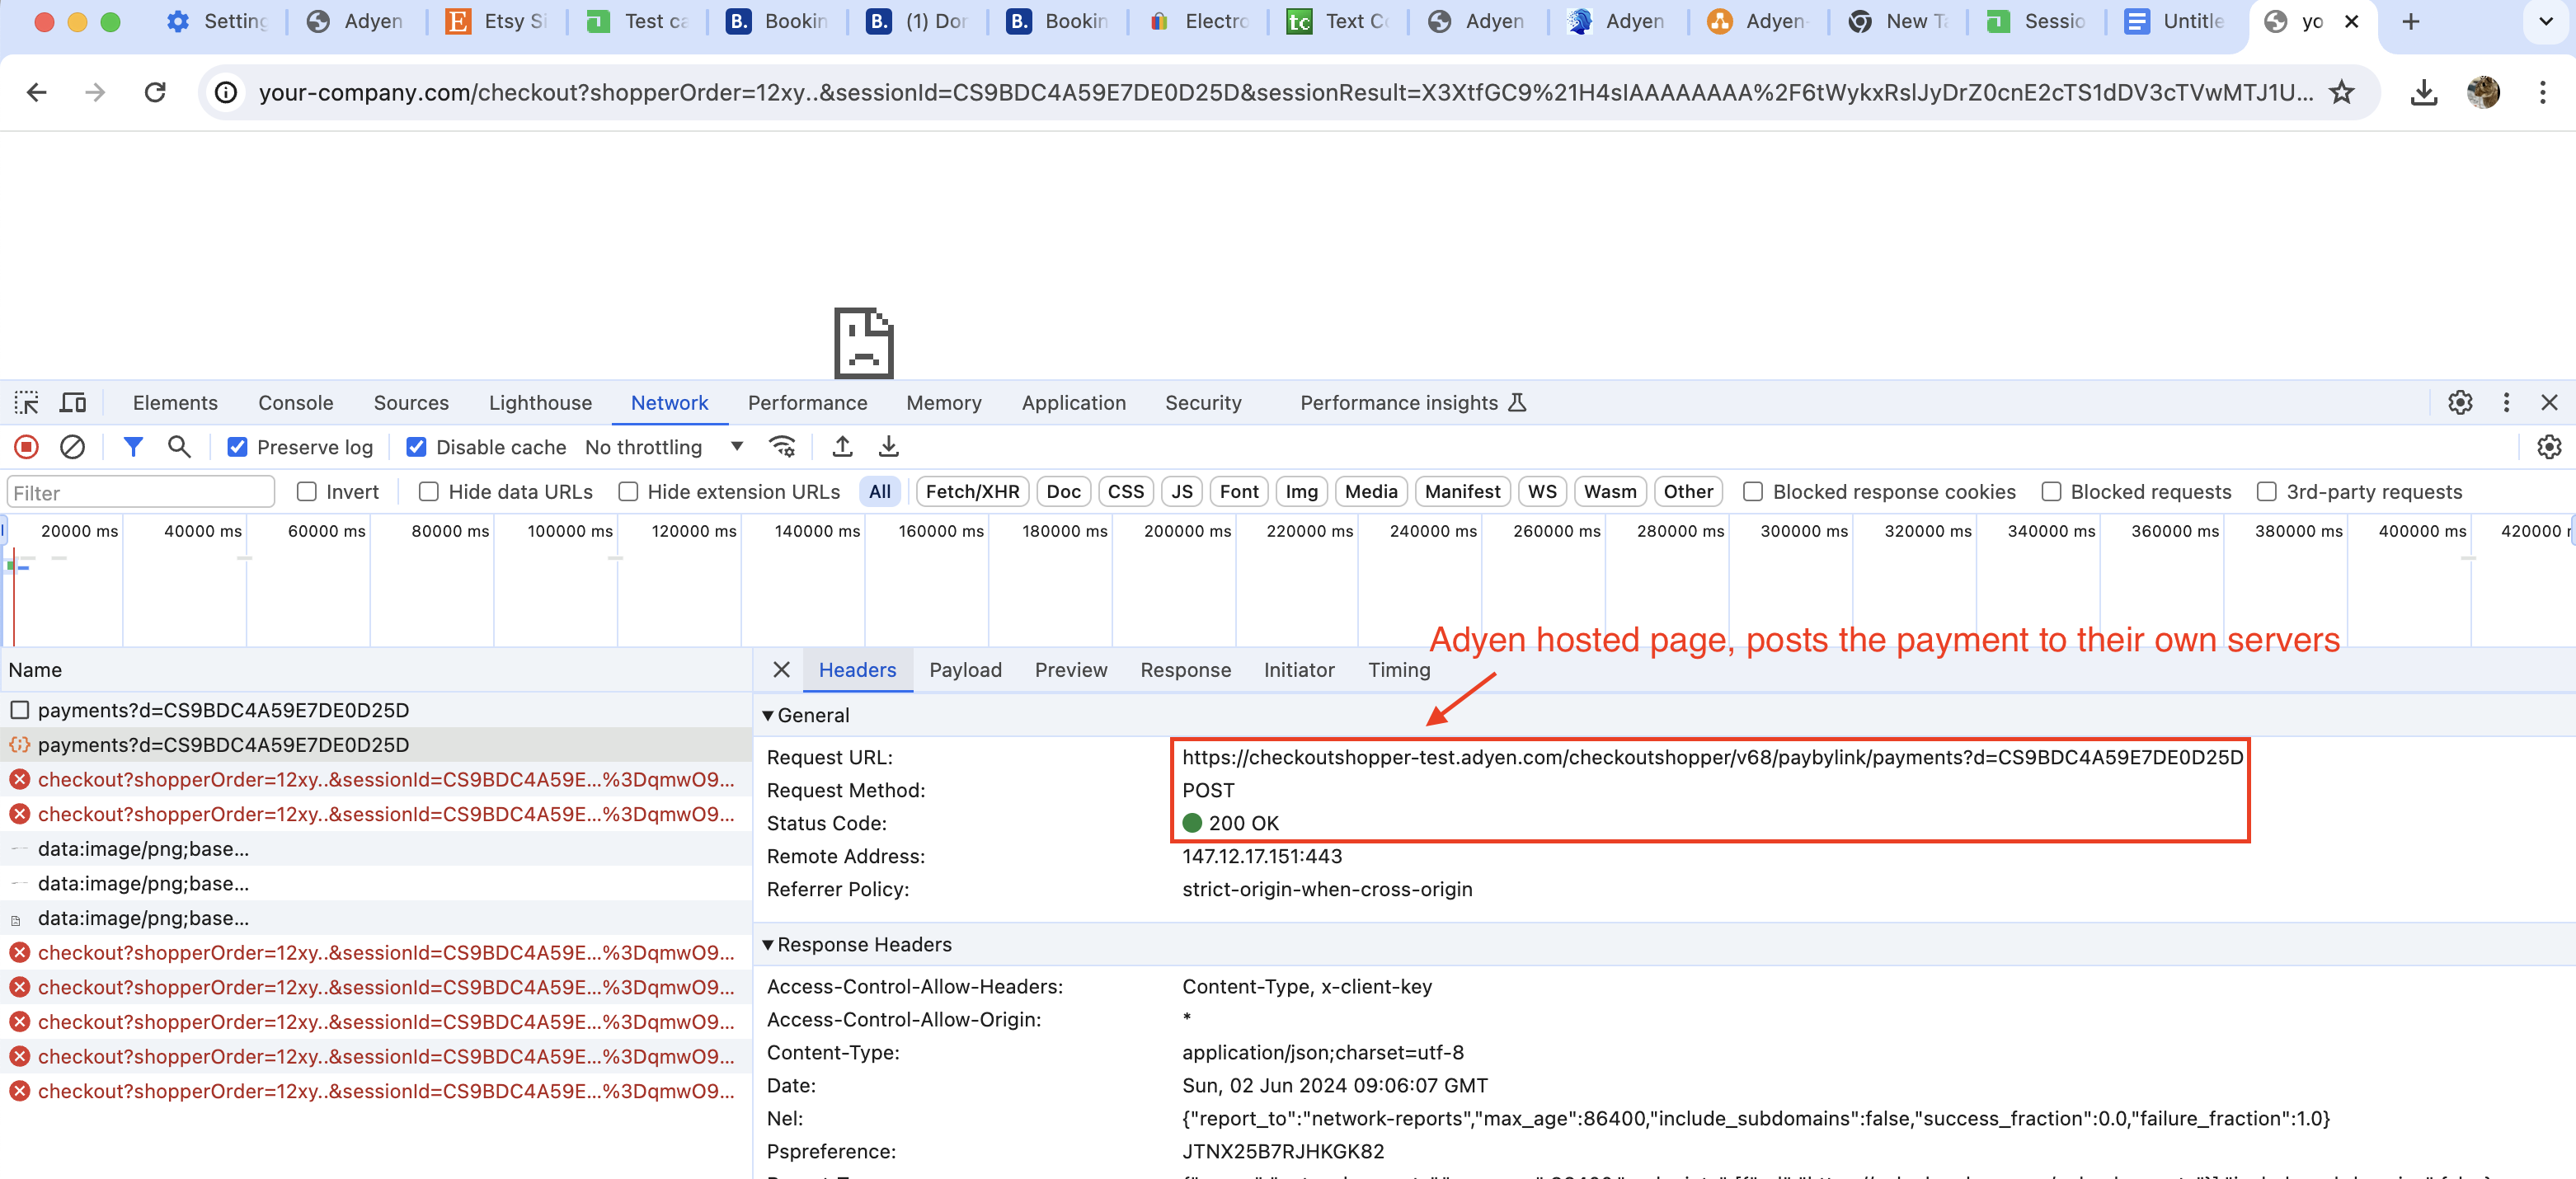
Don’t worry, the card details are all encrypted: 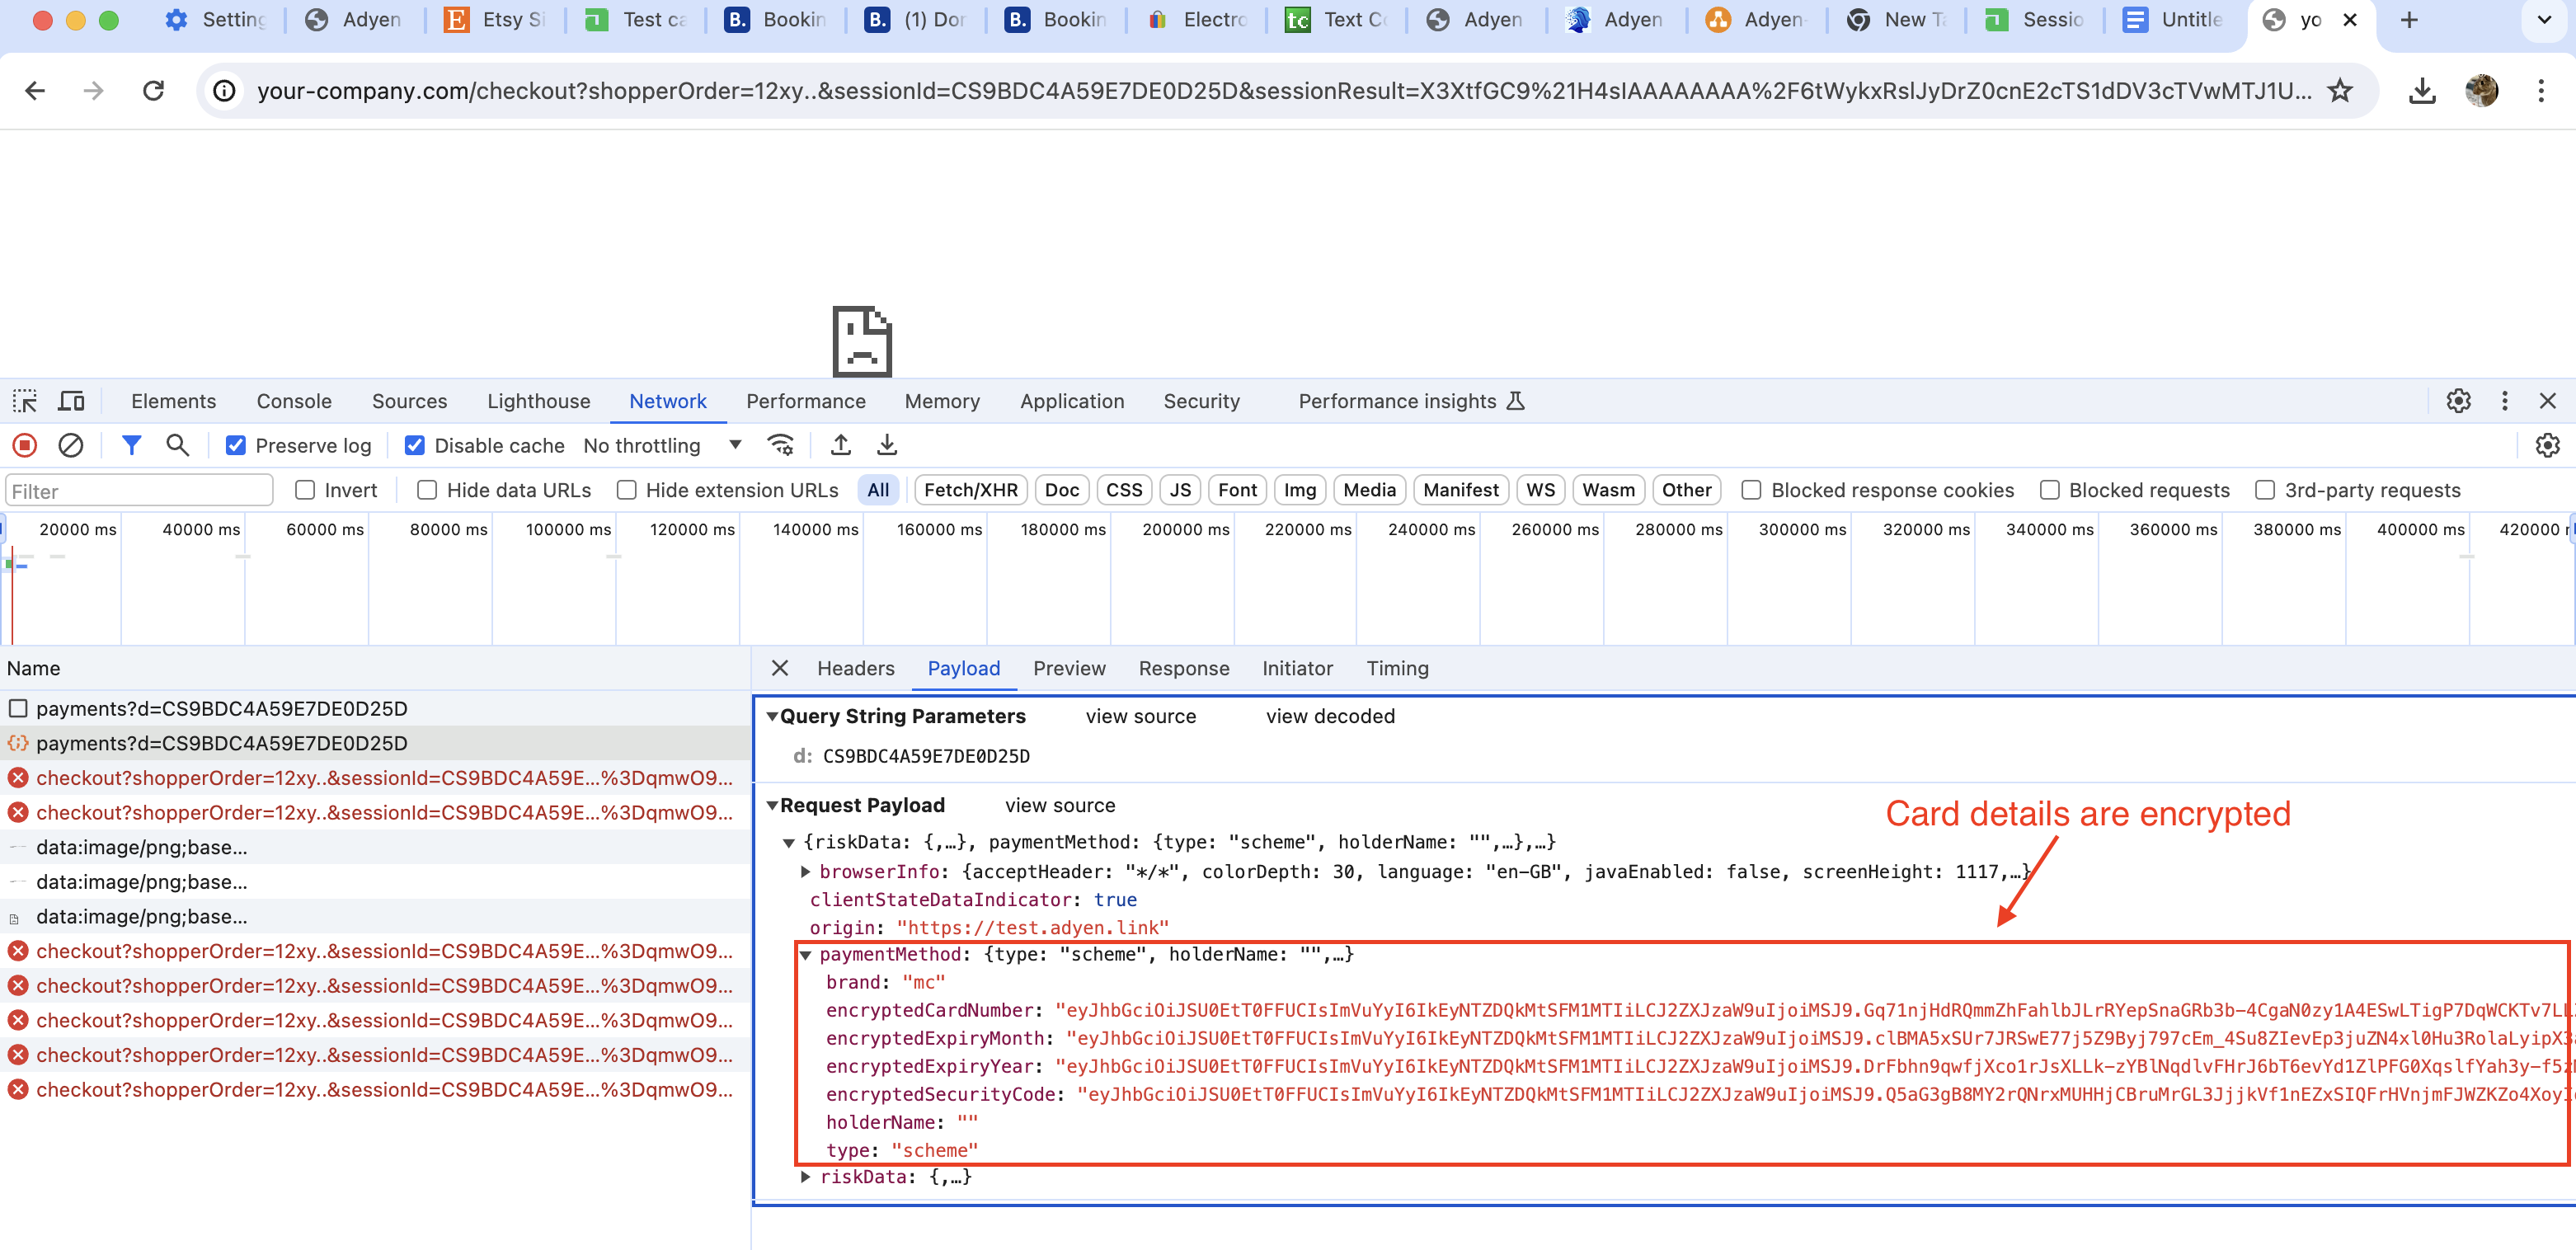
Ignore the broken page. This is because the return URL was stated as https://your-company.com/checkout?shopperOrder=12xy.. in our postman test. This URL does not exist, hence the broken page is expected.
Next step, we need to ensure that the payment is successful. Since the page is hosted by Adyen, how would the ecommerce site know when the transaction is successful (besides the redirect URL).
Step 5: Webhook Confirmation
This is where Adyen webhook comes into play! In general, my understanding is that we don’t really trust client site redirect because it has a higher surface area for malicious attacks. Adyen webhook/callback will be the true source the e-commerce site will use to decide whether the transaction is successful or not.
When a payment is successul, Adyen would actually send a call to an endpoint that is configured by the e-commerce site. For us, we configured the petcoach.sg site as the webhook endpoint because:
- I happen to be site admin for the site, hence I can check the logs
- The site is publicly acessible, so no firewalls required to open traffic channels
Checking Adyen’s logs, we can indeed see a webhook triggered at the same time the checkout payment button was hit: 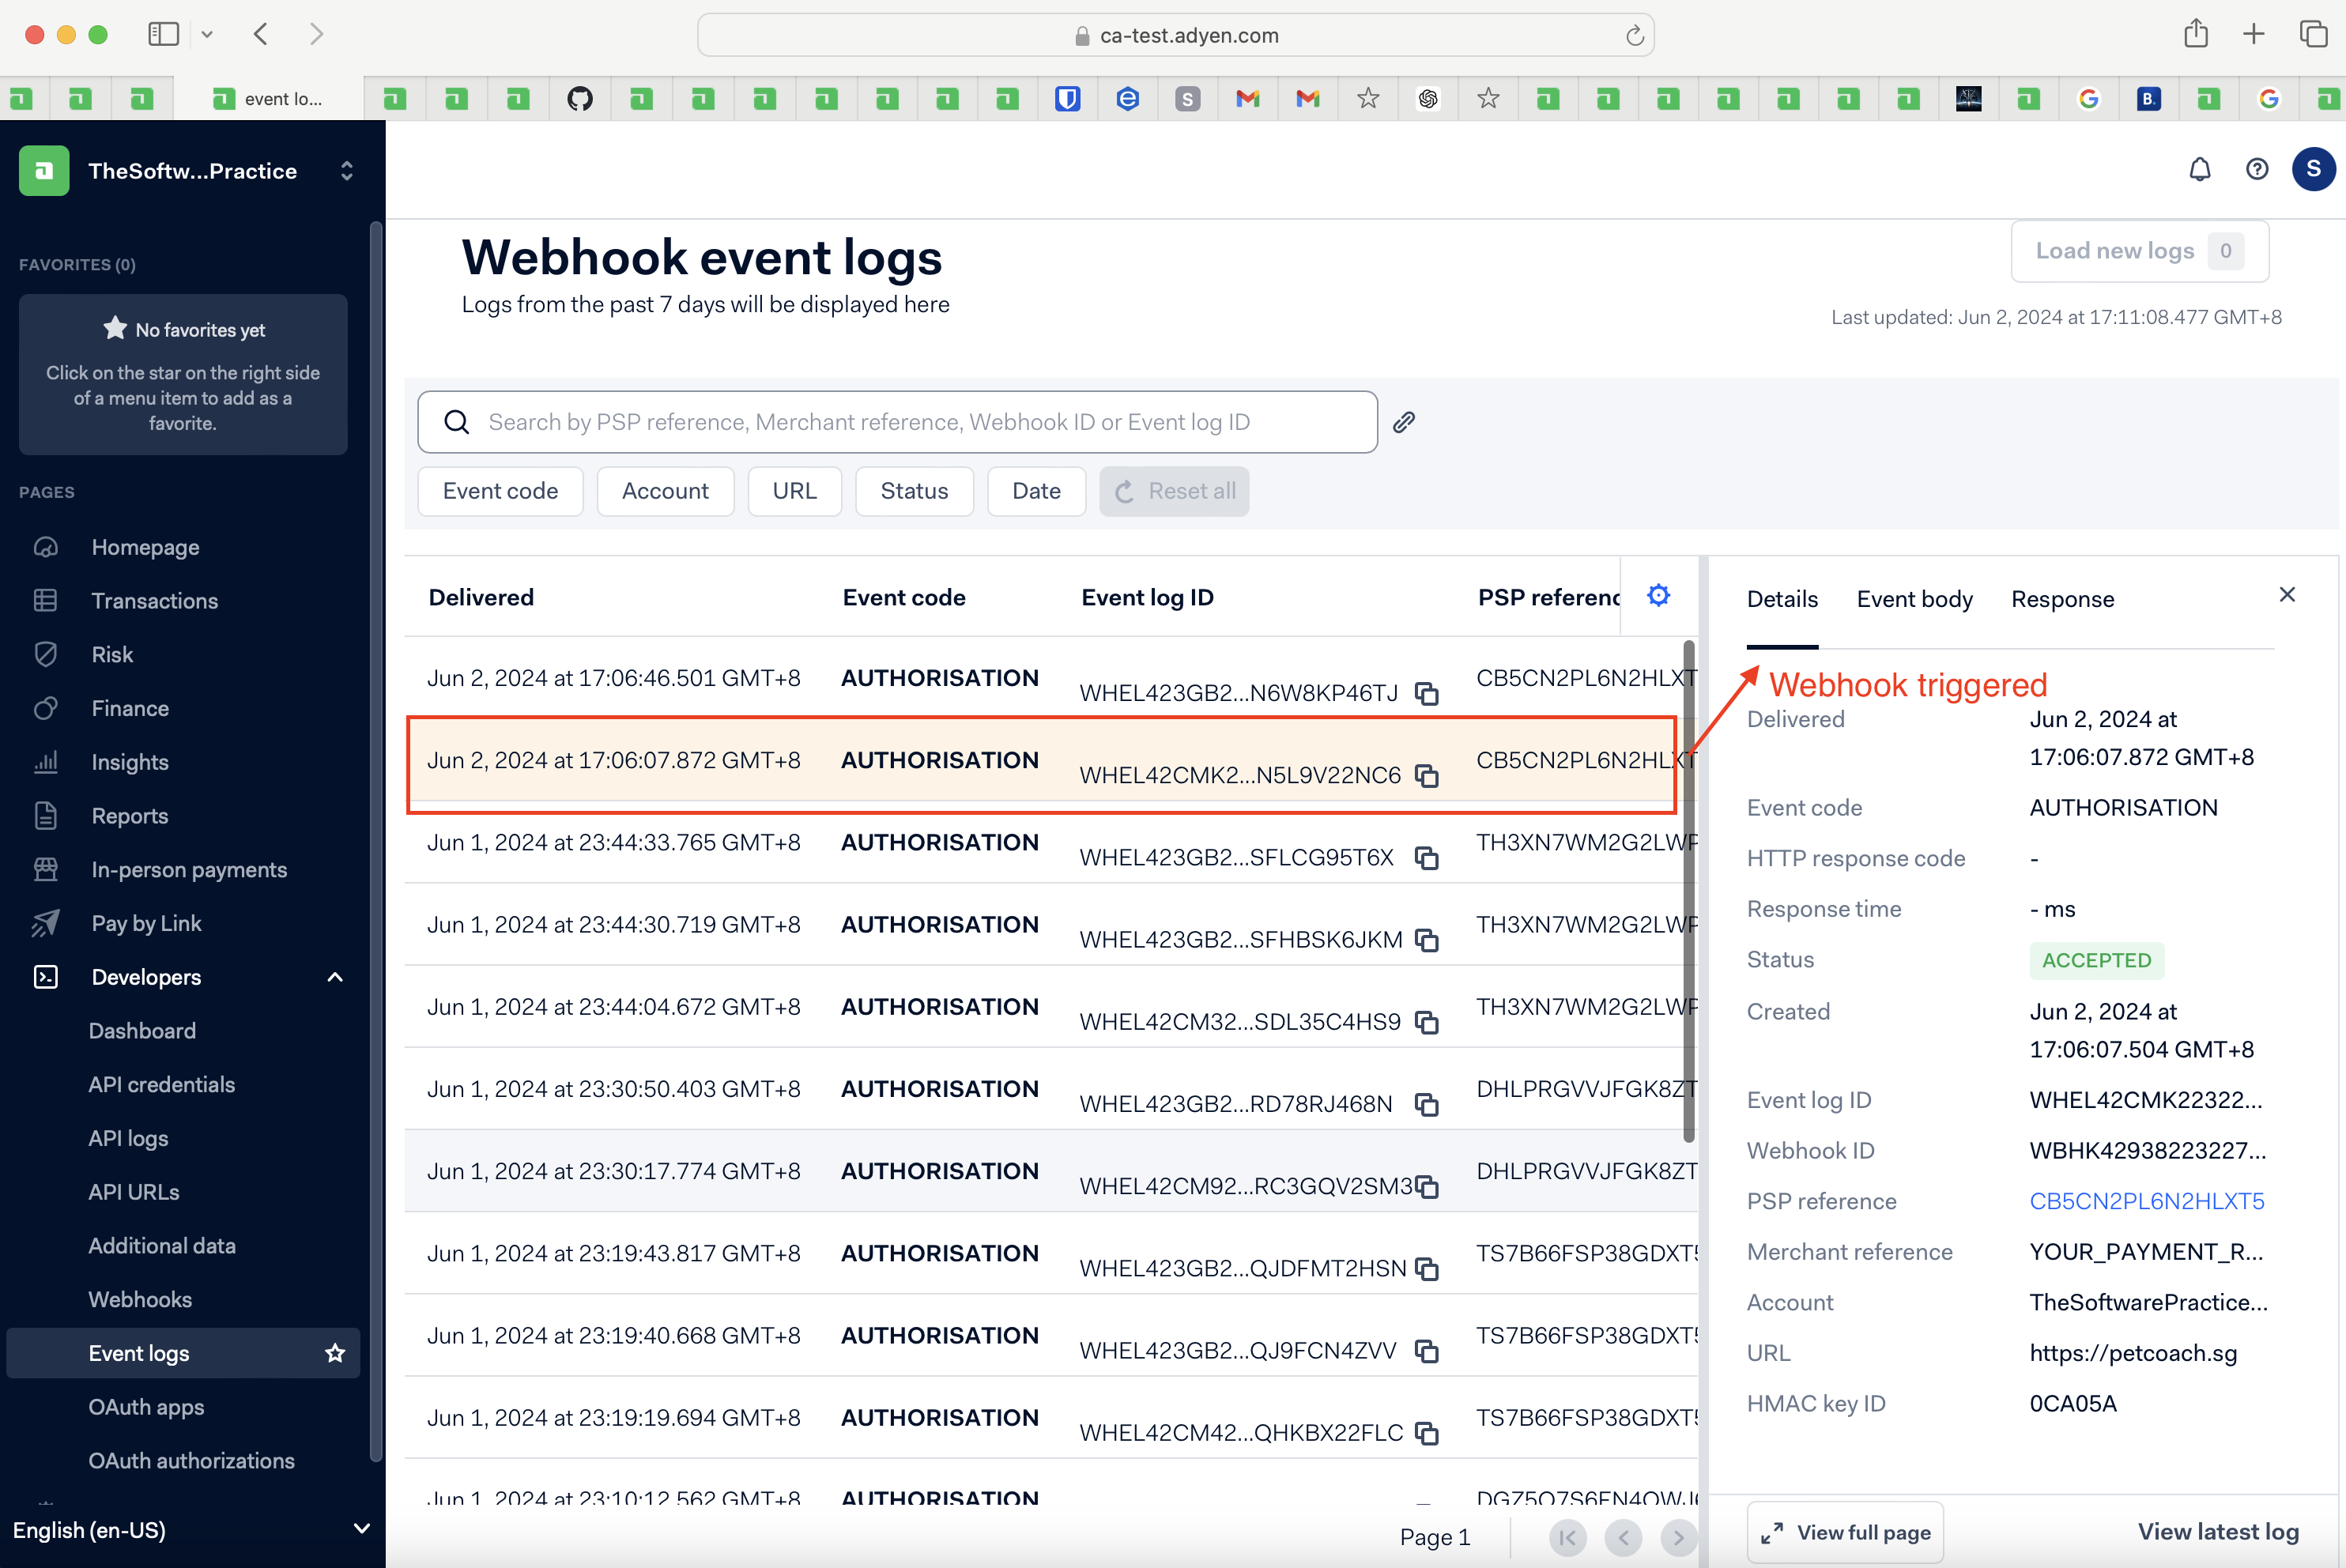
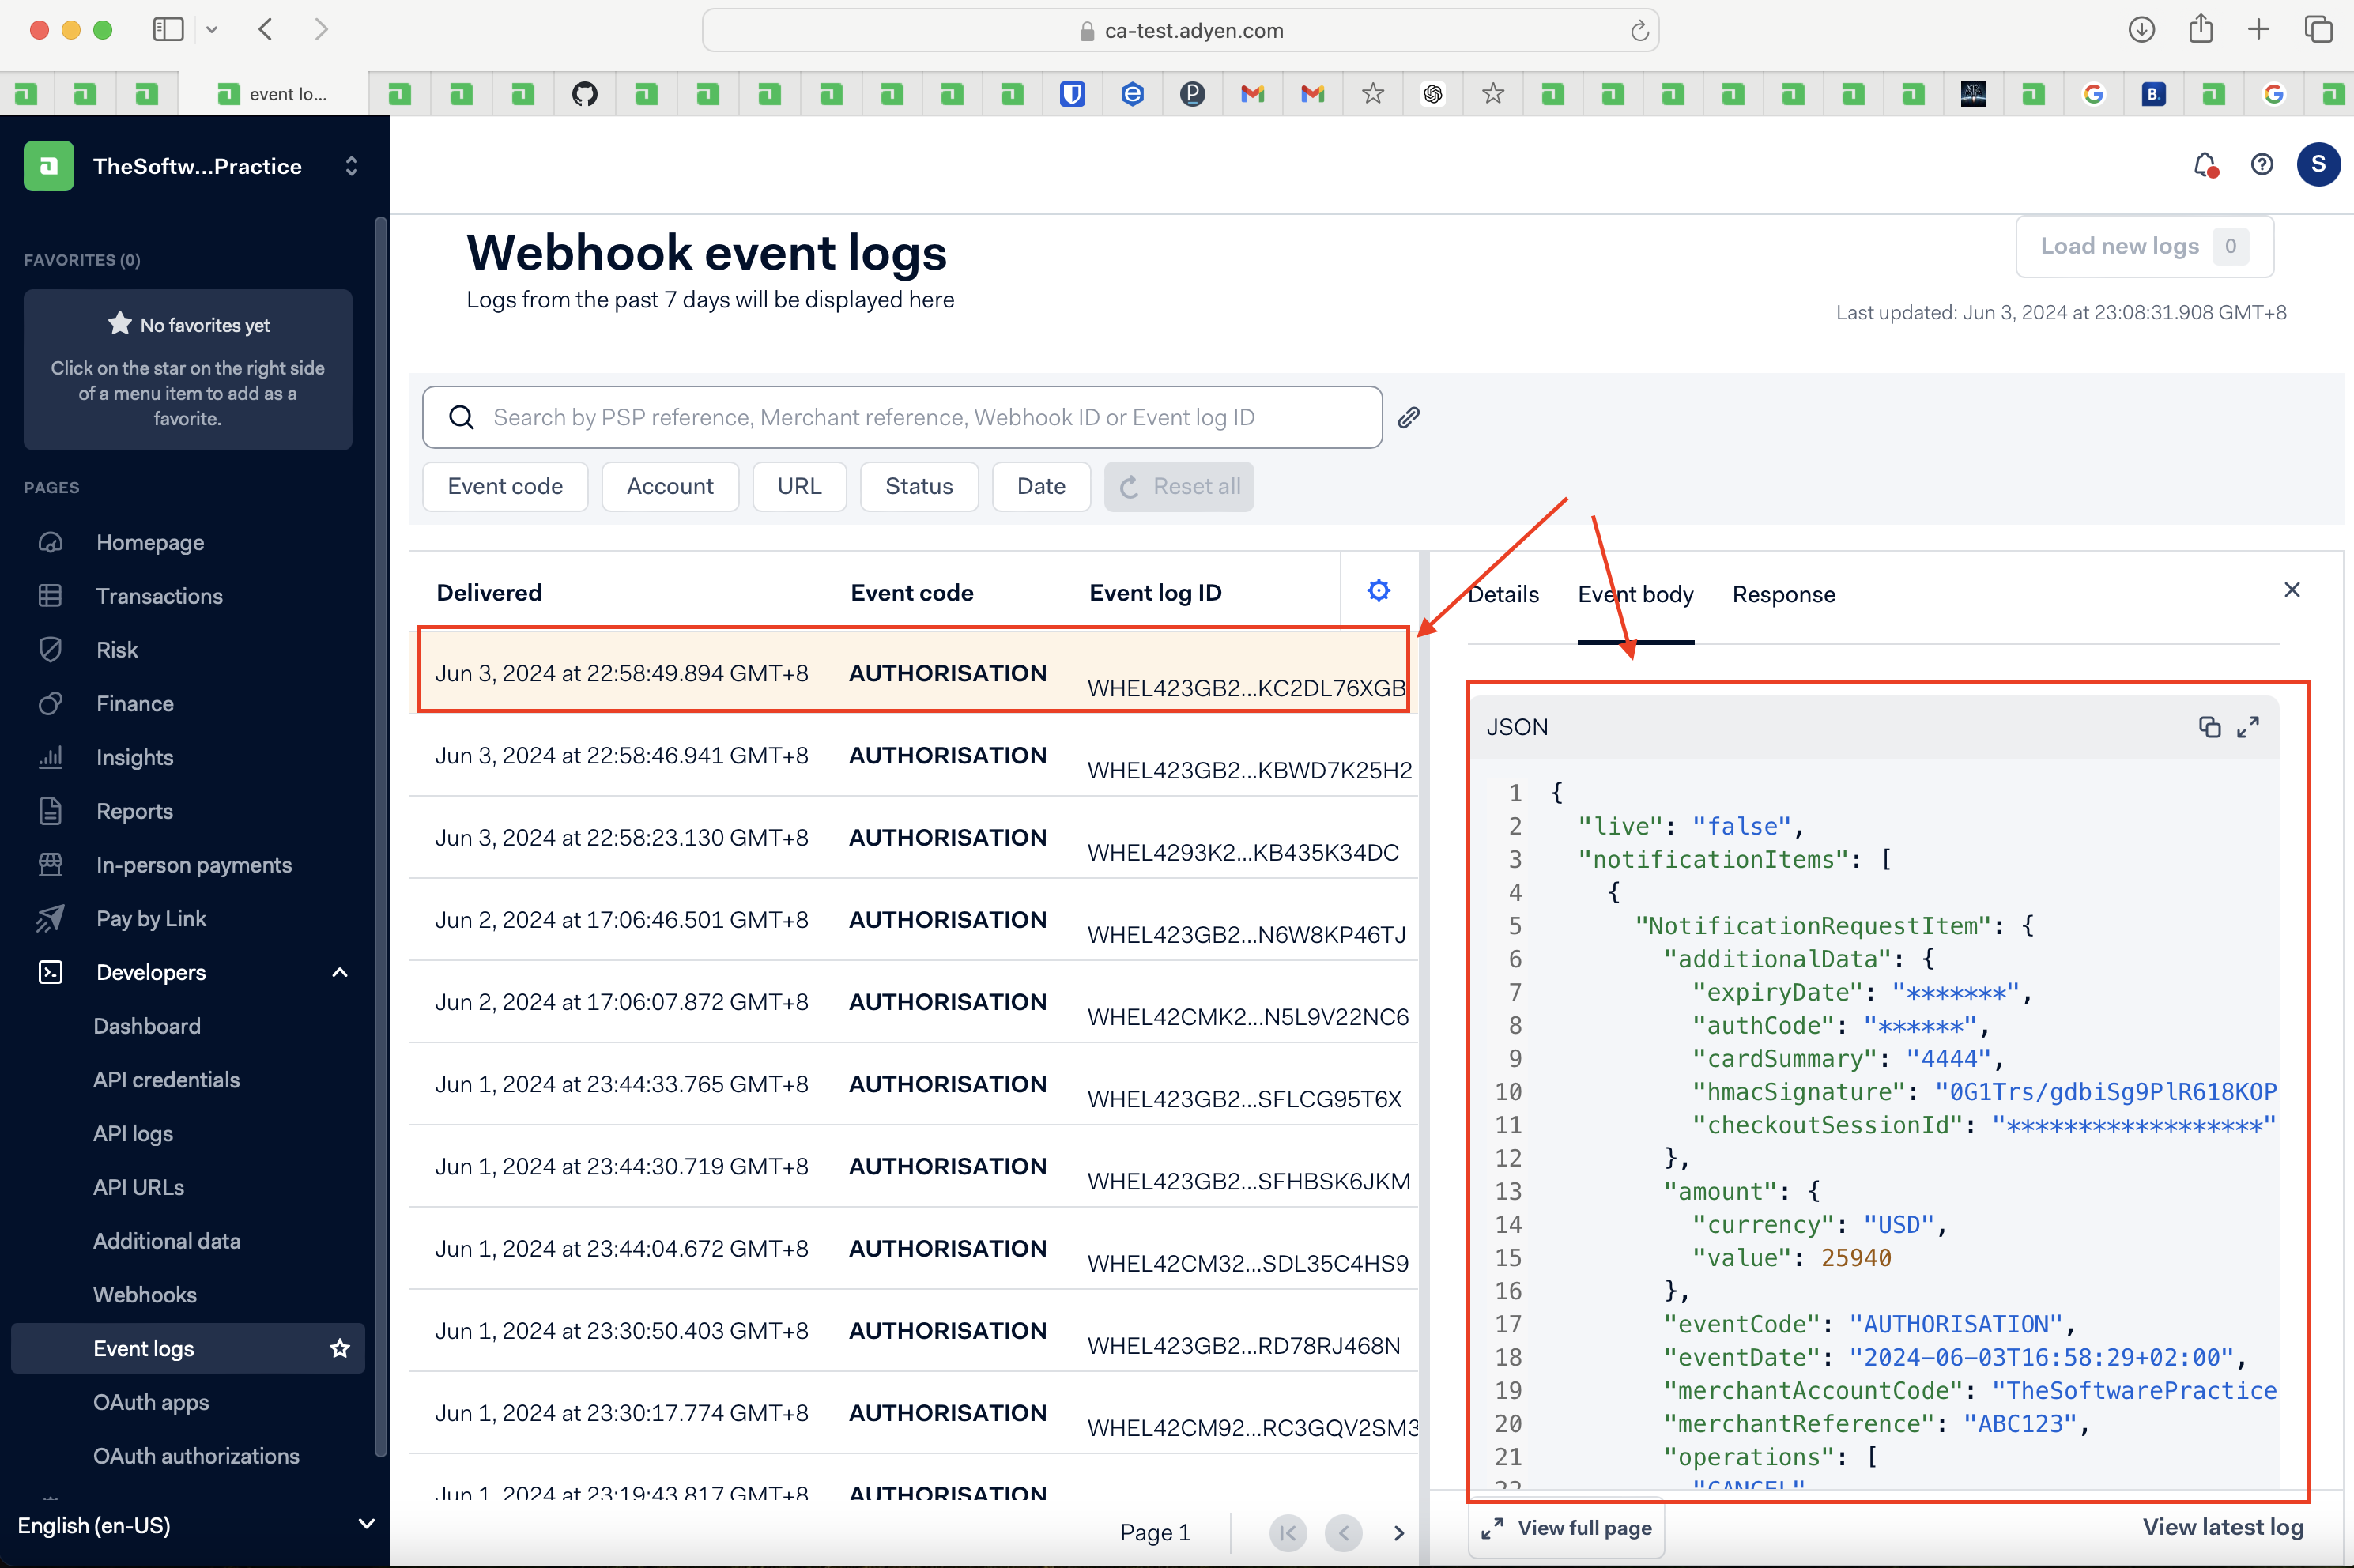
From the logs, we can see the body of the webhook. With this, the e-commerce can ensure that the following property that is passed to Adyen is unique when creating the payment session: "merchantReference": "YOUR_PAYMENT_REFERENCE". This is especially important when troubleshooting any missed payments that needs reconciliation.
{
  "live": "false",
  "notificationItems": [
    {
      "NotificationRequestItem": {
        "additionalData": {
          "expiryDate": "*******",
          "authCode": "******",
          "paymentLinkId": "*******************",
          "cardSummary": "4444",
          "threeds2.cardEnrolled": "false",
          "checkout.cardAddedBrand": "********",
          "hmacSignature": "Ho11JvTi3Cm4gdBy0rSW1NKW5efXtr/x0rtXgECnywI="
        },
        "amount": {
          "currency": "EUR",
          "value": 1000
        },
        "eventCode": "AUTHORISATION",
        "eventDate": "2024-06-02T11:06:07+02:00",
        "merchantAccountCode": "TheSoftwarePracticeECOM",
        "merchantReference": "YOUR_PAYMENT_REFERENCE",
        "operations": [
          "CANCEL",
          "CAPTURE",
          "REFUND"
        ],
        "paymentMethod": "mc",
        "pspReference": "CB5CN2PL6N2HLXT5",
        "reason": "033286:4444:03/2030",
        "success": "true"
      }
    }
  ]
}
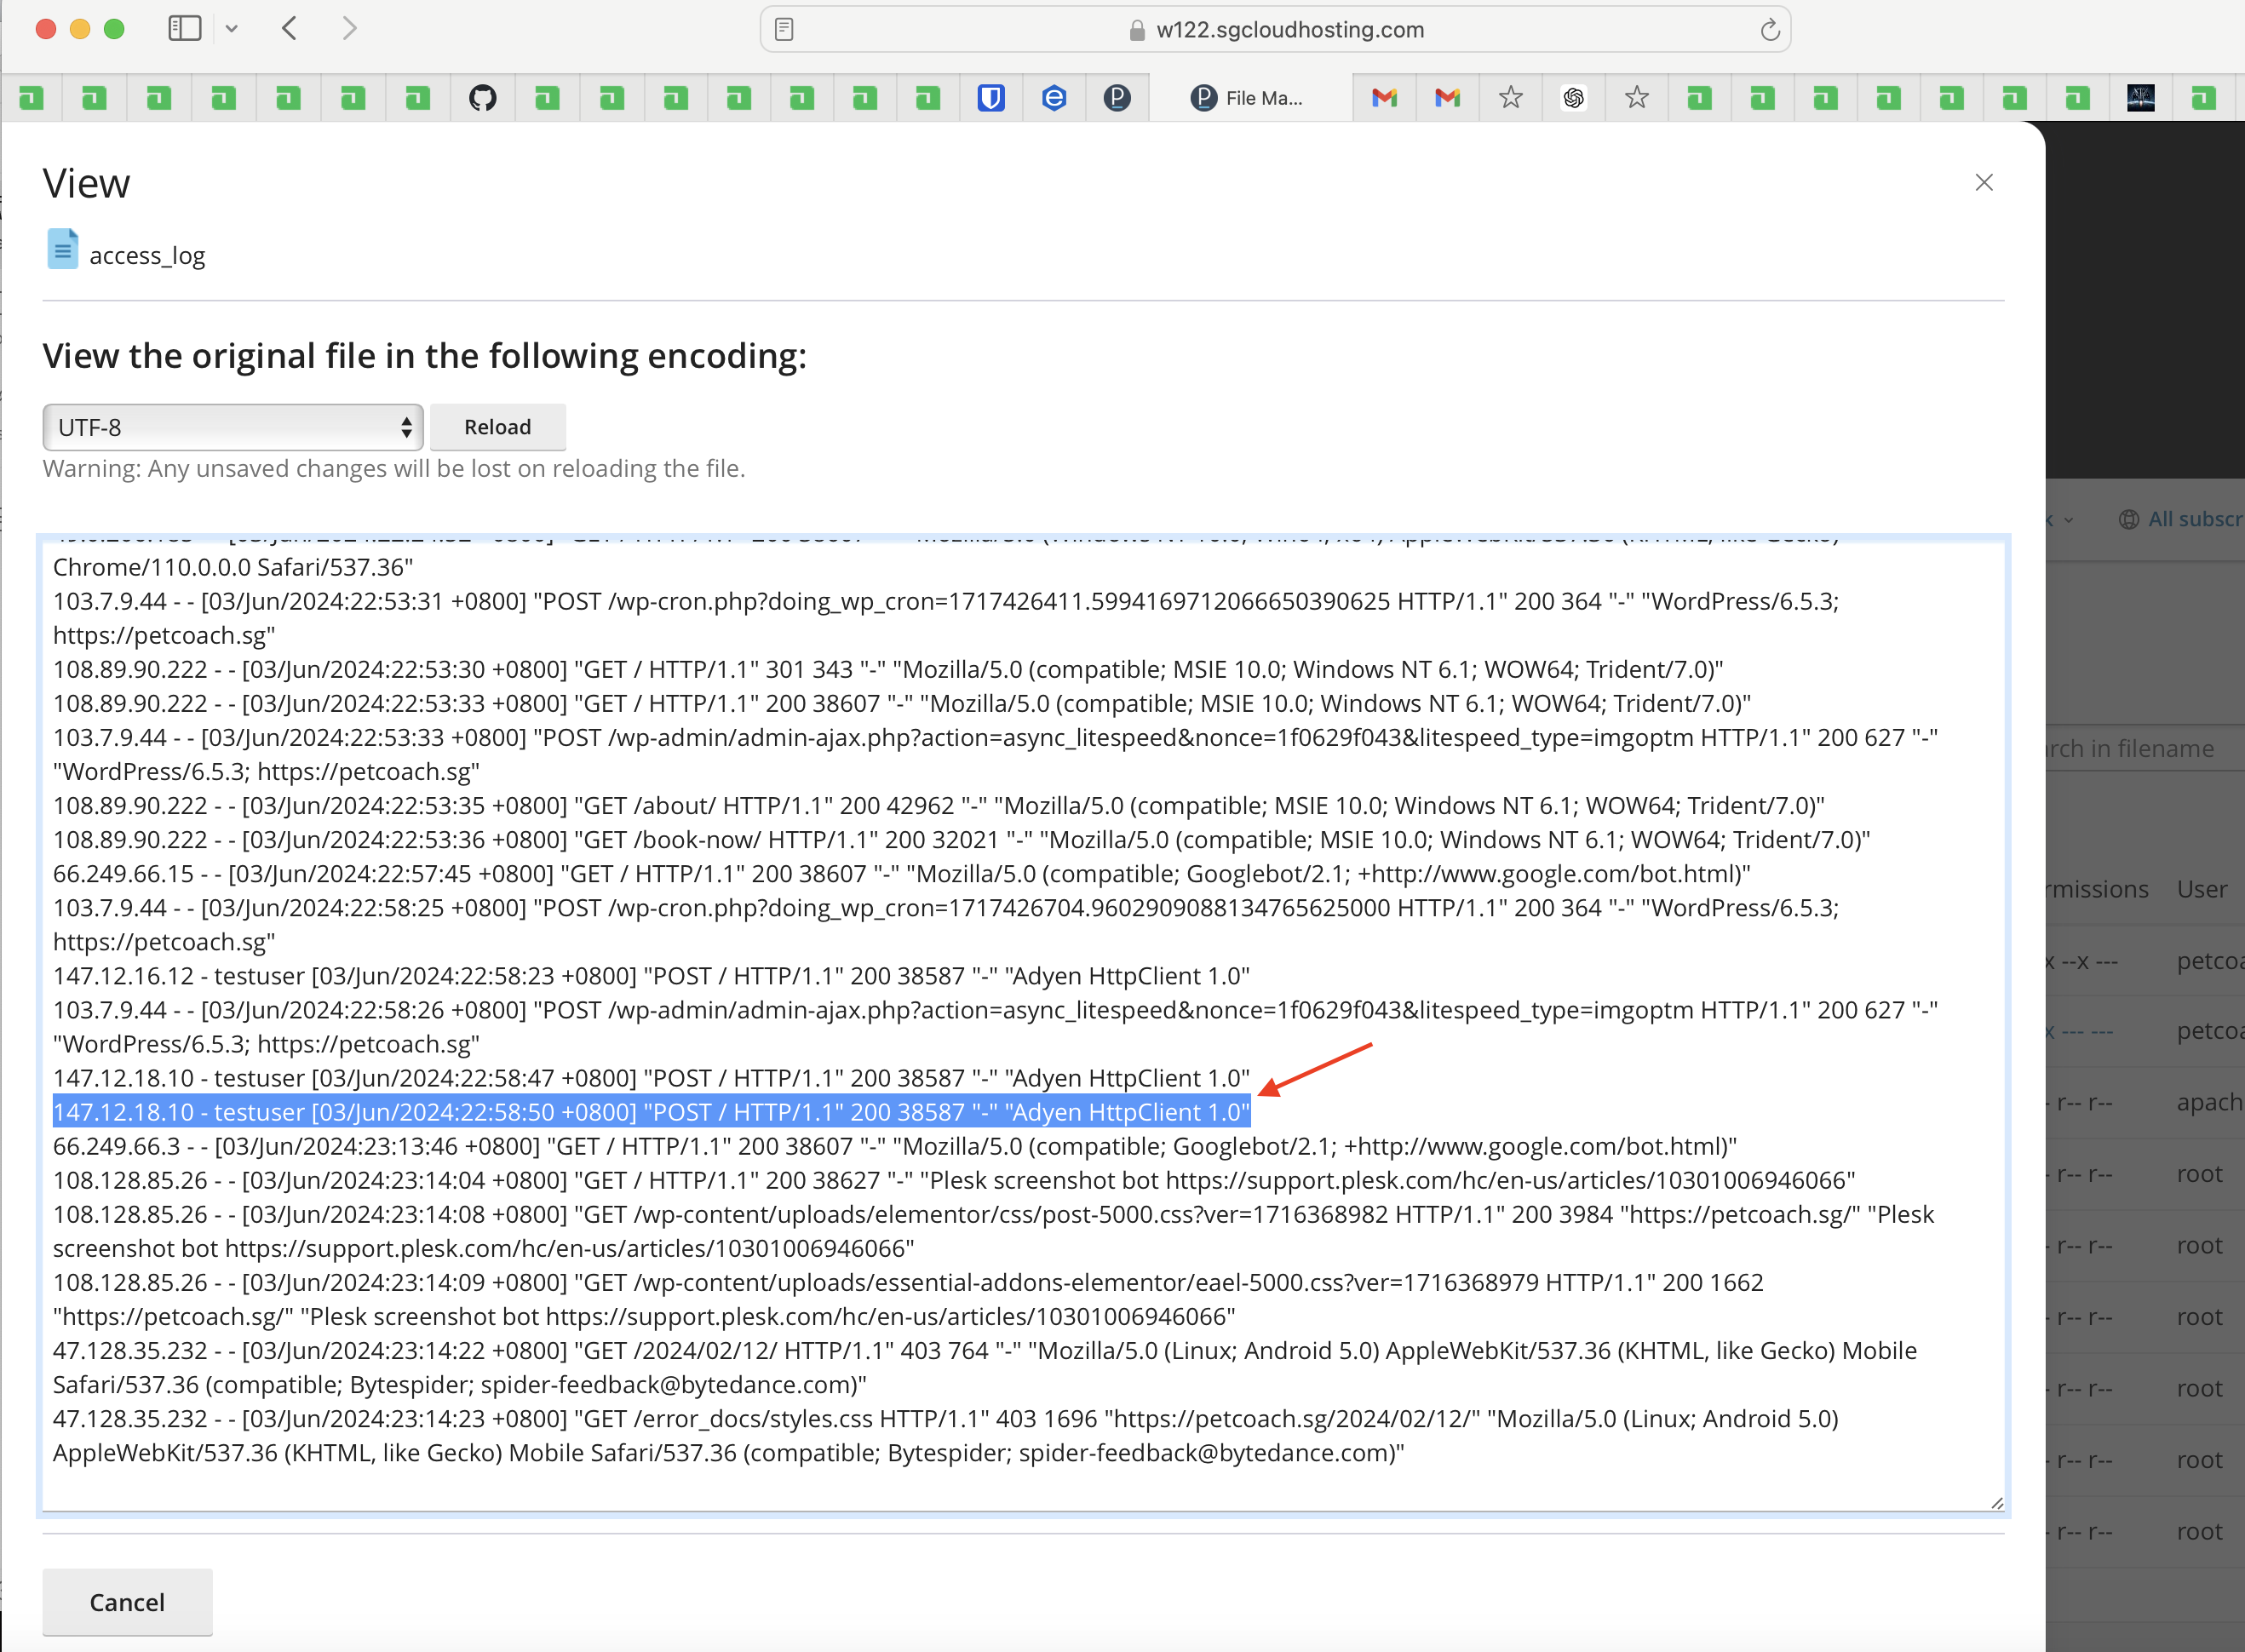
Checking Pet Coach SG logs, we can see that the webhook callback was indeed received: 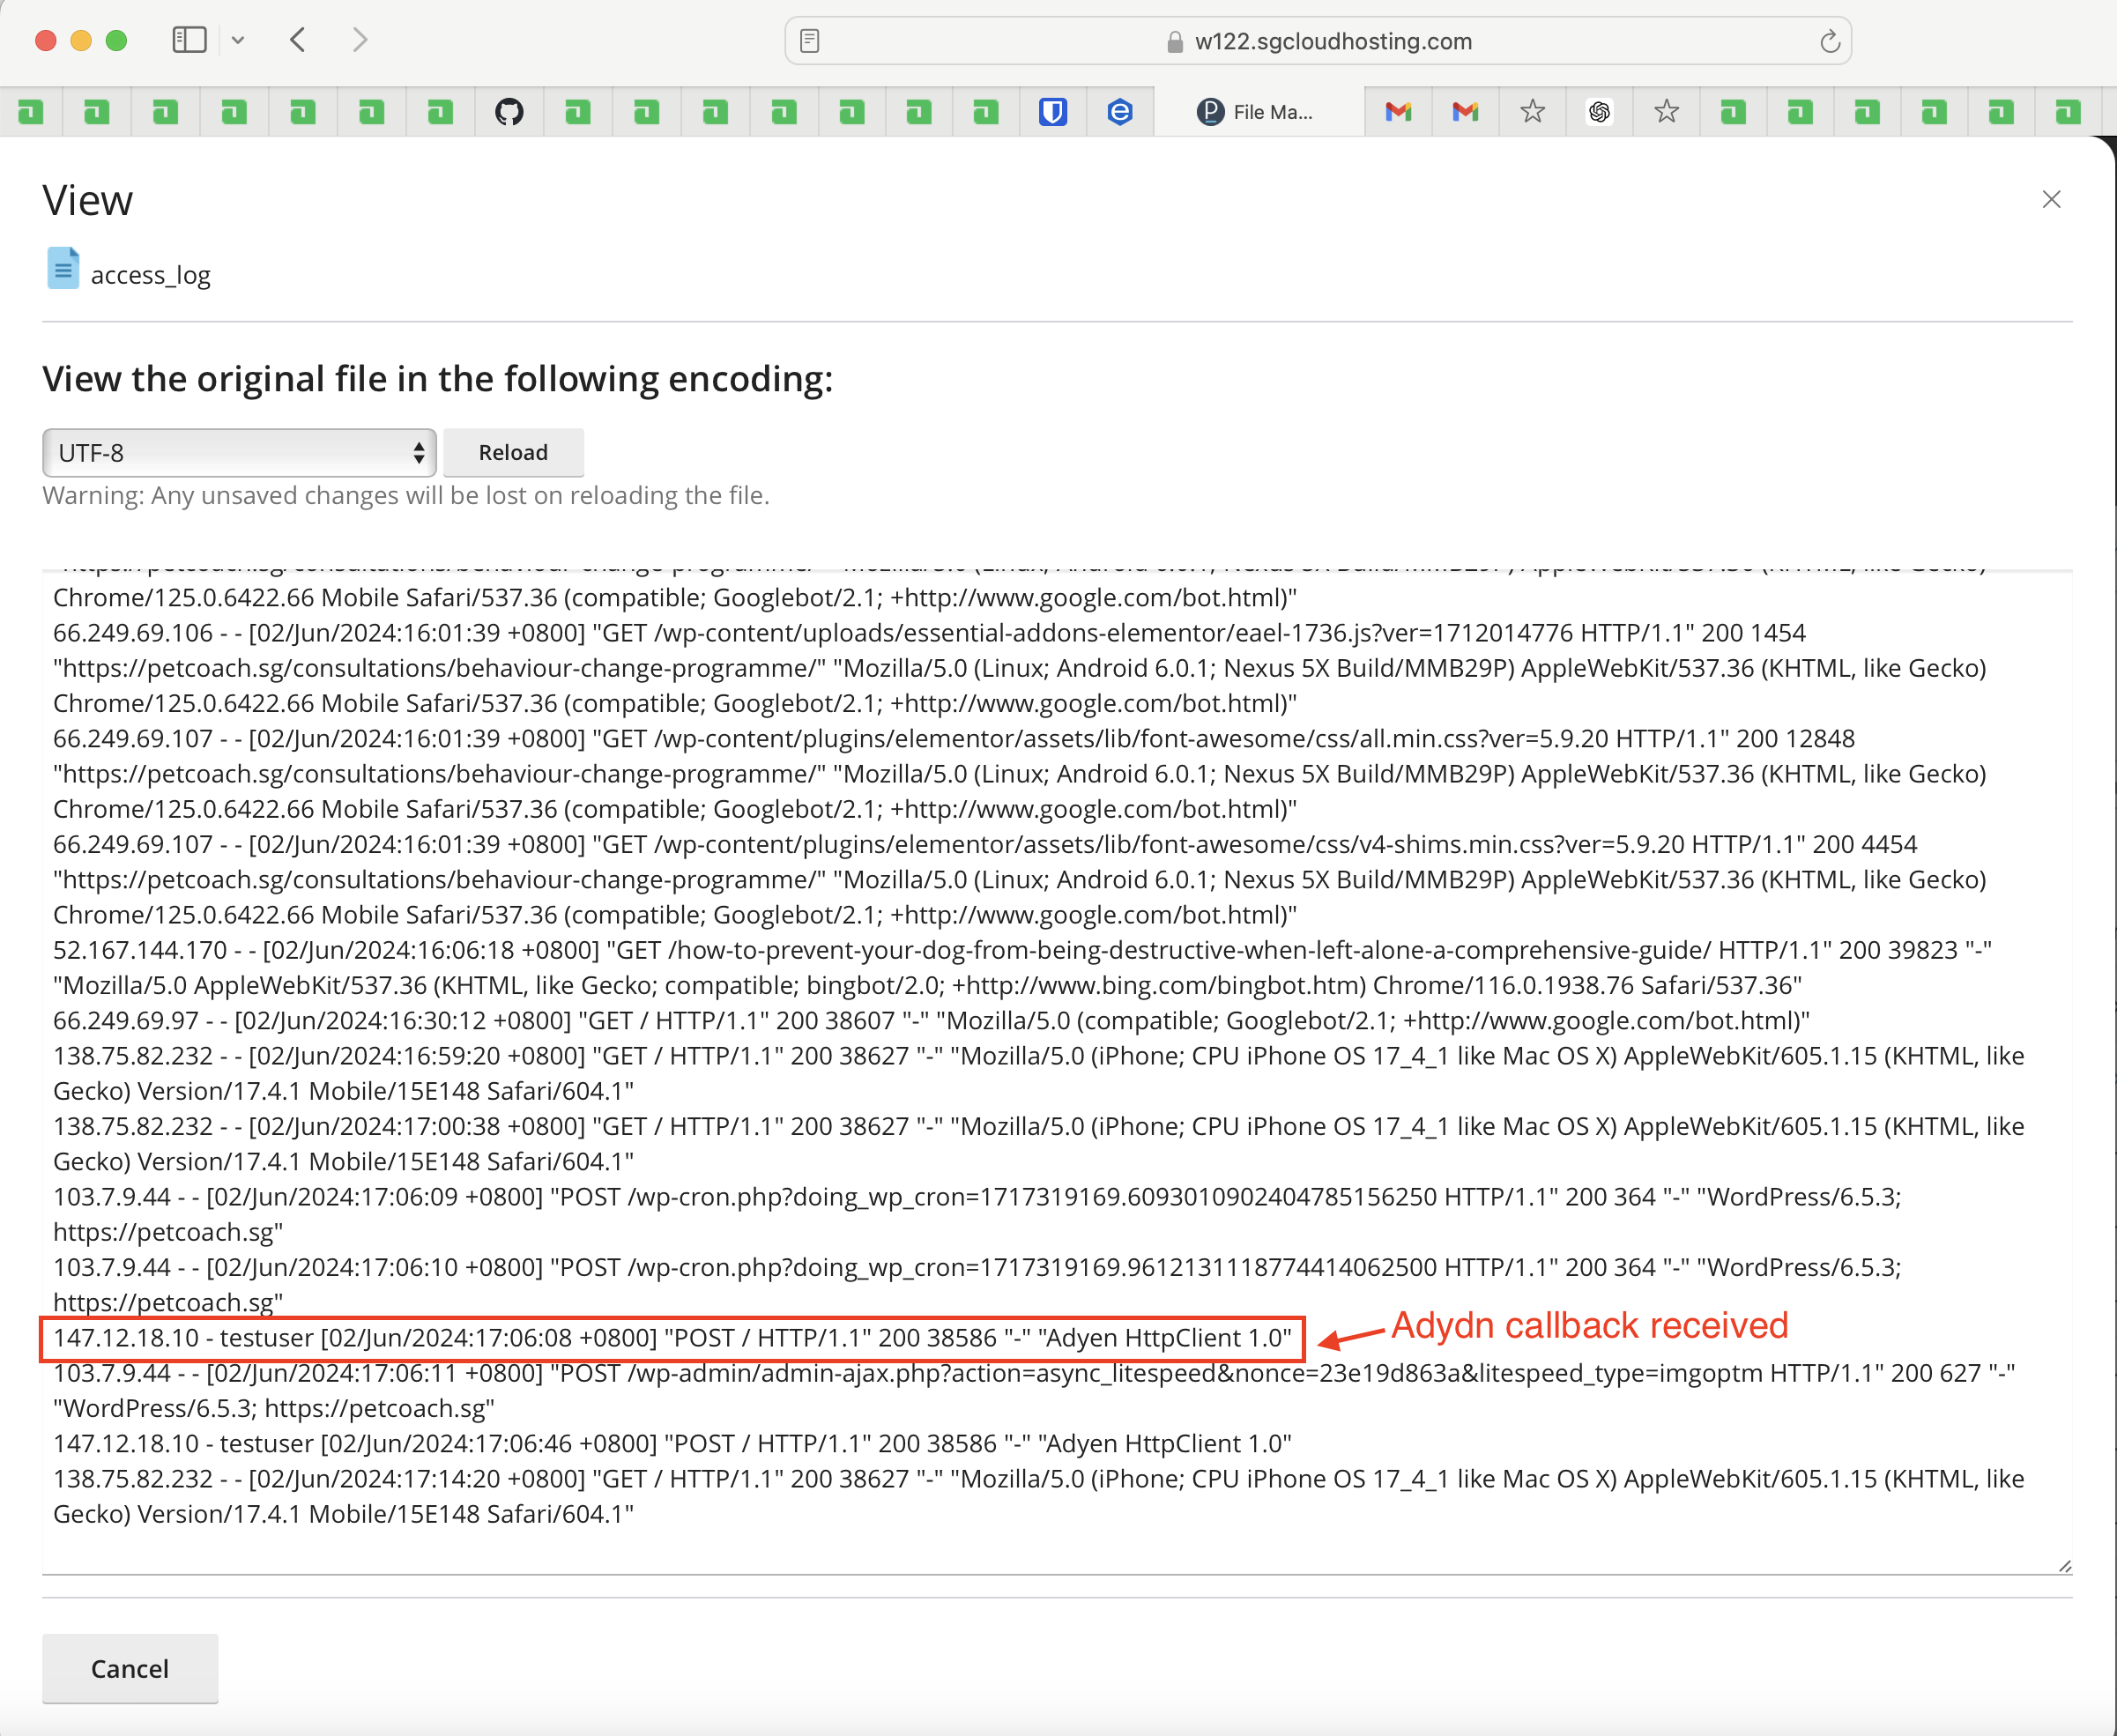
Instead of Pet Coach, we would normally configure the e-commerce server to expose an endpoint. When receiving the callback, we will update the details of the payment to success!
Using the Adyen UI Components
The previous sections describes using the hosted checkout page. It’s called Hosted Checkout because Adyen hosts the page. What if we want more control in terms of the user flow and UI components? Adyen provides a set of UI components that are completely open-sourced and customisable using CSS styles. Let’s revisit the payment flow, this time using the Ayden’s Drop-in UI Component flow!
The flow from the user perspective remains the same. But the implementation behind the scenes differs significantly. Let’s check it out!
Adyen’s Sandbox Environment
To fiddle around with the flow using Adyen’s UI components, we had to locally run the Adyen Web UI project. The project is run using NodeJS technology, and has been designed to be very user friend - yes, if a project manager can run the project, we can safely say it’s well documented and user friendly ><!
The steps are as follows:
- Just clone the project
- Install all the dependencies as per the
ReadMedocumentation - it’s well documented - Create a
.envfile and start the project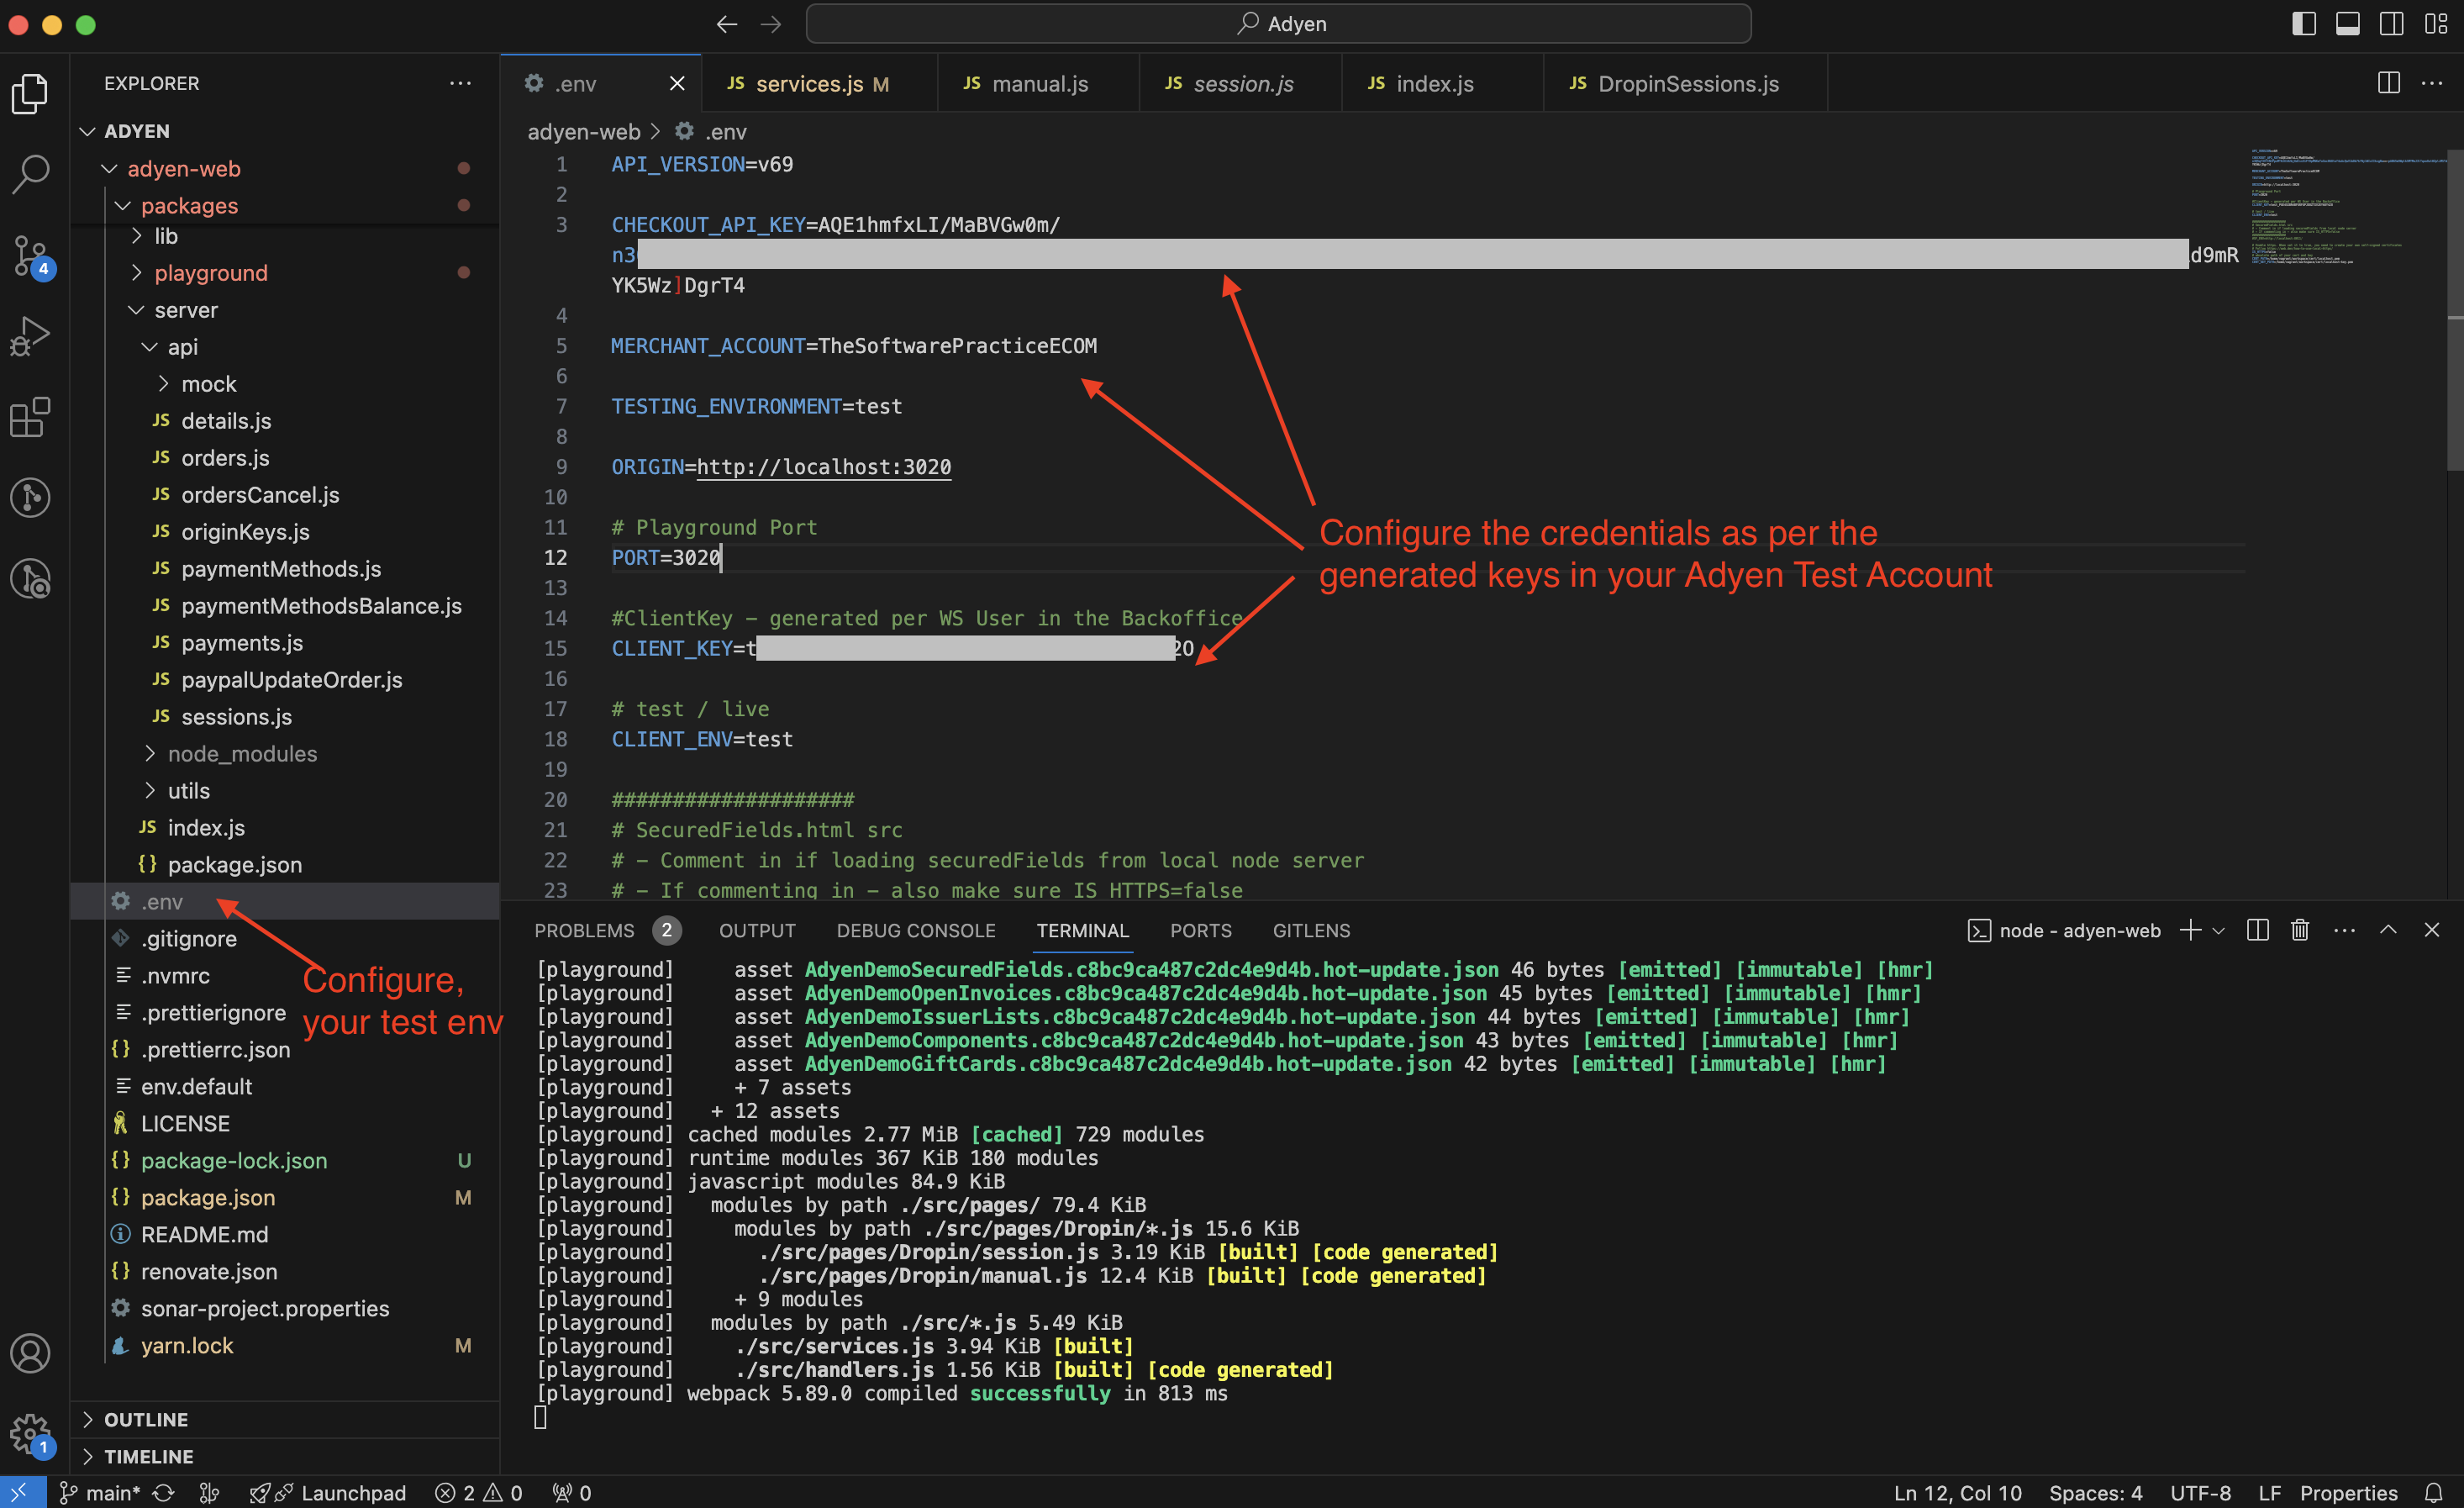
- Access the website on your
locahostat the port configured in your.env. For us it’s port: 3020!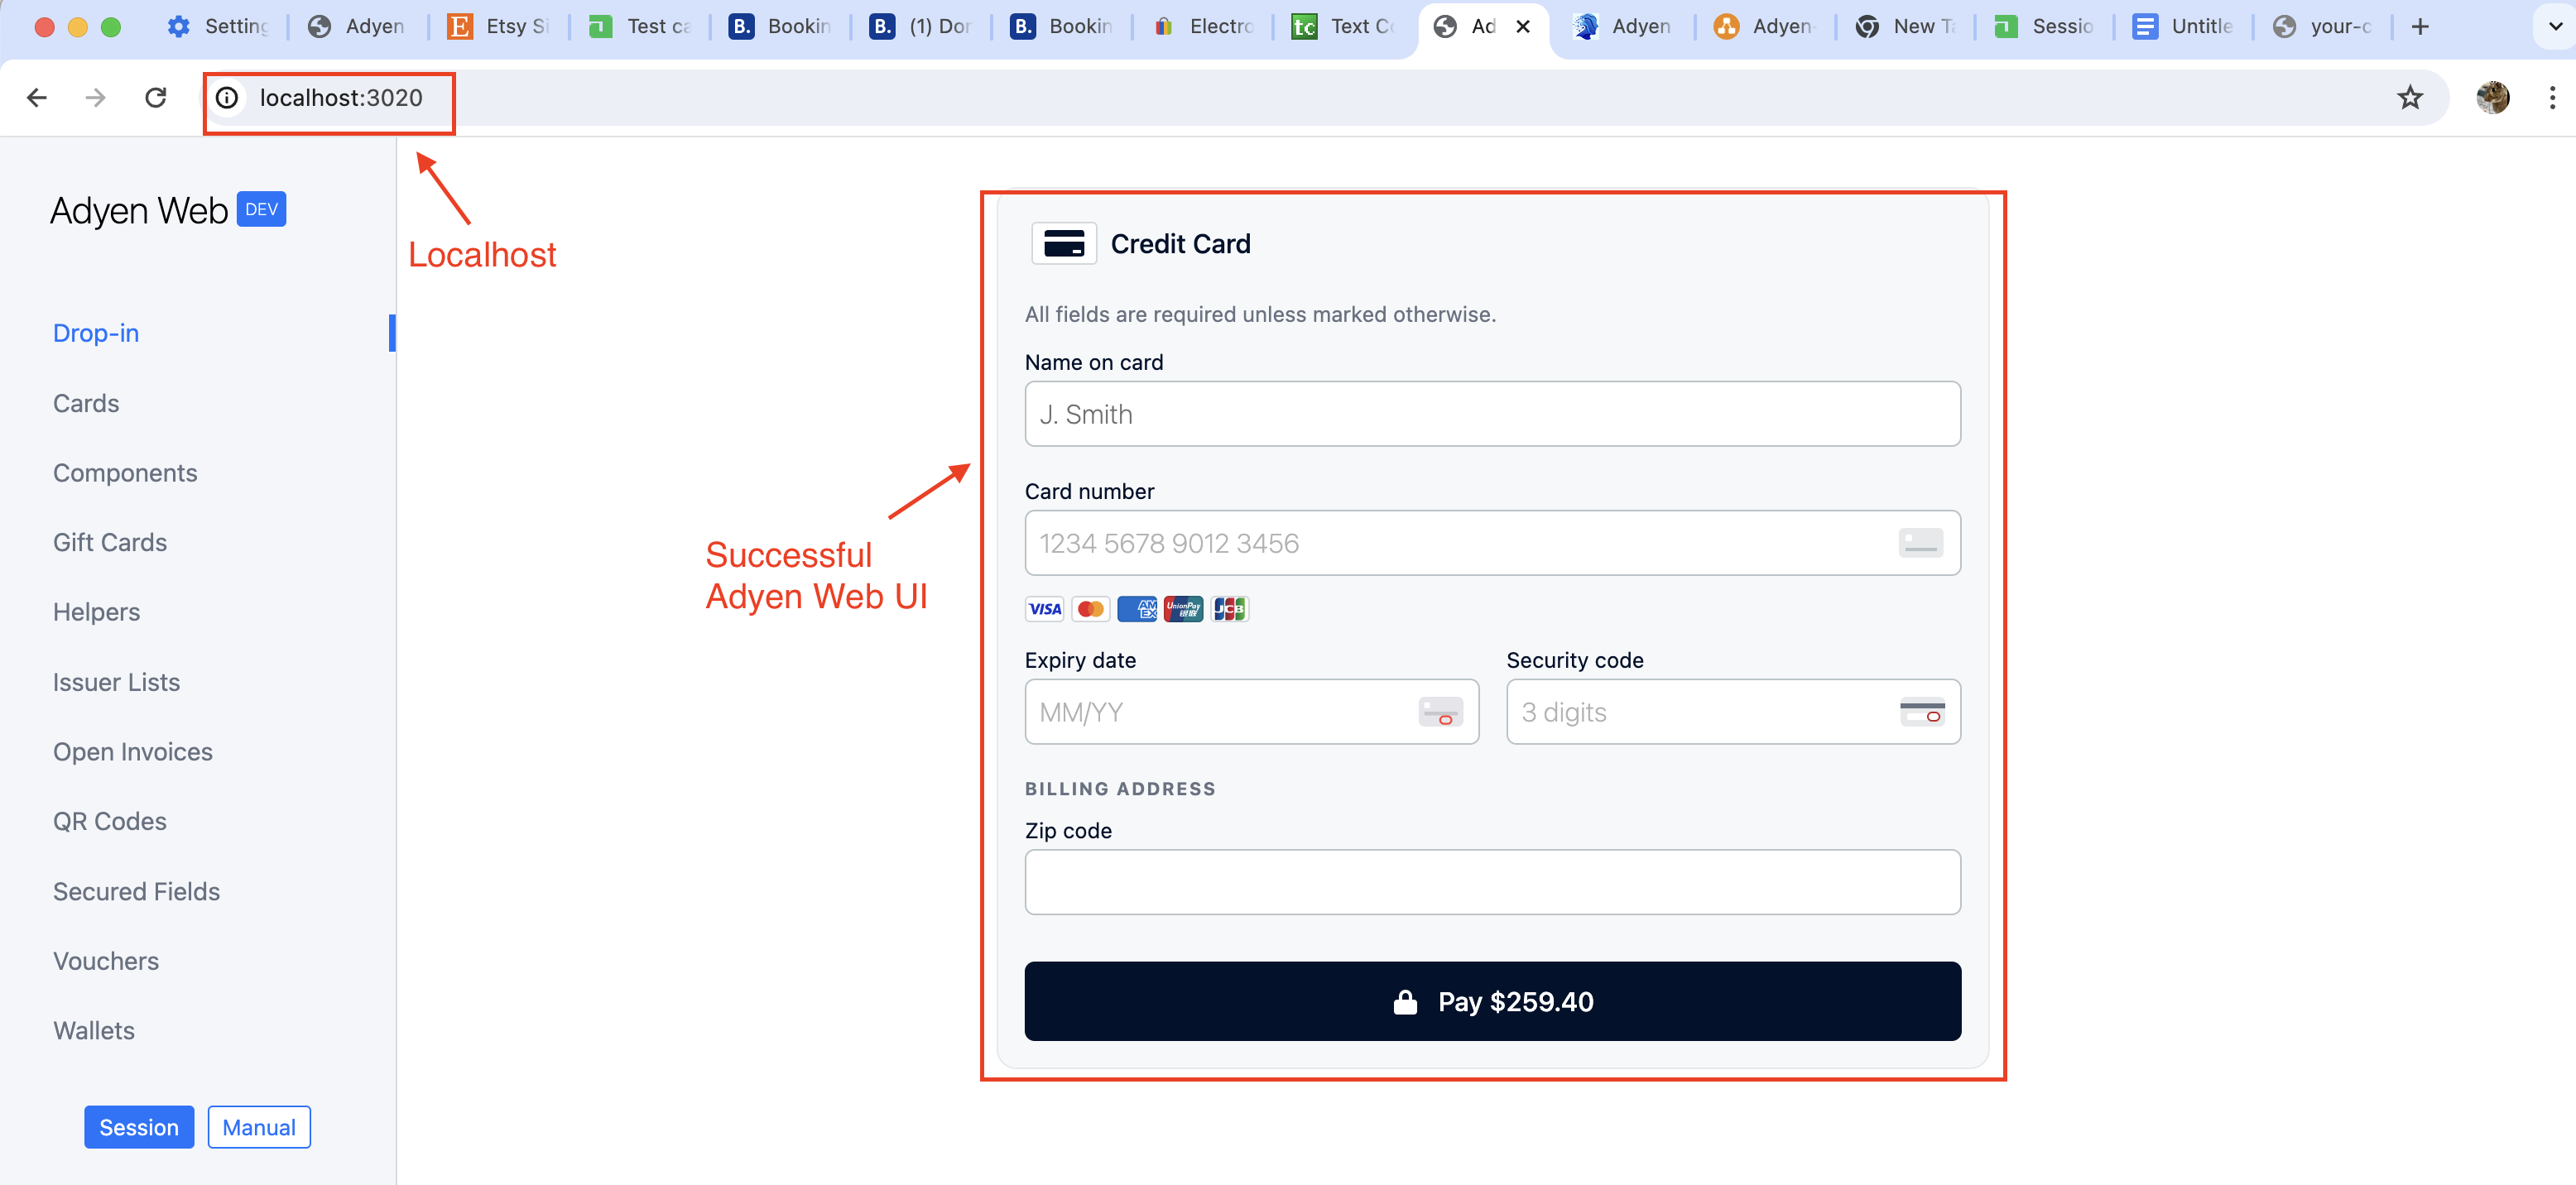
Now that we have Adyen Web UI hosted locally, let’s proceed to run some tests and see what goes on behind the scenes!
Step #2: Create Checkout Session
The Adyen Web UI Sandbox, initiates a checkout session when we first load the page based on the configuration in the test project
- When hitting
localhost:3020/, the drop-in.js script is downloaded and then executed by the browser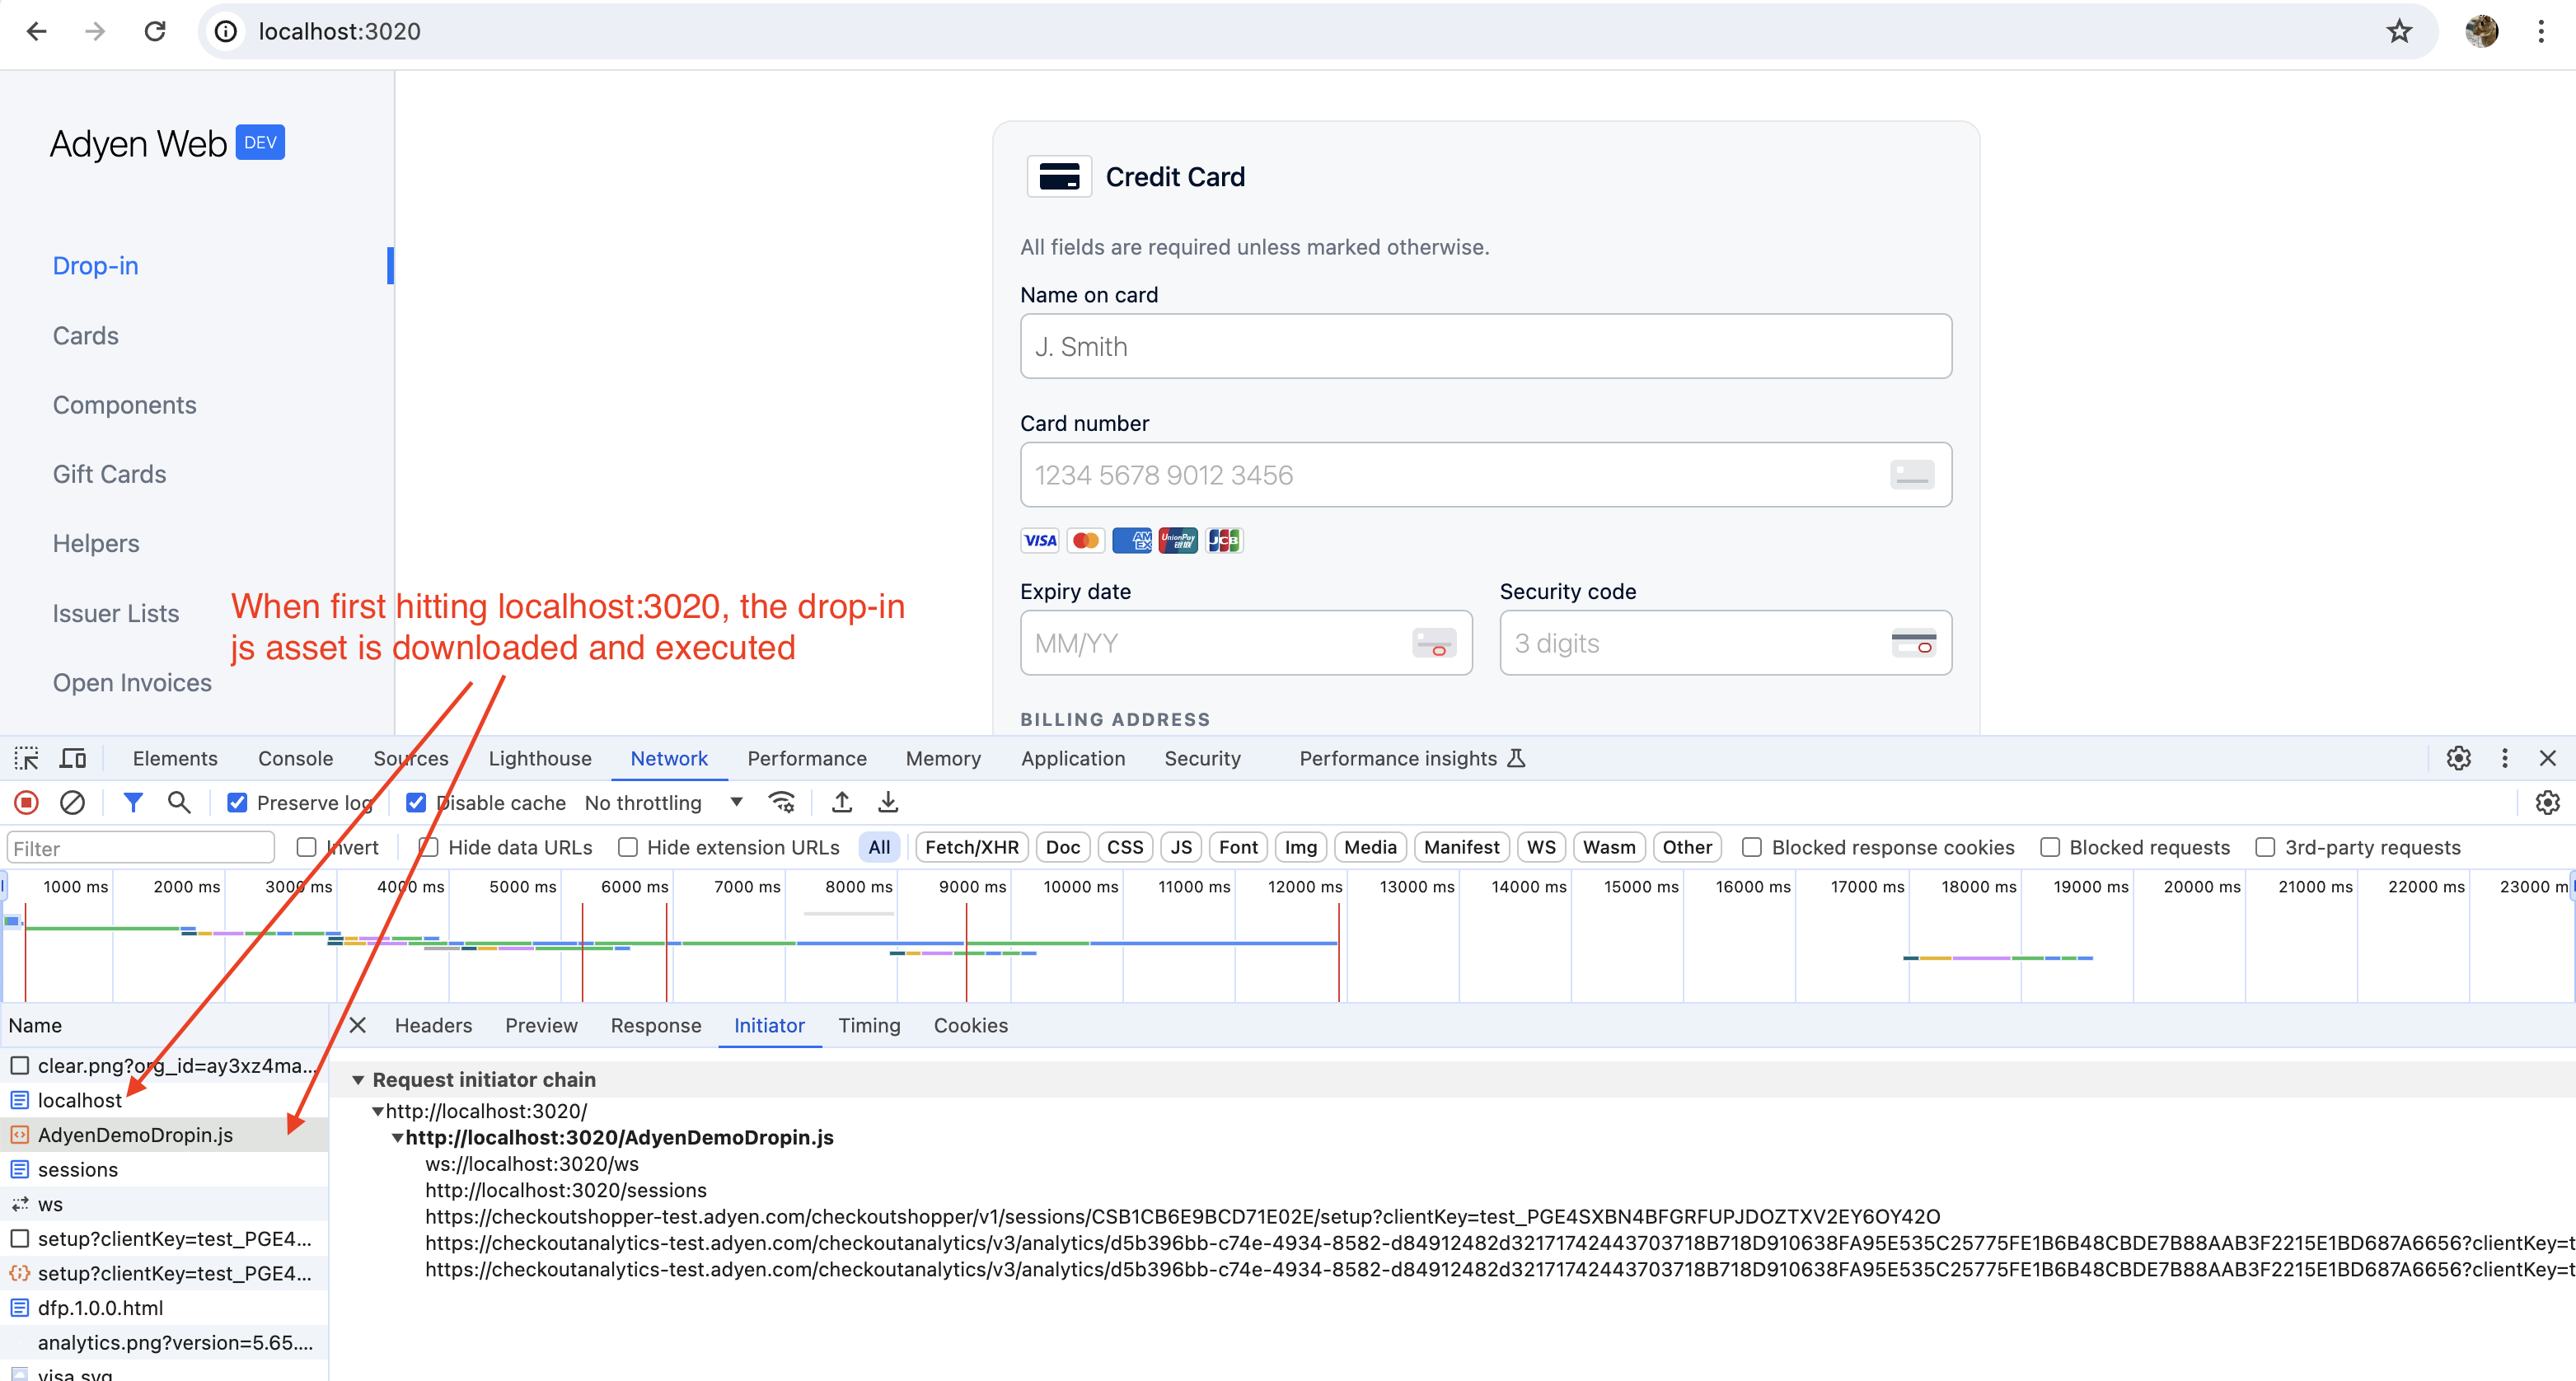
- Inspecting the code further, we can see that the dropin.js initializes the
initSession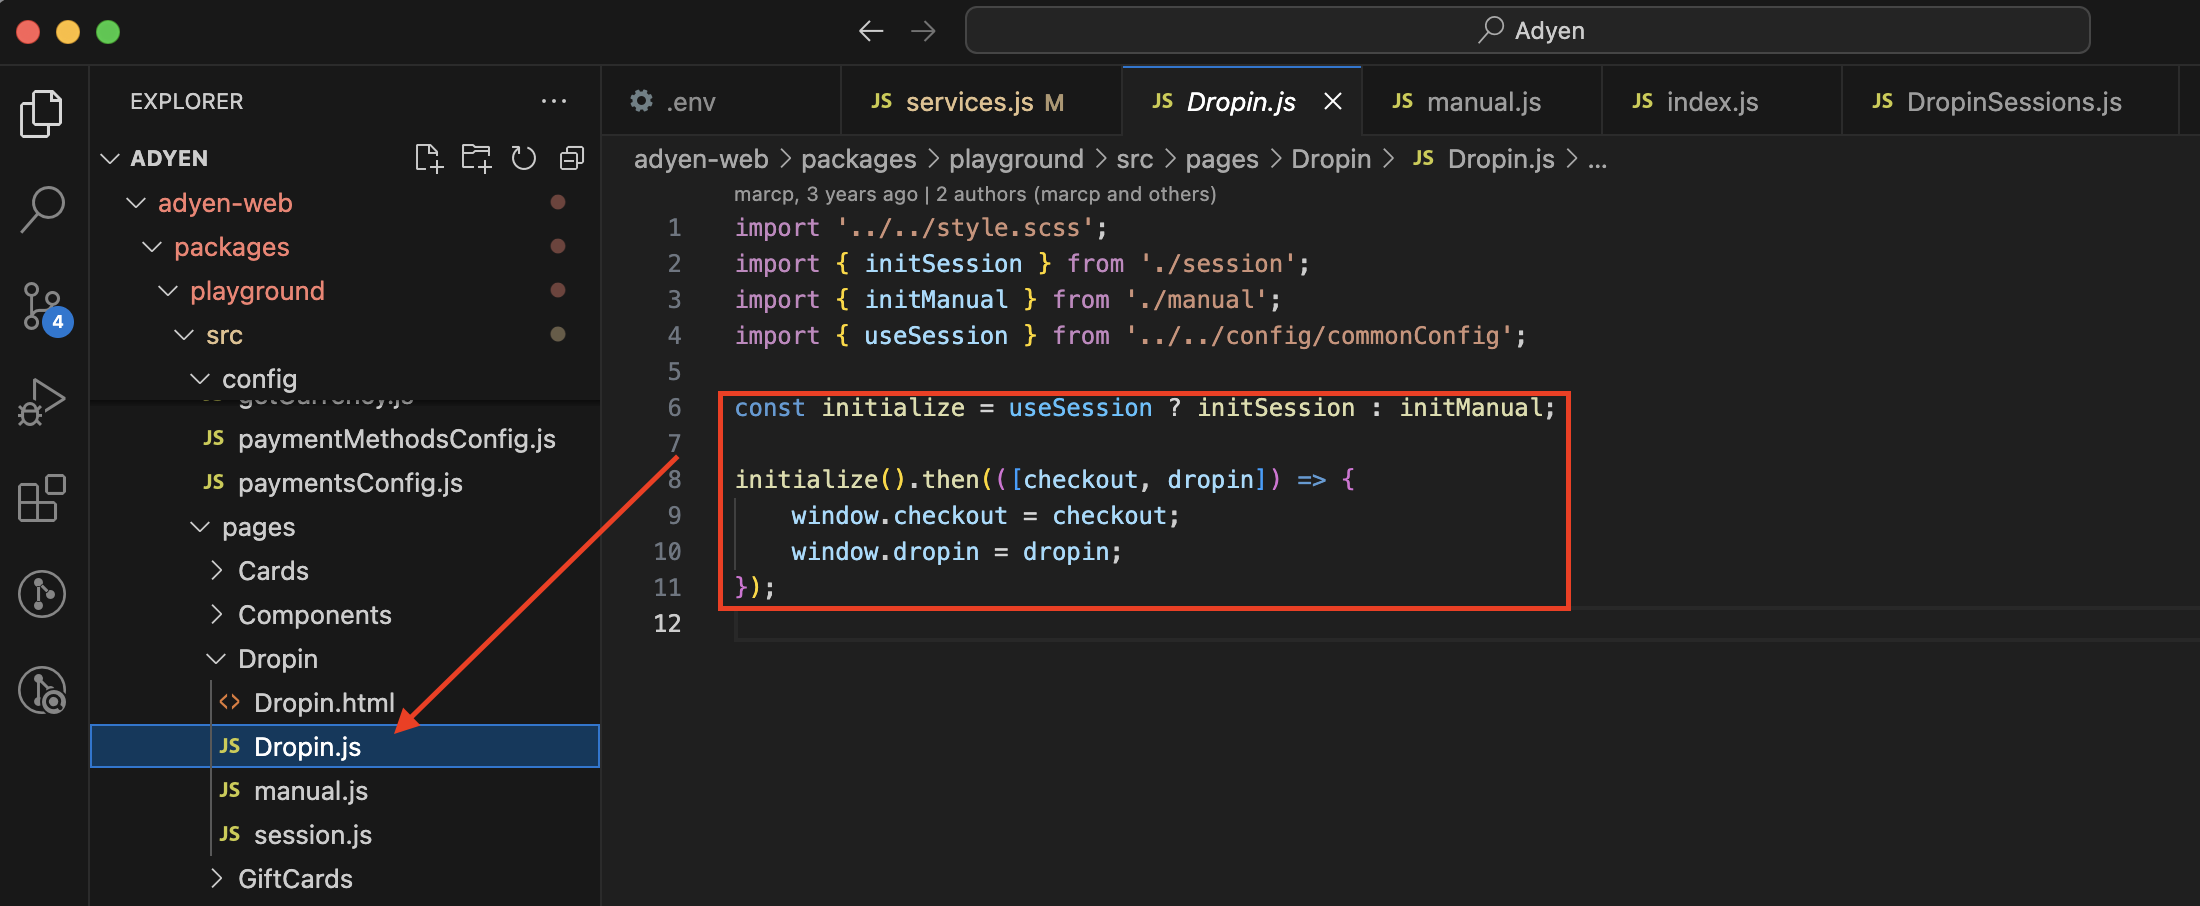
- The Init Session creates a session, which initiates a call to
/session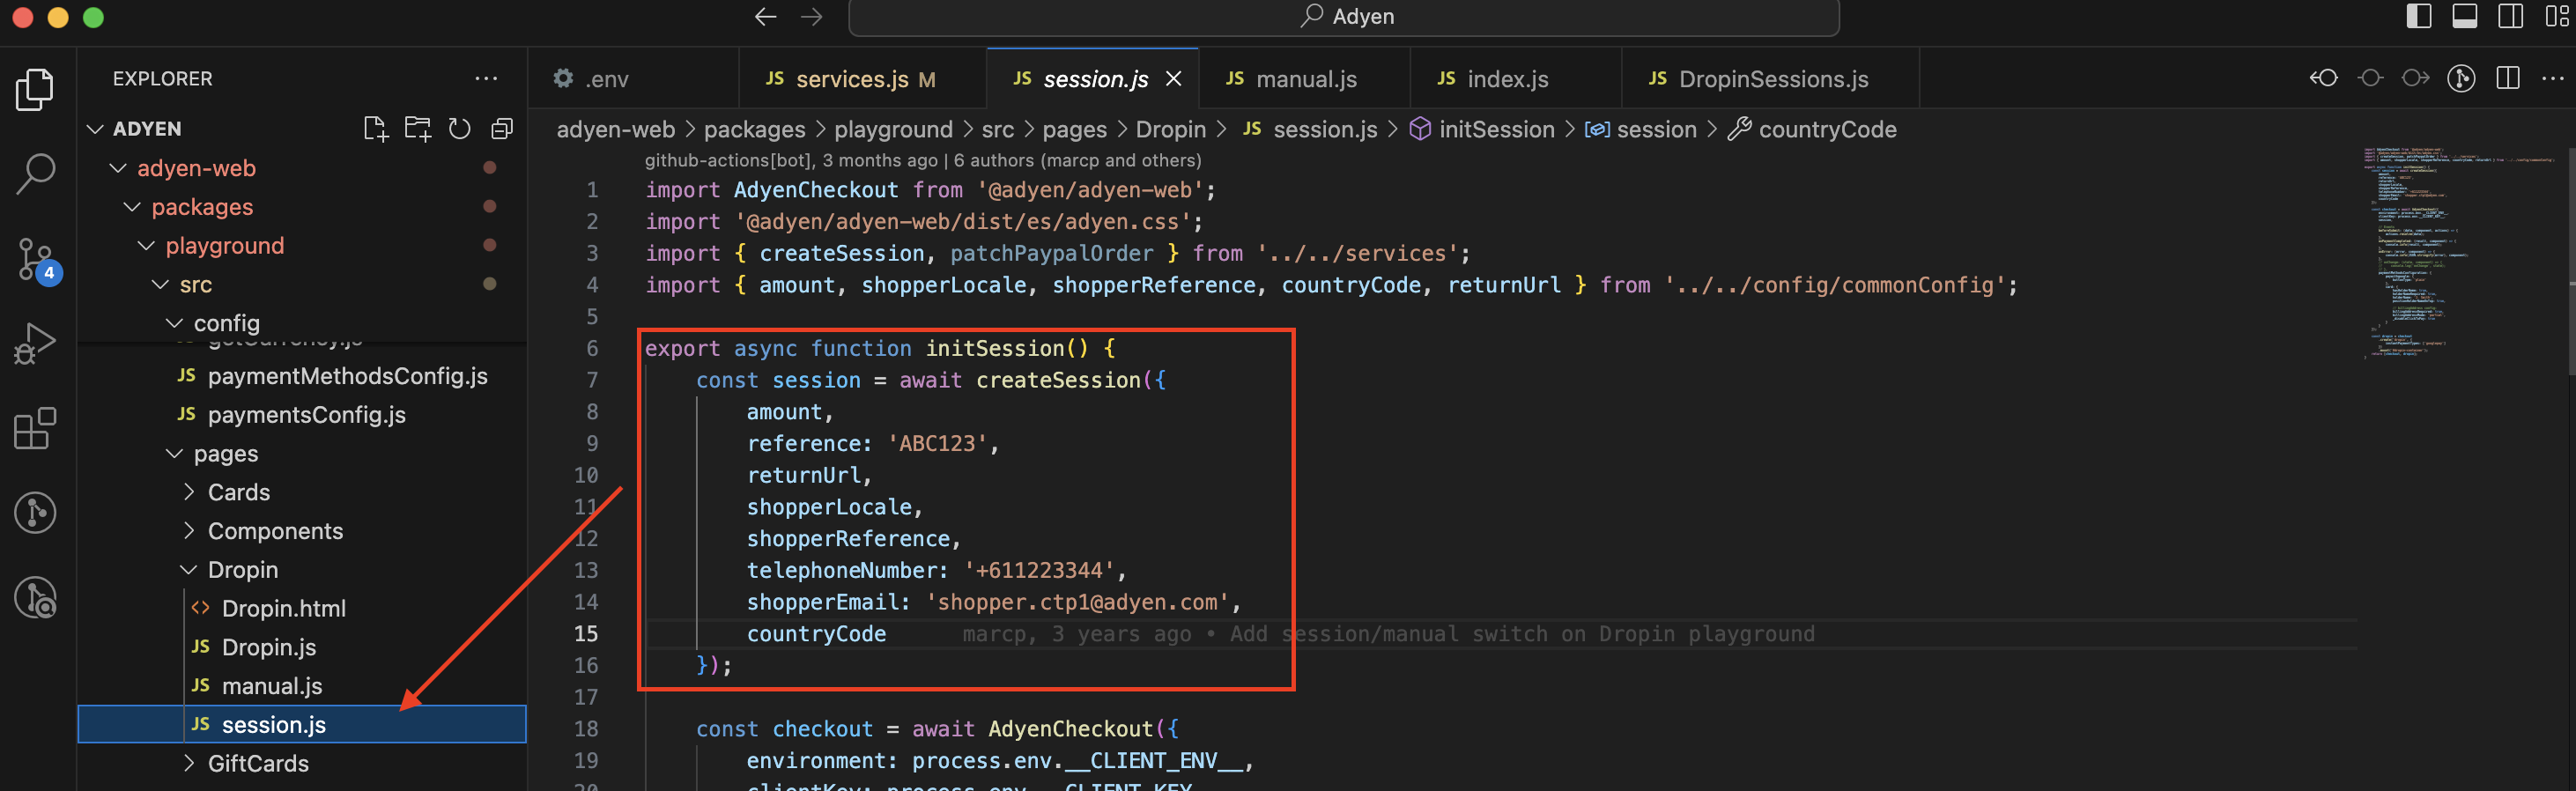
- Inspecting the code further, we can see that the dropin.js initializes the
- The script initiates a call to
/sessionand passes the payload configured in the Adyen Web Sandbox Project. We can see that the reference, shopper email etc., are as per defined in the test project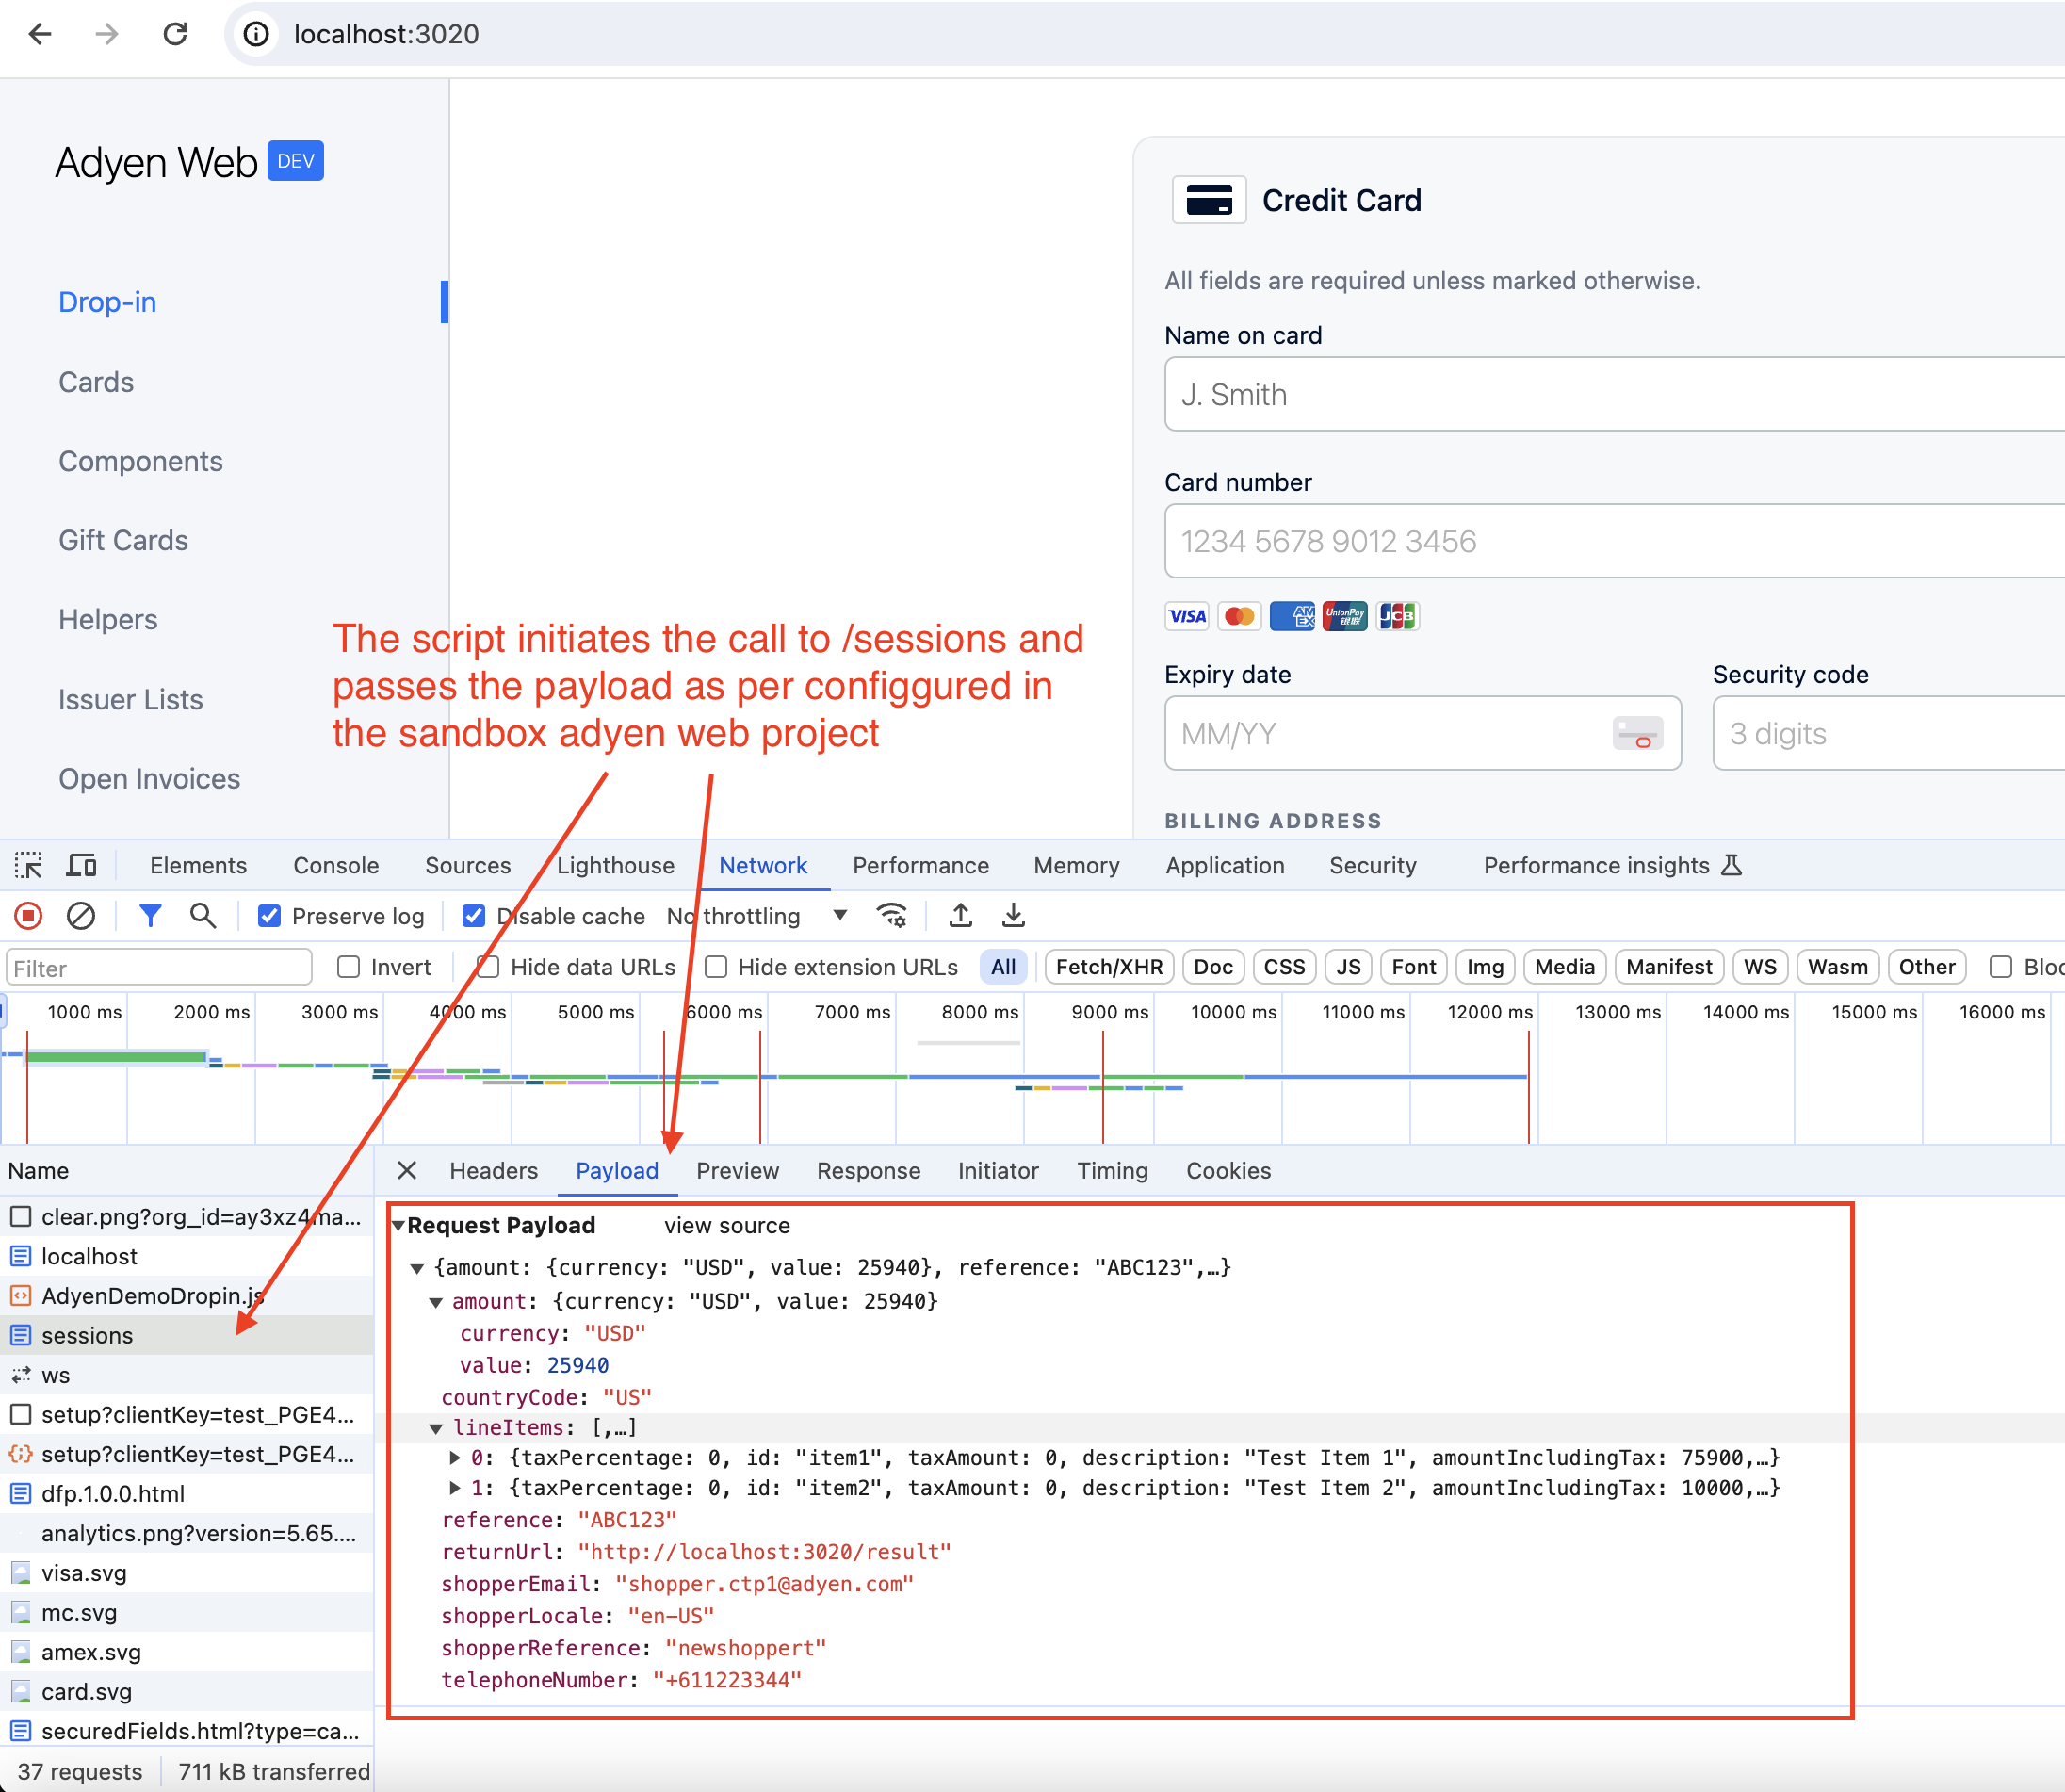
- Where does this go? Let’s inspect the Sandbox Adyen Web UI project to find out more! We can confirm that our Adyen Web UI project listens on
/sessions:
- Checking the config, we can see that the payload is being posted by the server to Adyen test checkout URL:
Note: We can’t see this in the browser because this request is being sent by our nodejs server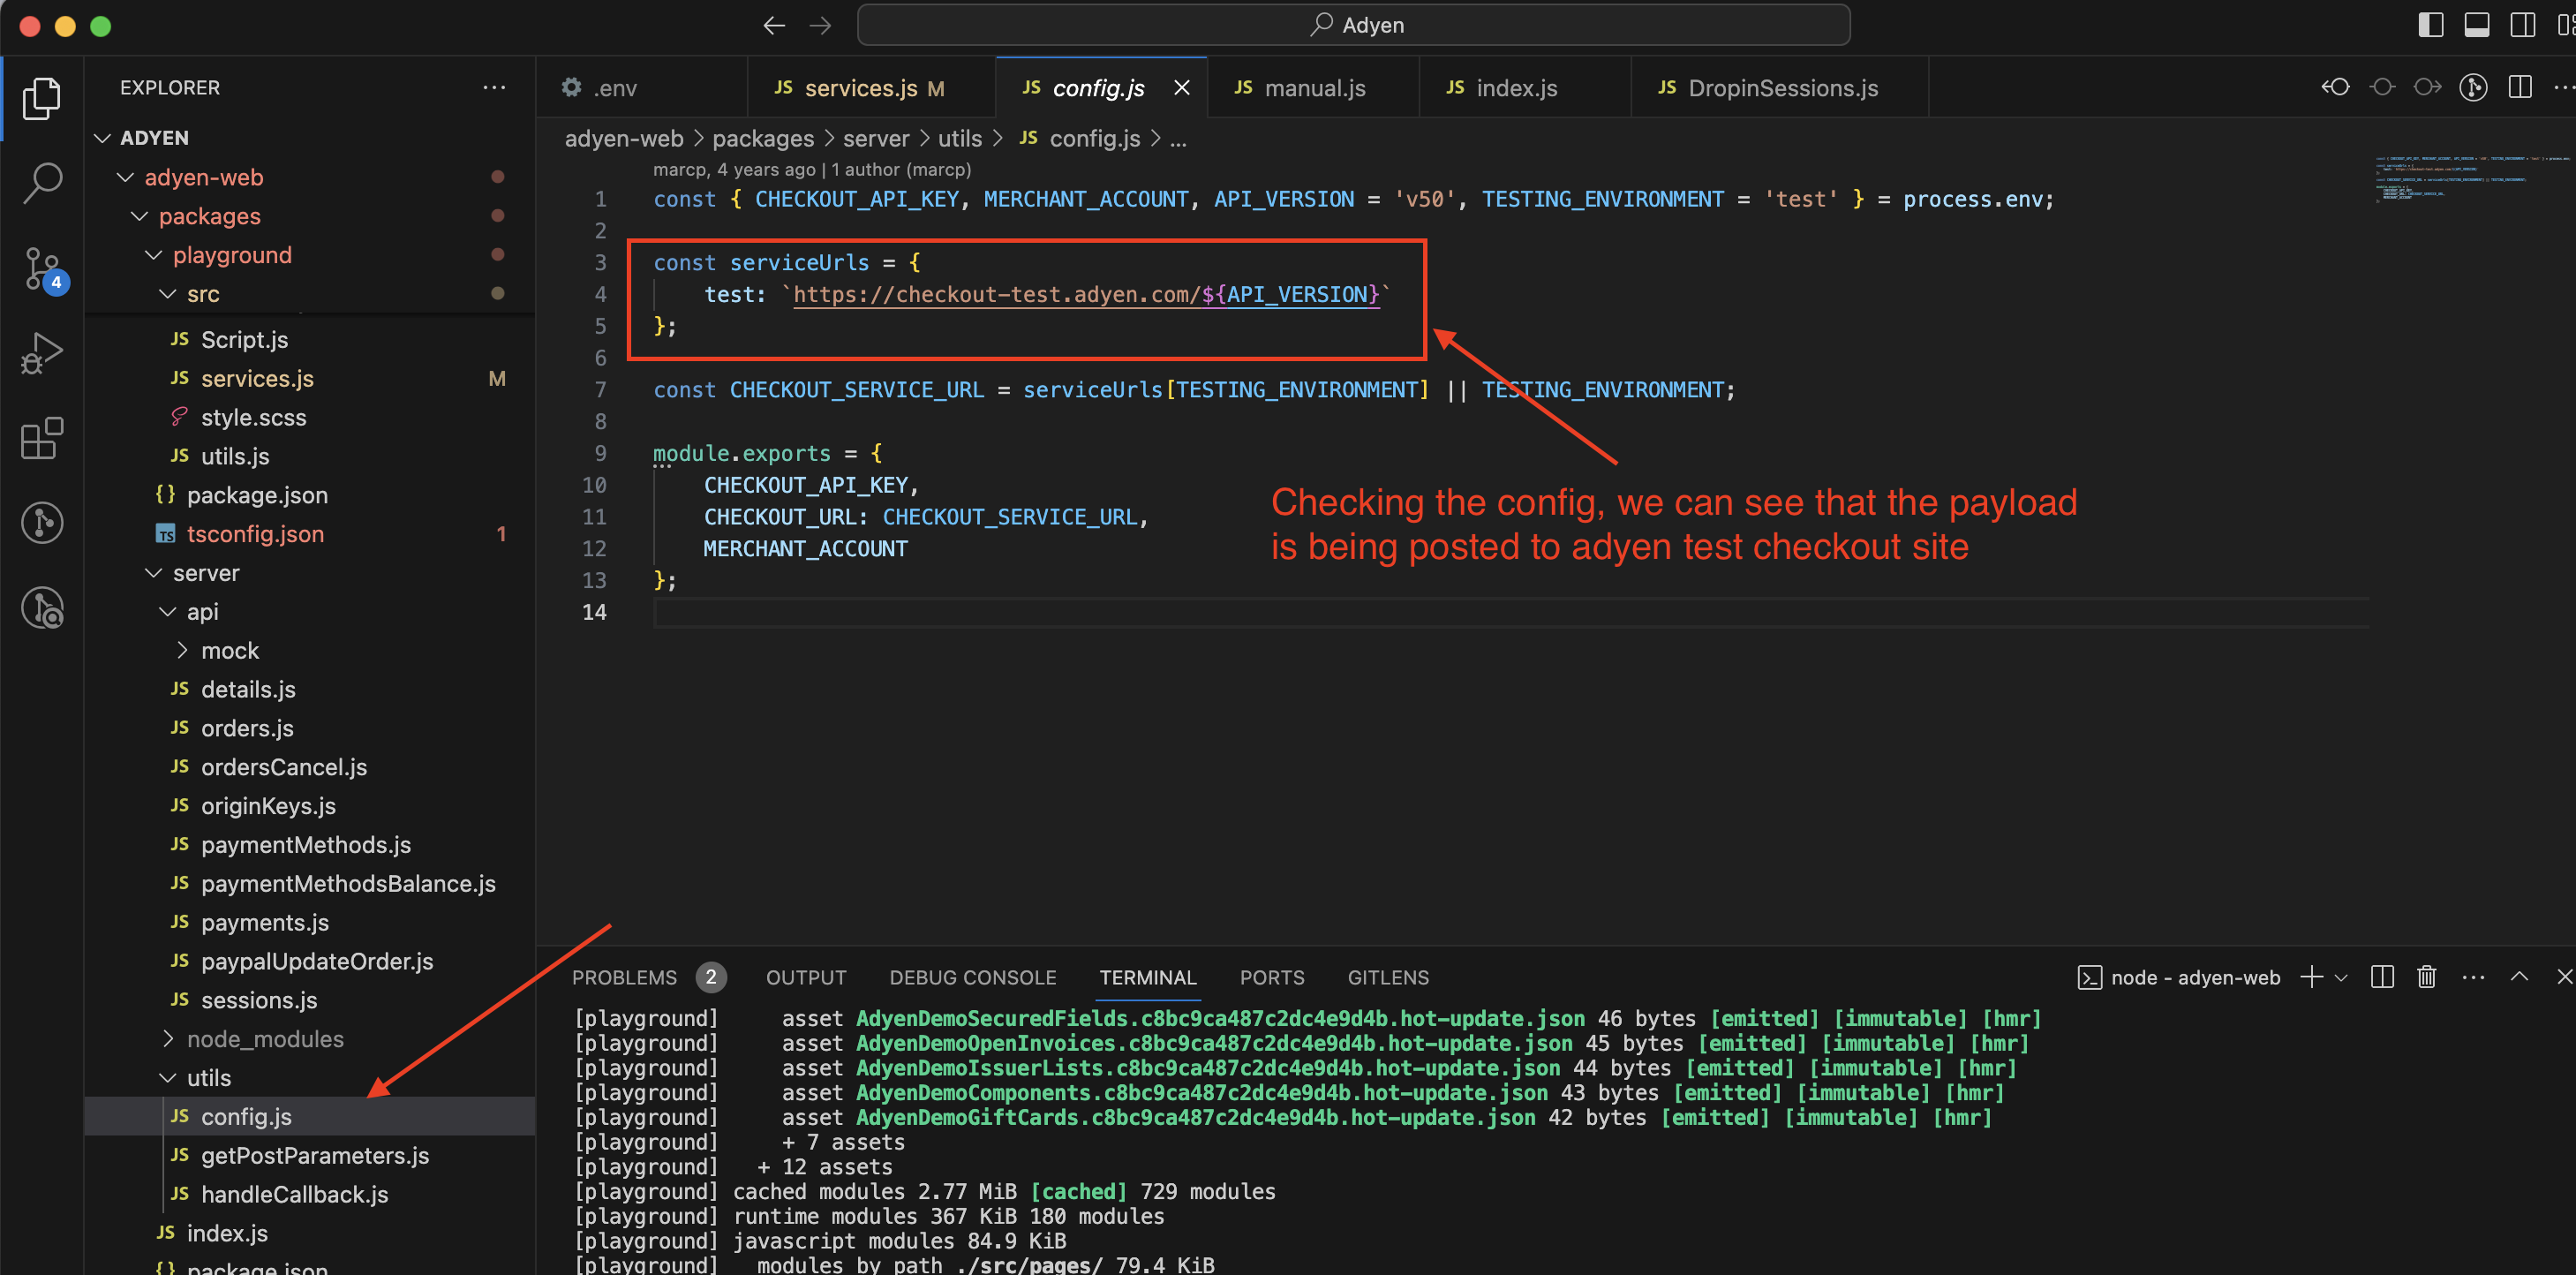
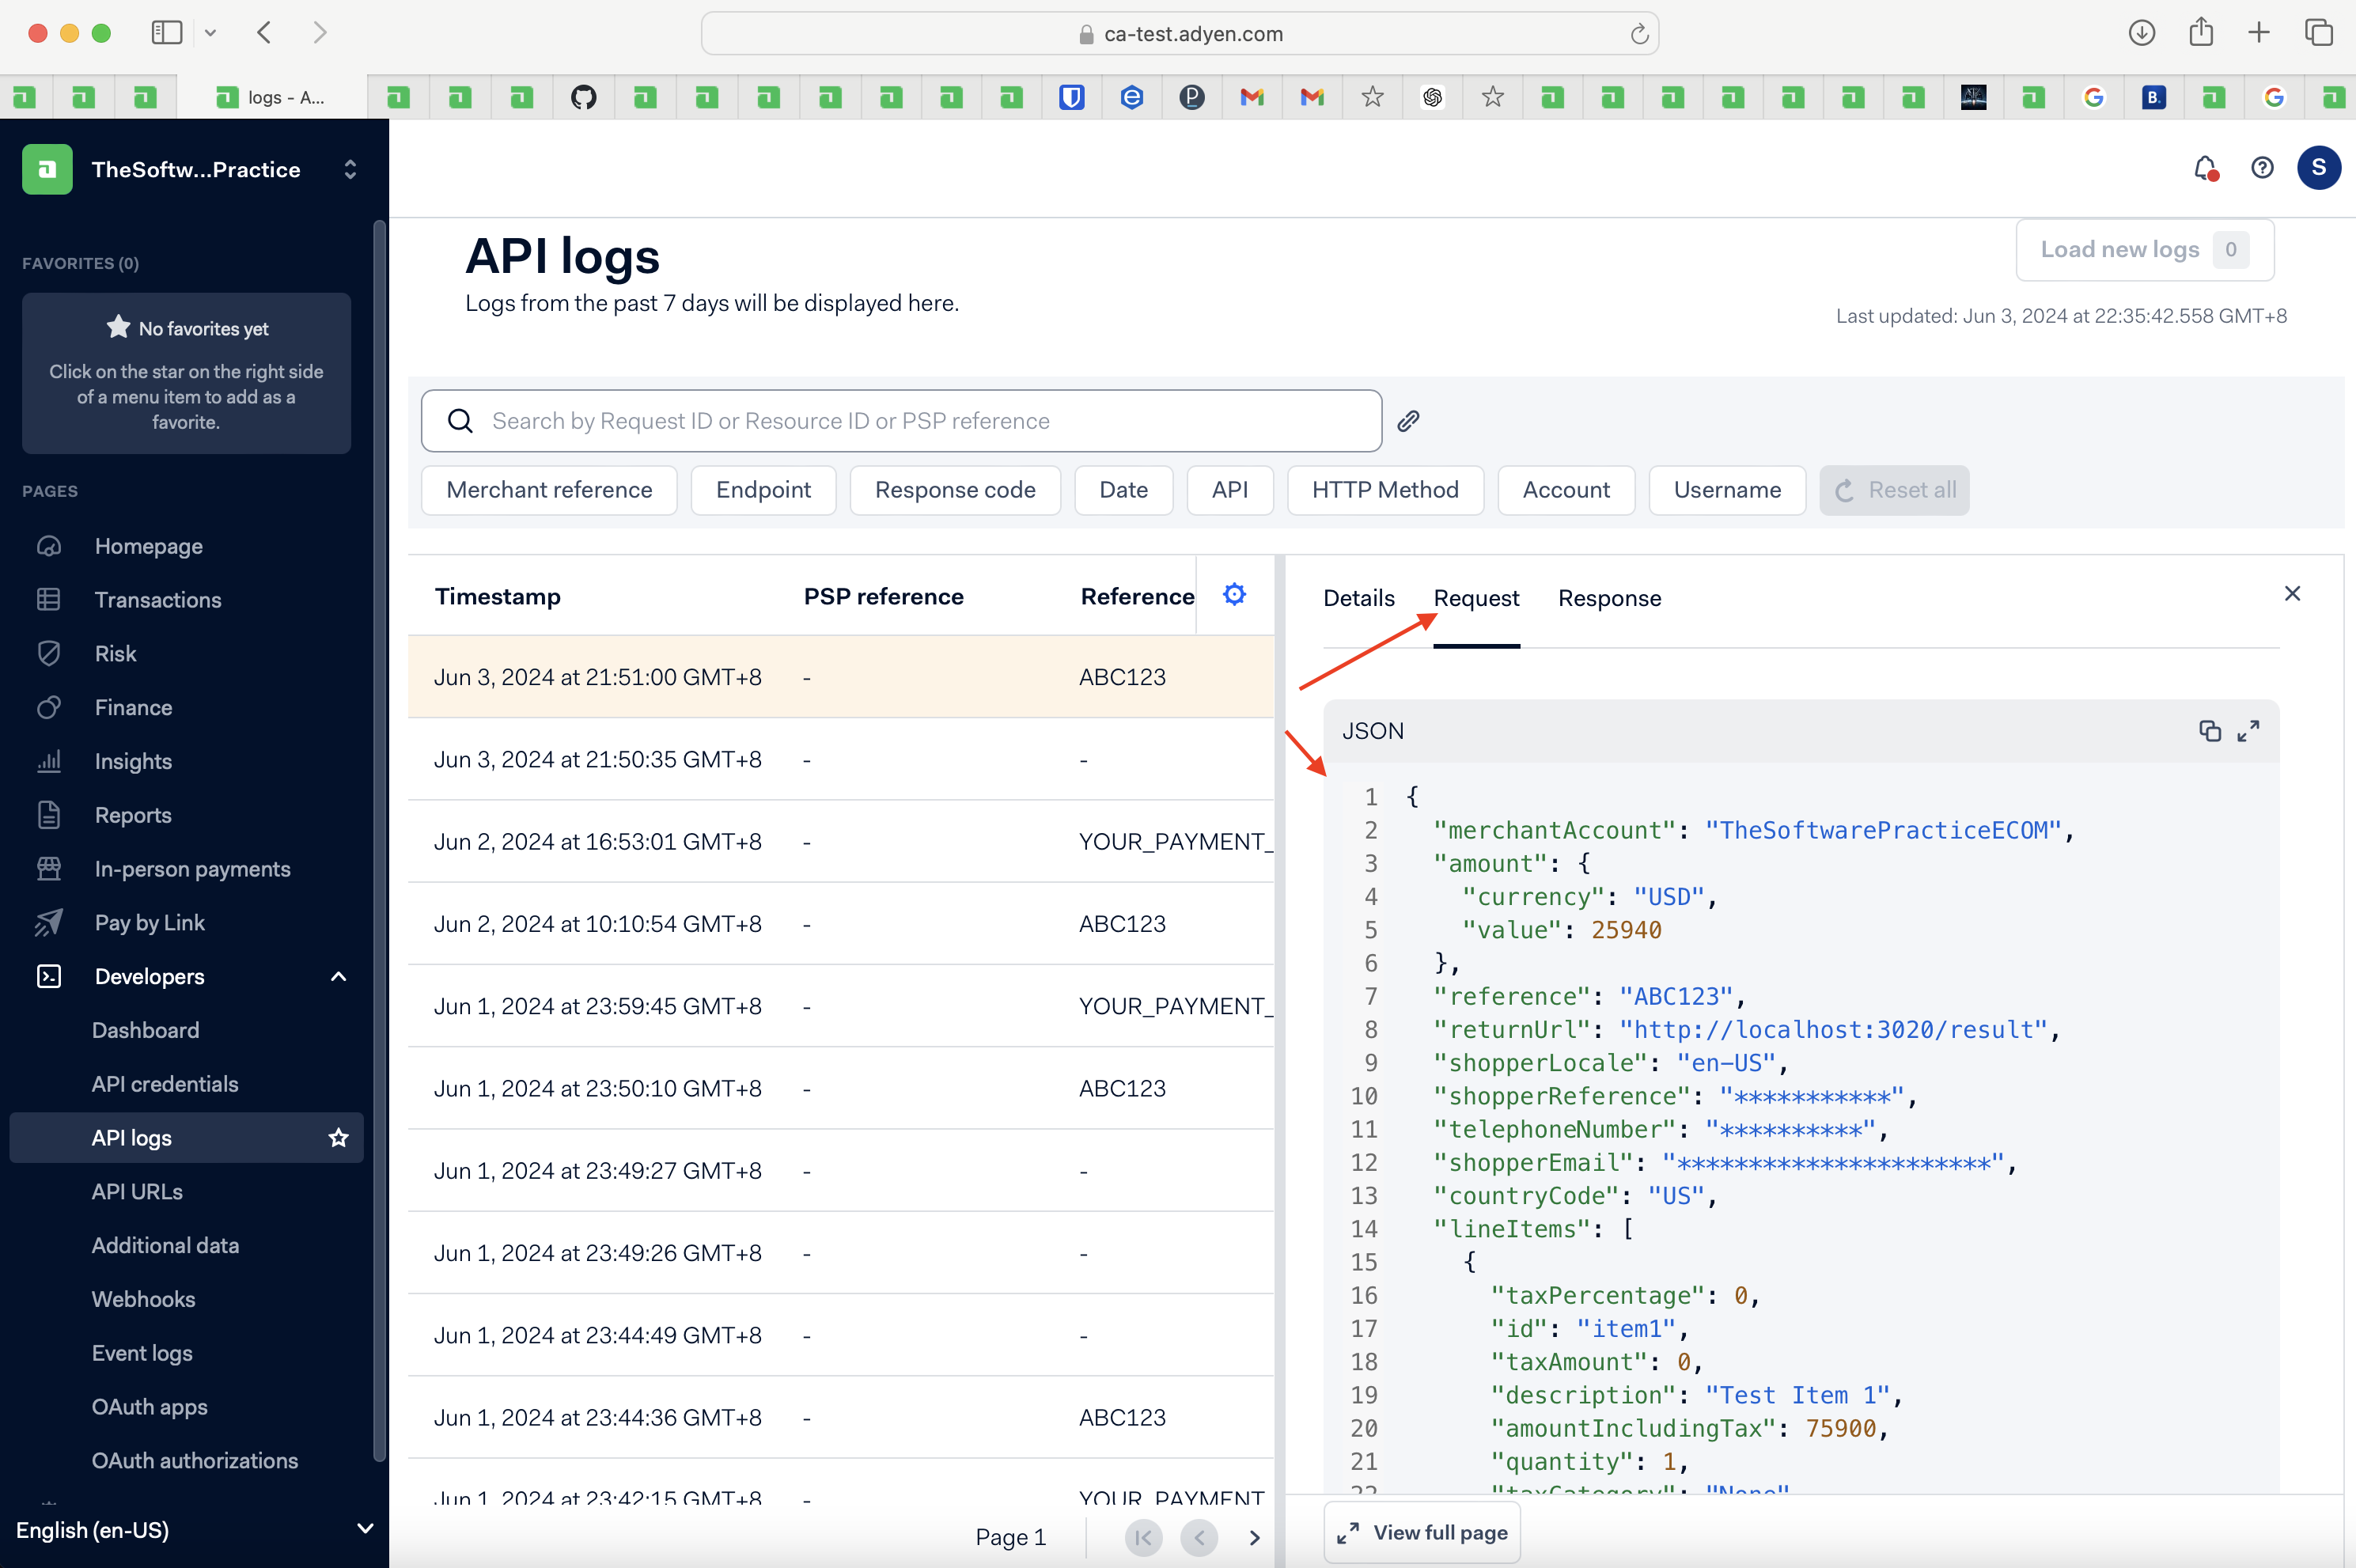
- To confirm that indeed the payload reached Adyen Test Server, we can check our Adyen Test Account Logs:
- Request received by Adyen in the logs:
- Exact same request forward in the site to
/sessions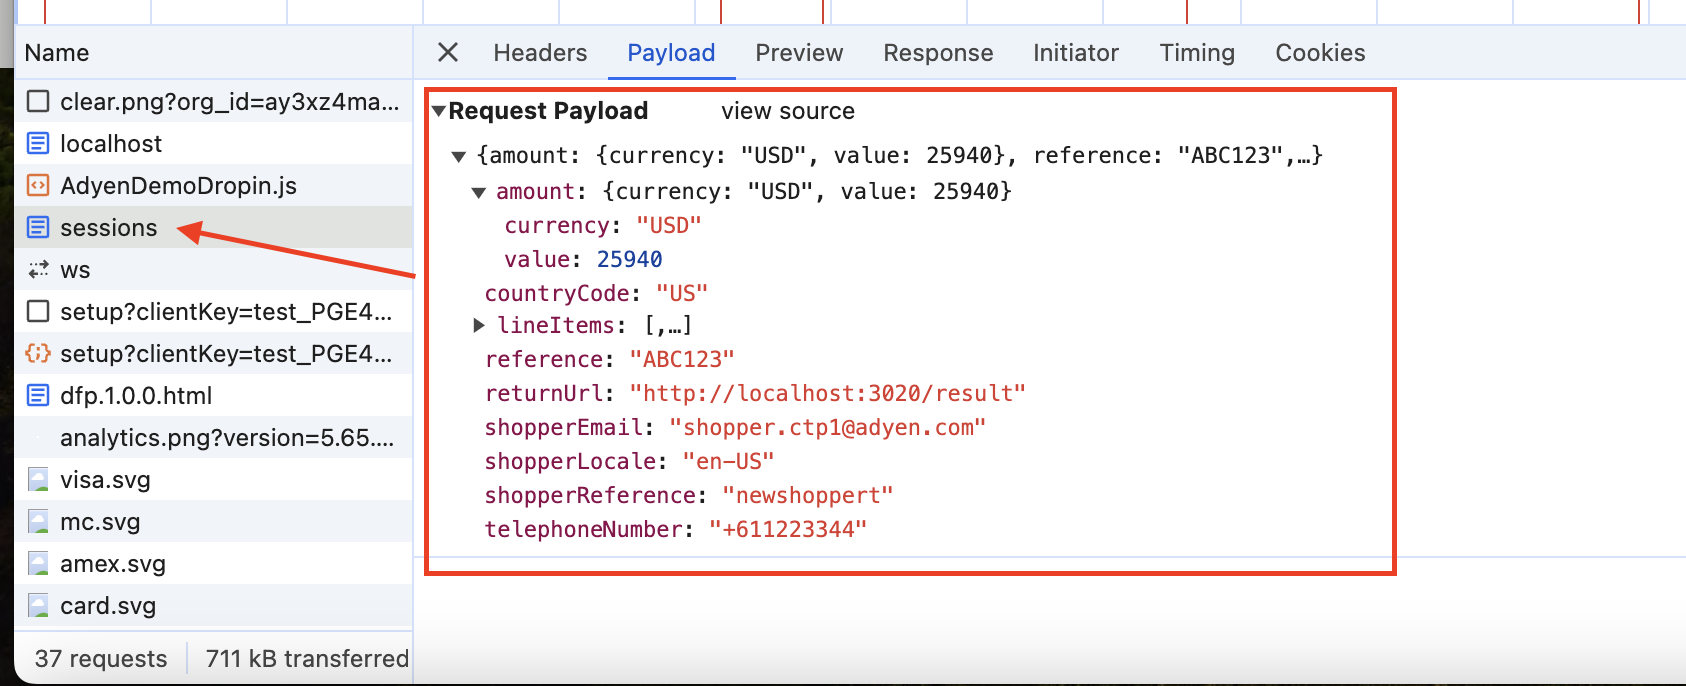
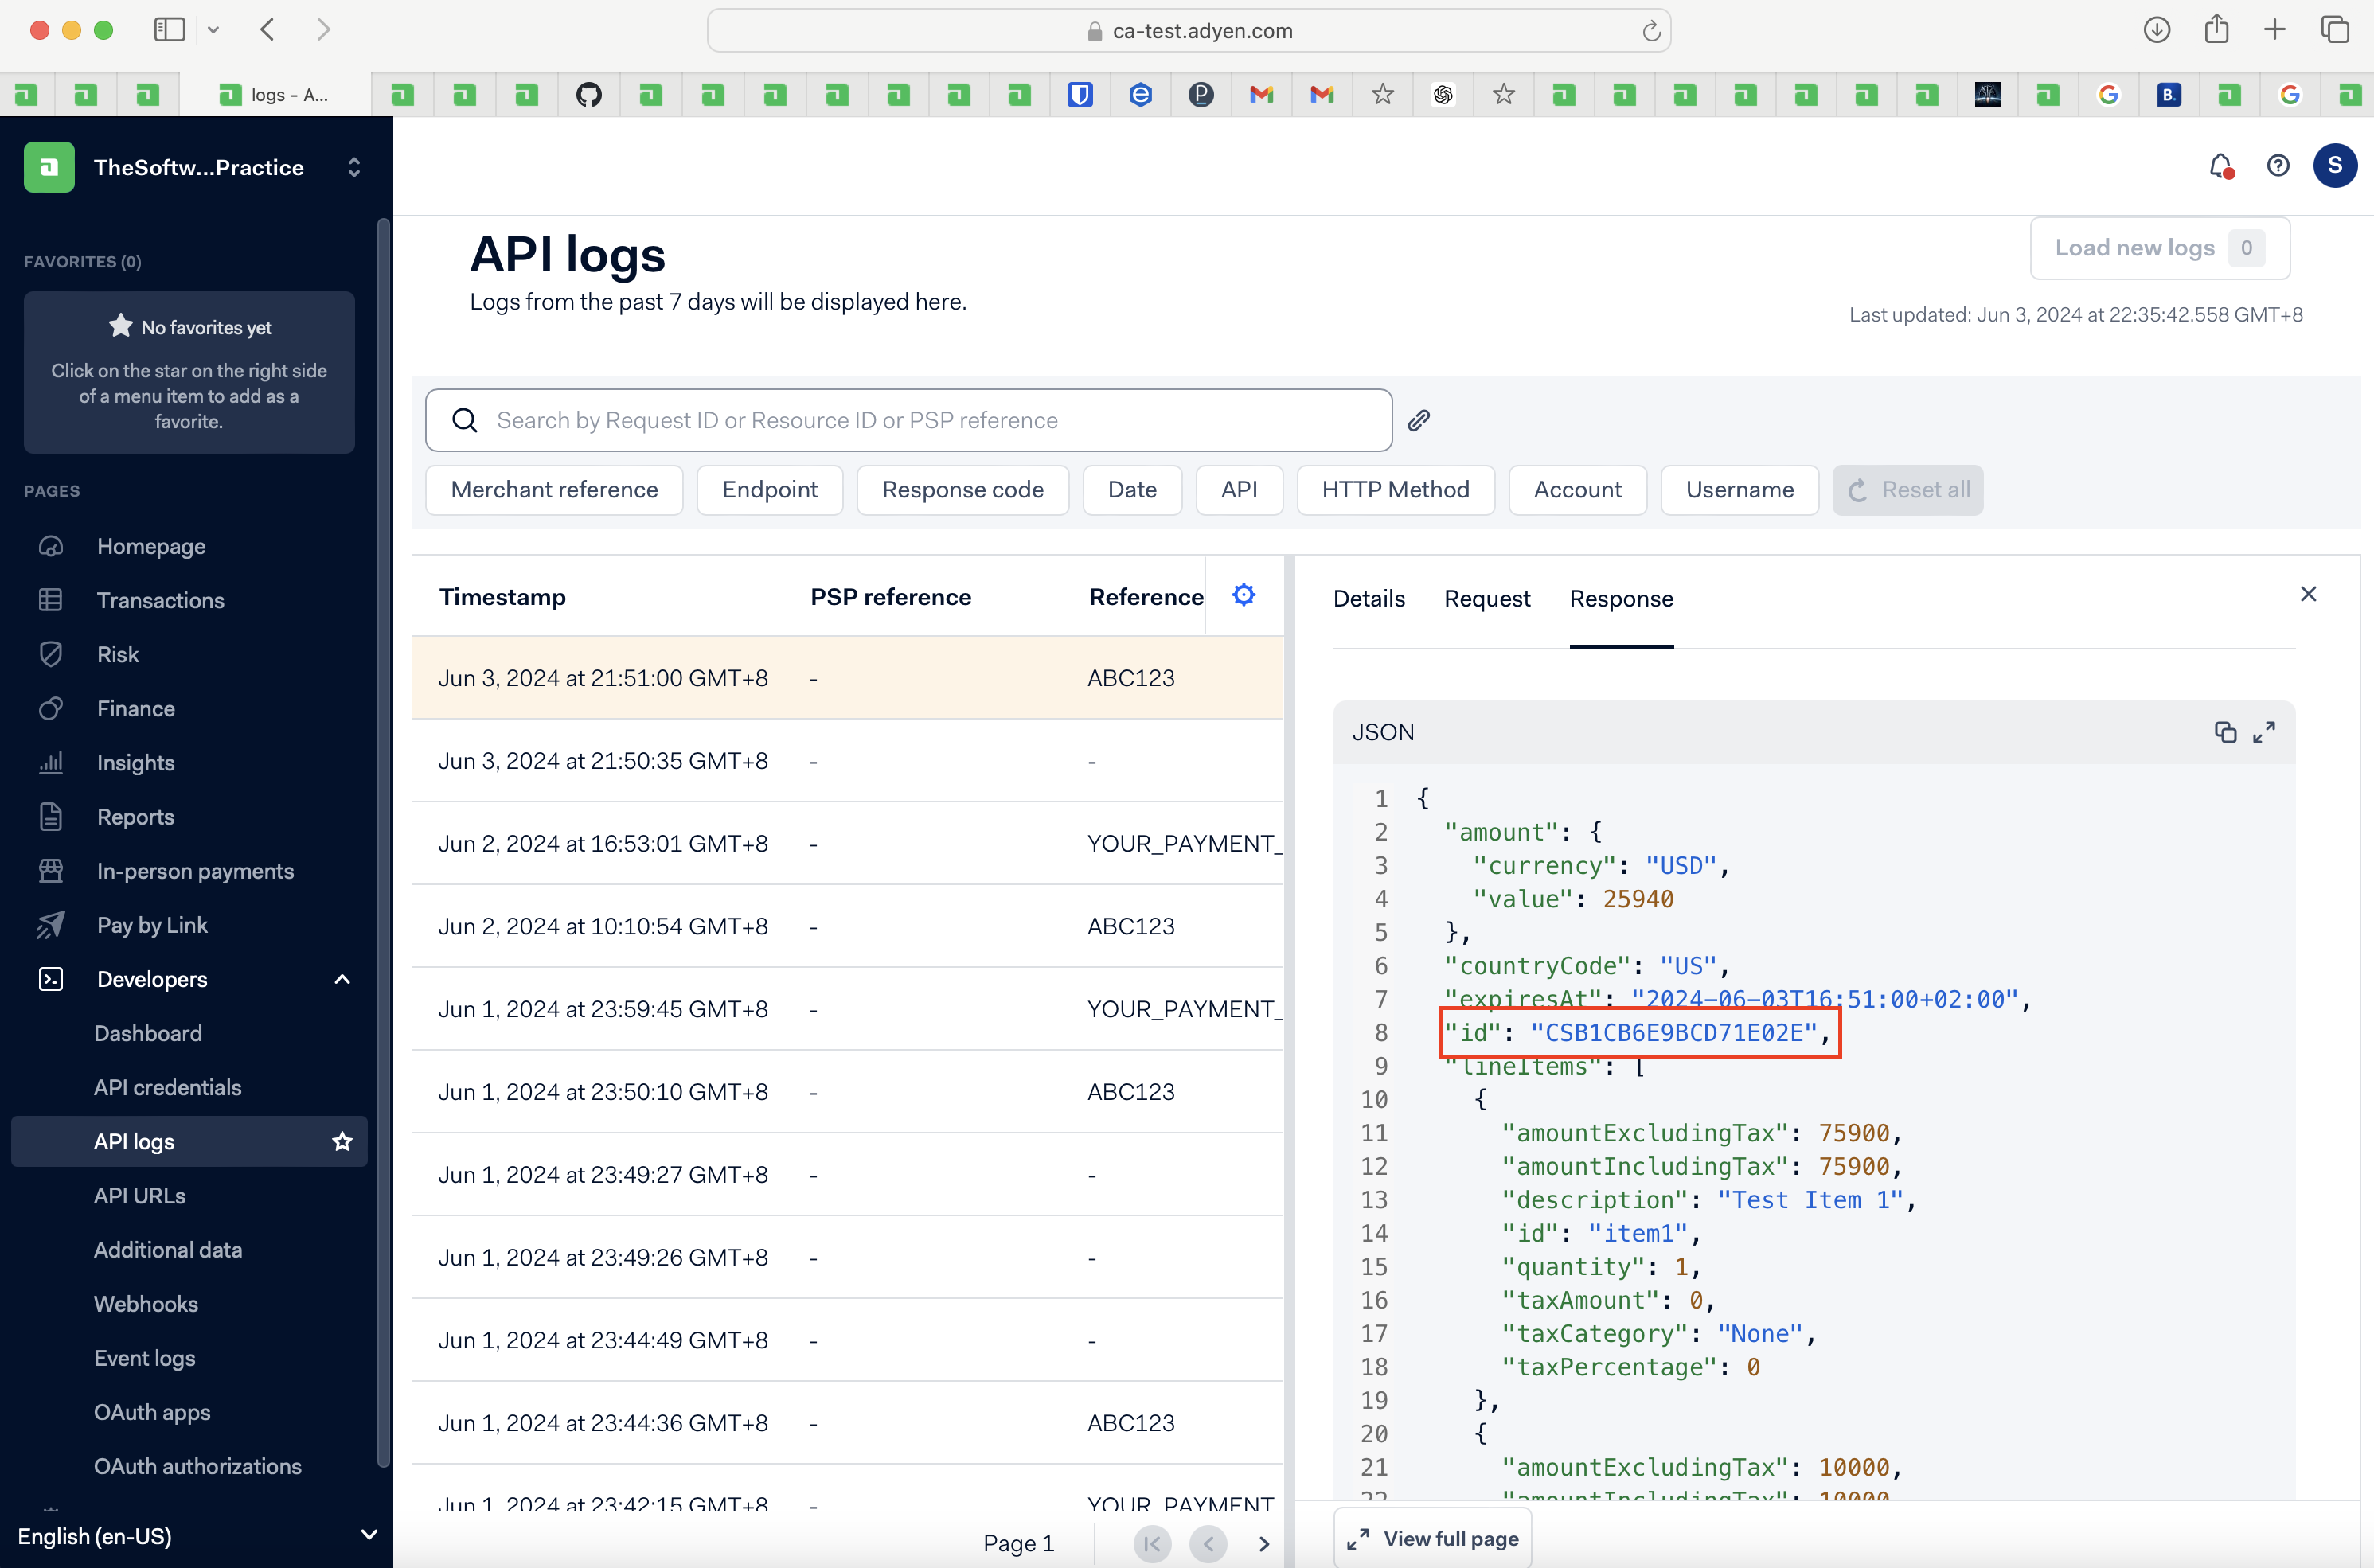
- Response from Adyen in Adyen logs:
- Response received in our browser:
- Request received by Adyen in the logs:
- Next, we also see another call made to adyen’s checkoutshopper-test server
- See request sent, containing the payload received in Step #5
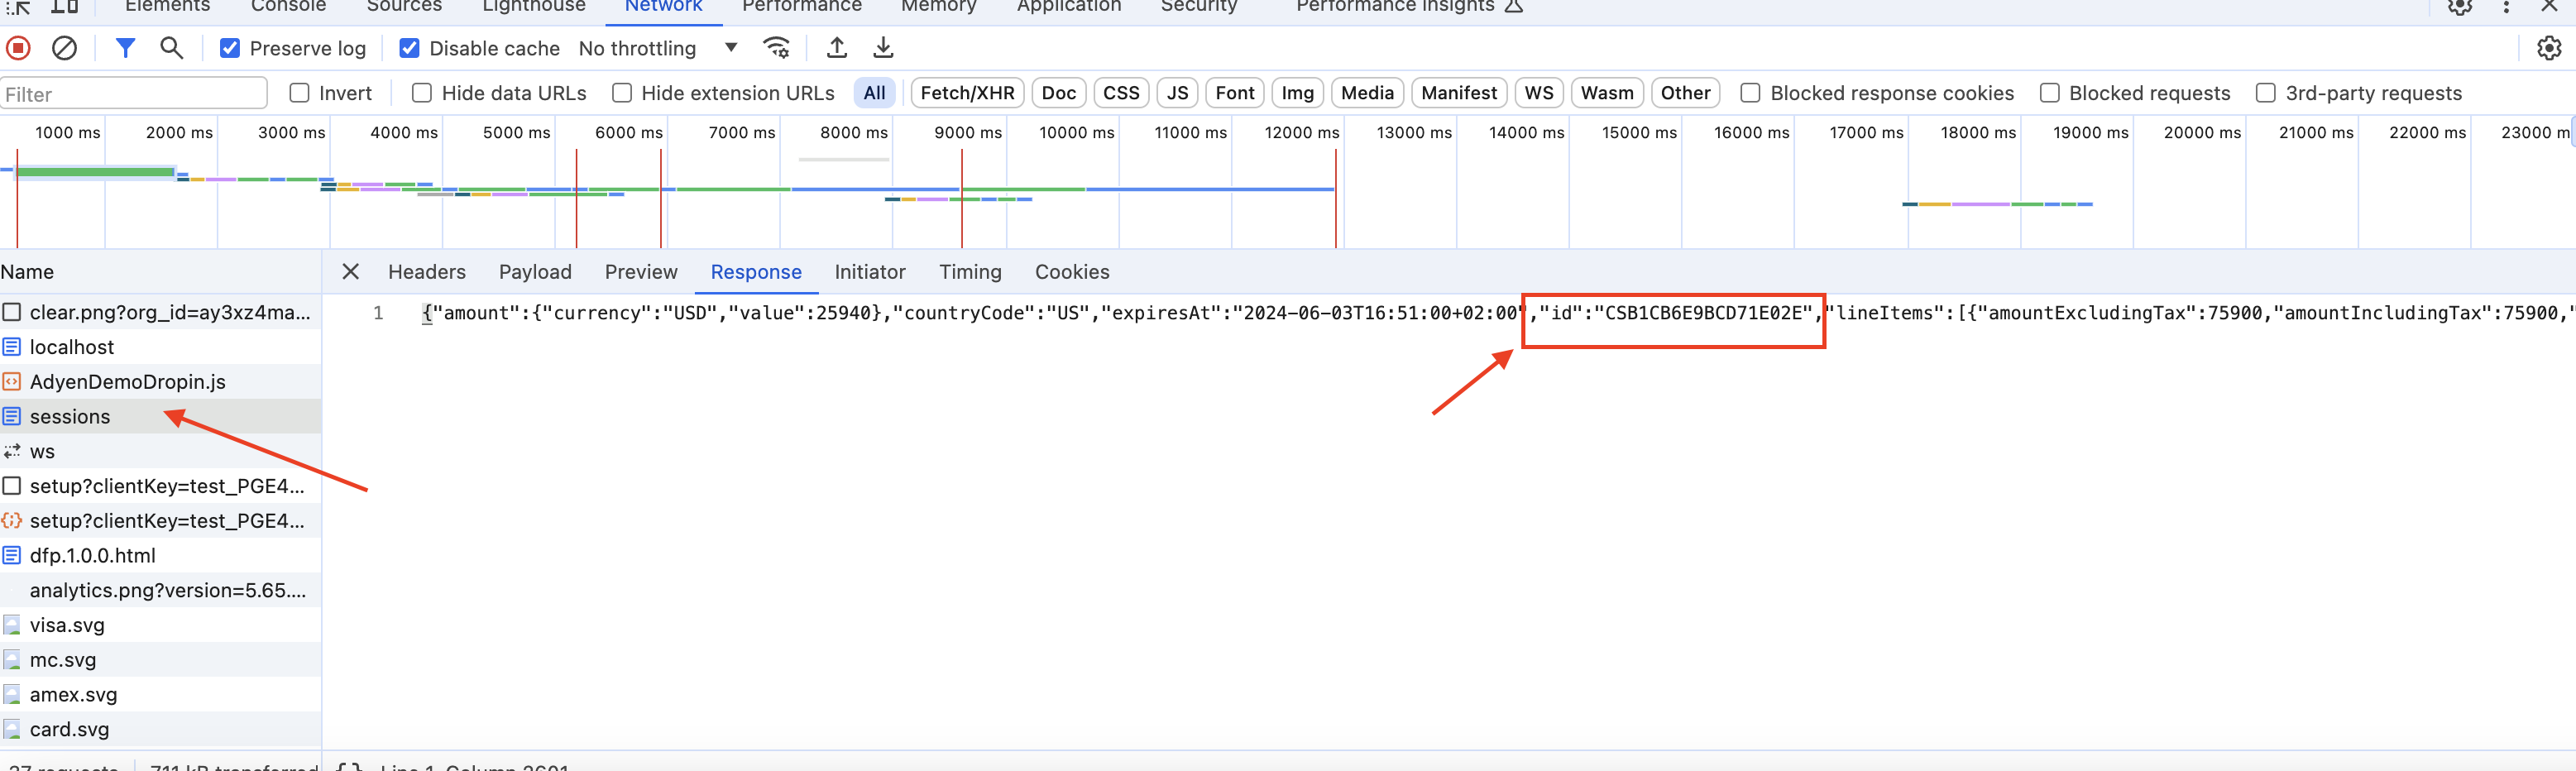
- See response received, another set of
session datareceived from Adyen alongside payment mode available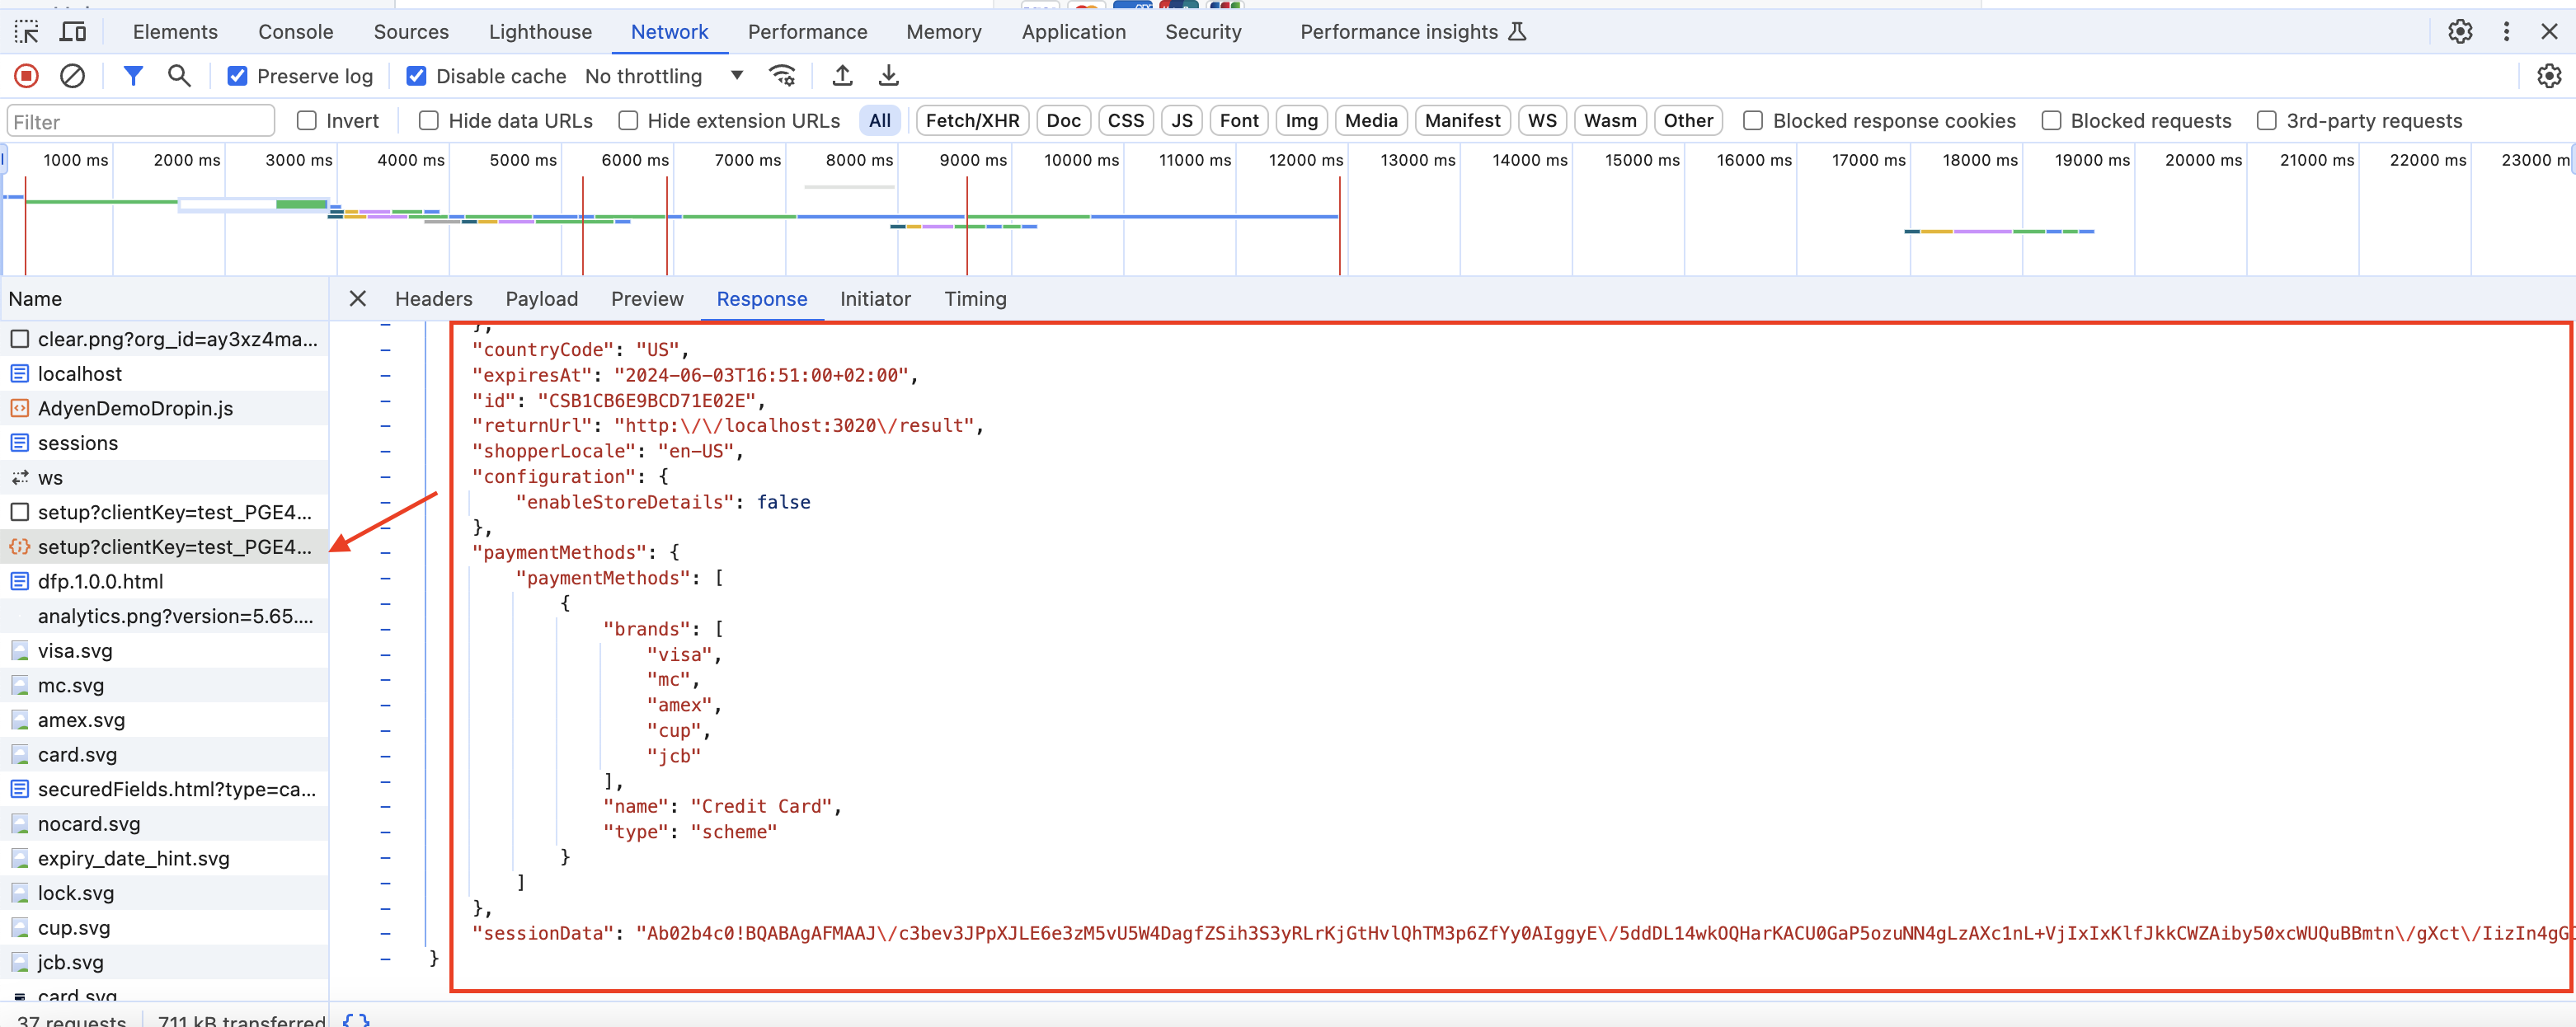 My guess is that this session data and payment modes is used by the Adyen Web UI to infer what can be displayed in the checkout page
- See request sent, containing the payload received in Step #5
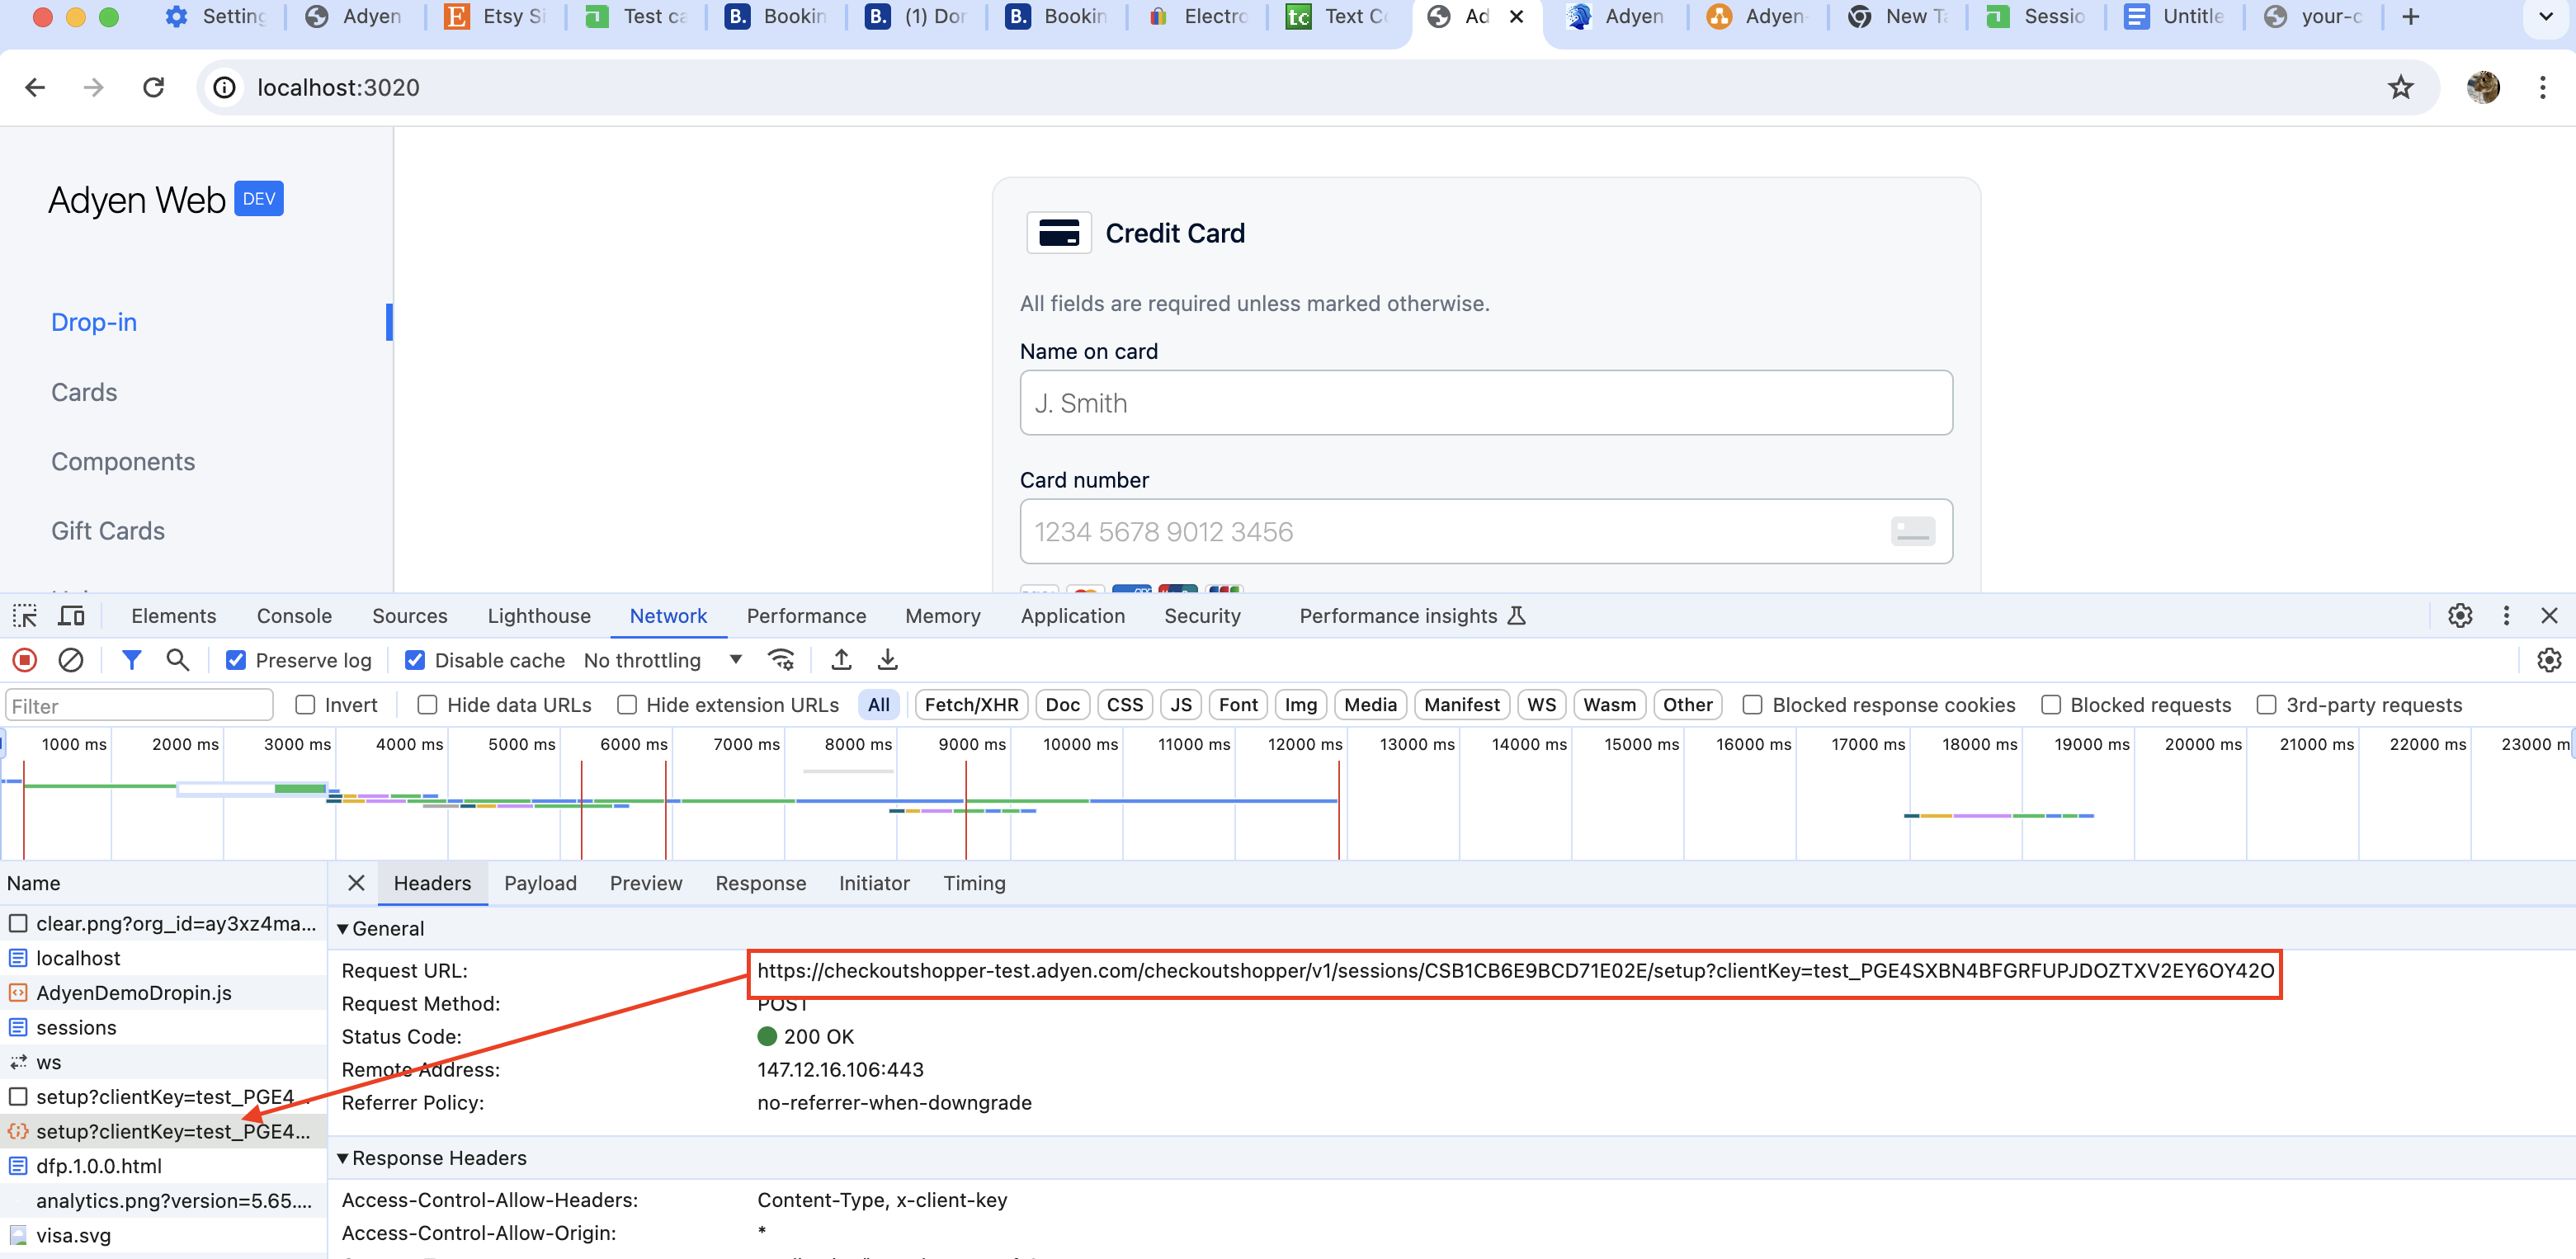
Step #3: Create and Display Checkout UI
Here, my guess is that we use the payment modes and session data returned in the second call to https://checkoutshopper-test.adyen.com/checkoutshopper/v1/sessions/CSB1CB6E9BCD71E02E/setup?clientKey=test_PGE4SXBN4BFGRFUPJDOZTXV2EY6OY42O to setup the checkout UI.
This is just my guess based on Adyen’s How it Works documentation, because I didn’t have the time to go and follow the implementation in Adyen Web UI - it would have taken too long for me ><
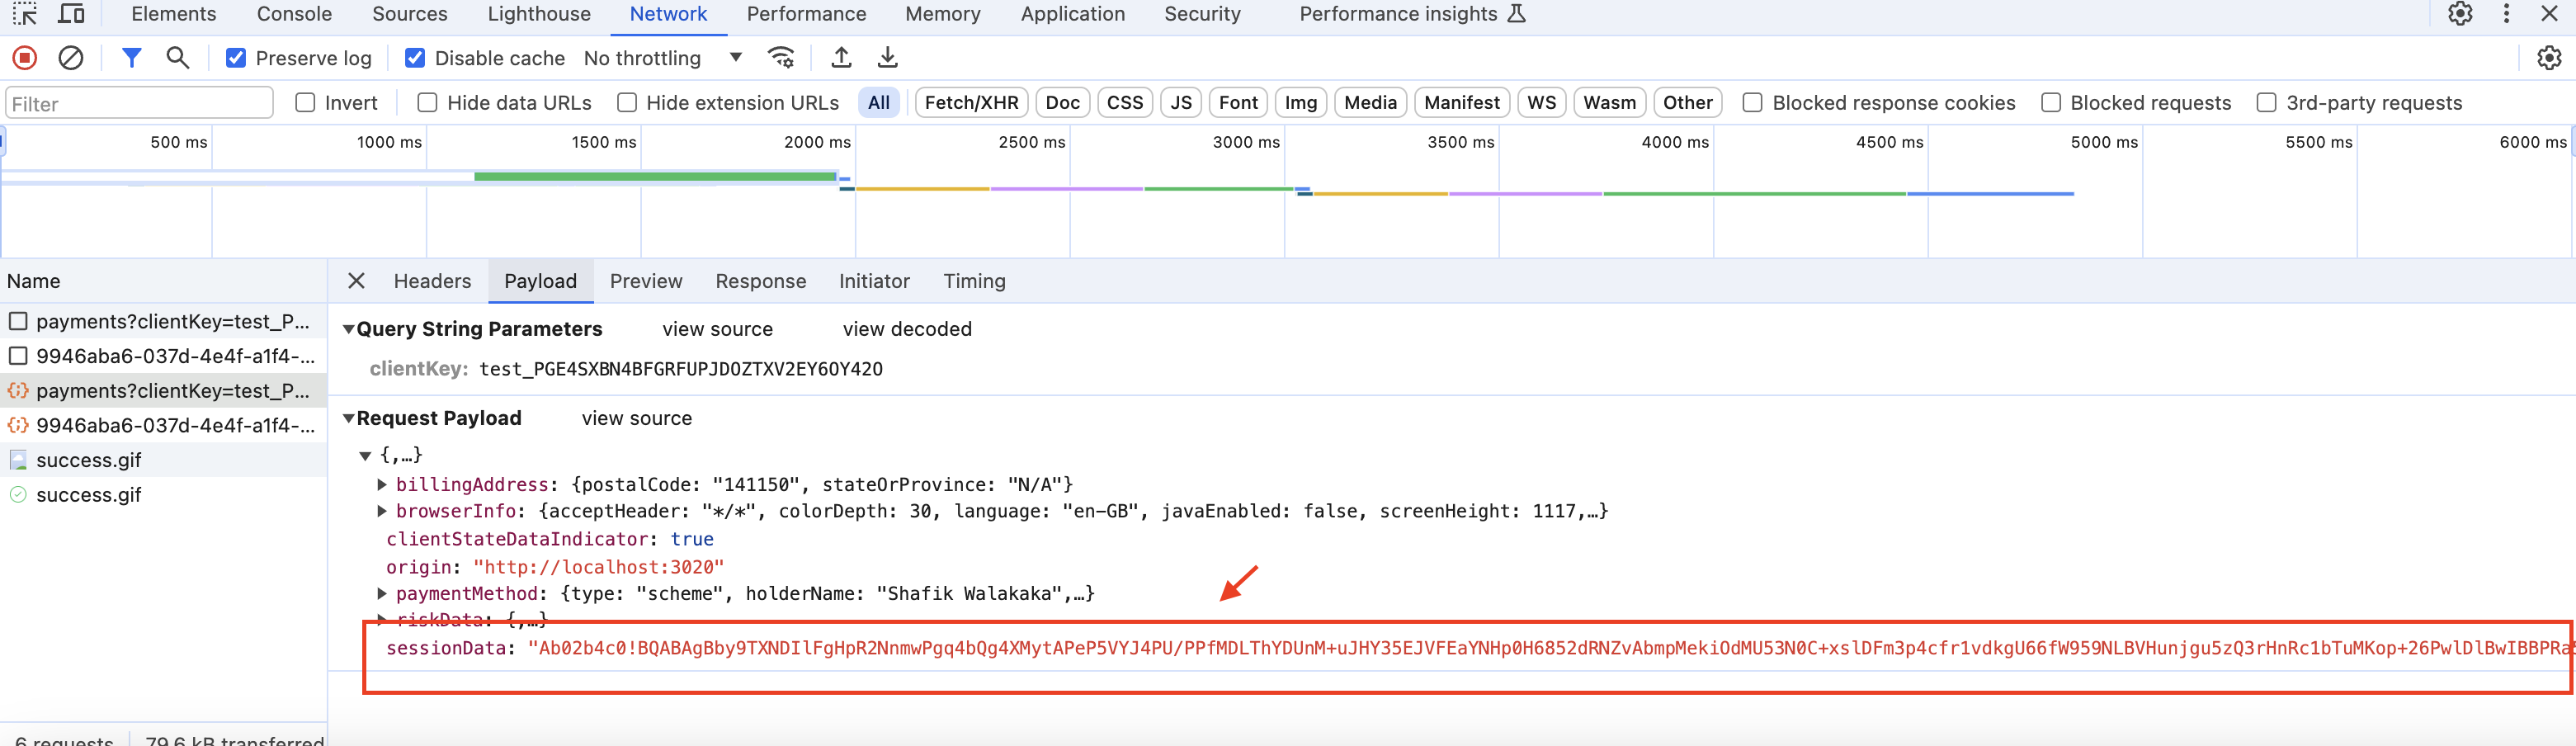
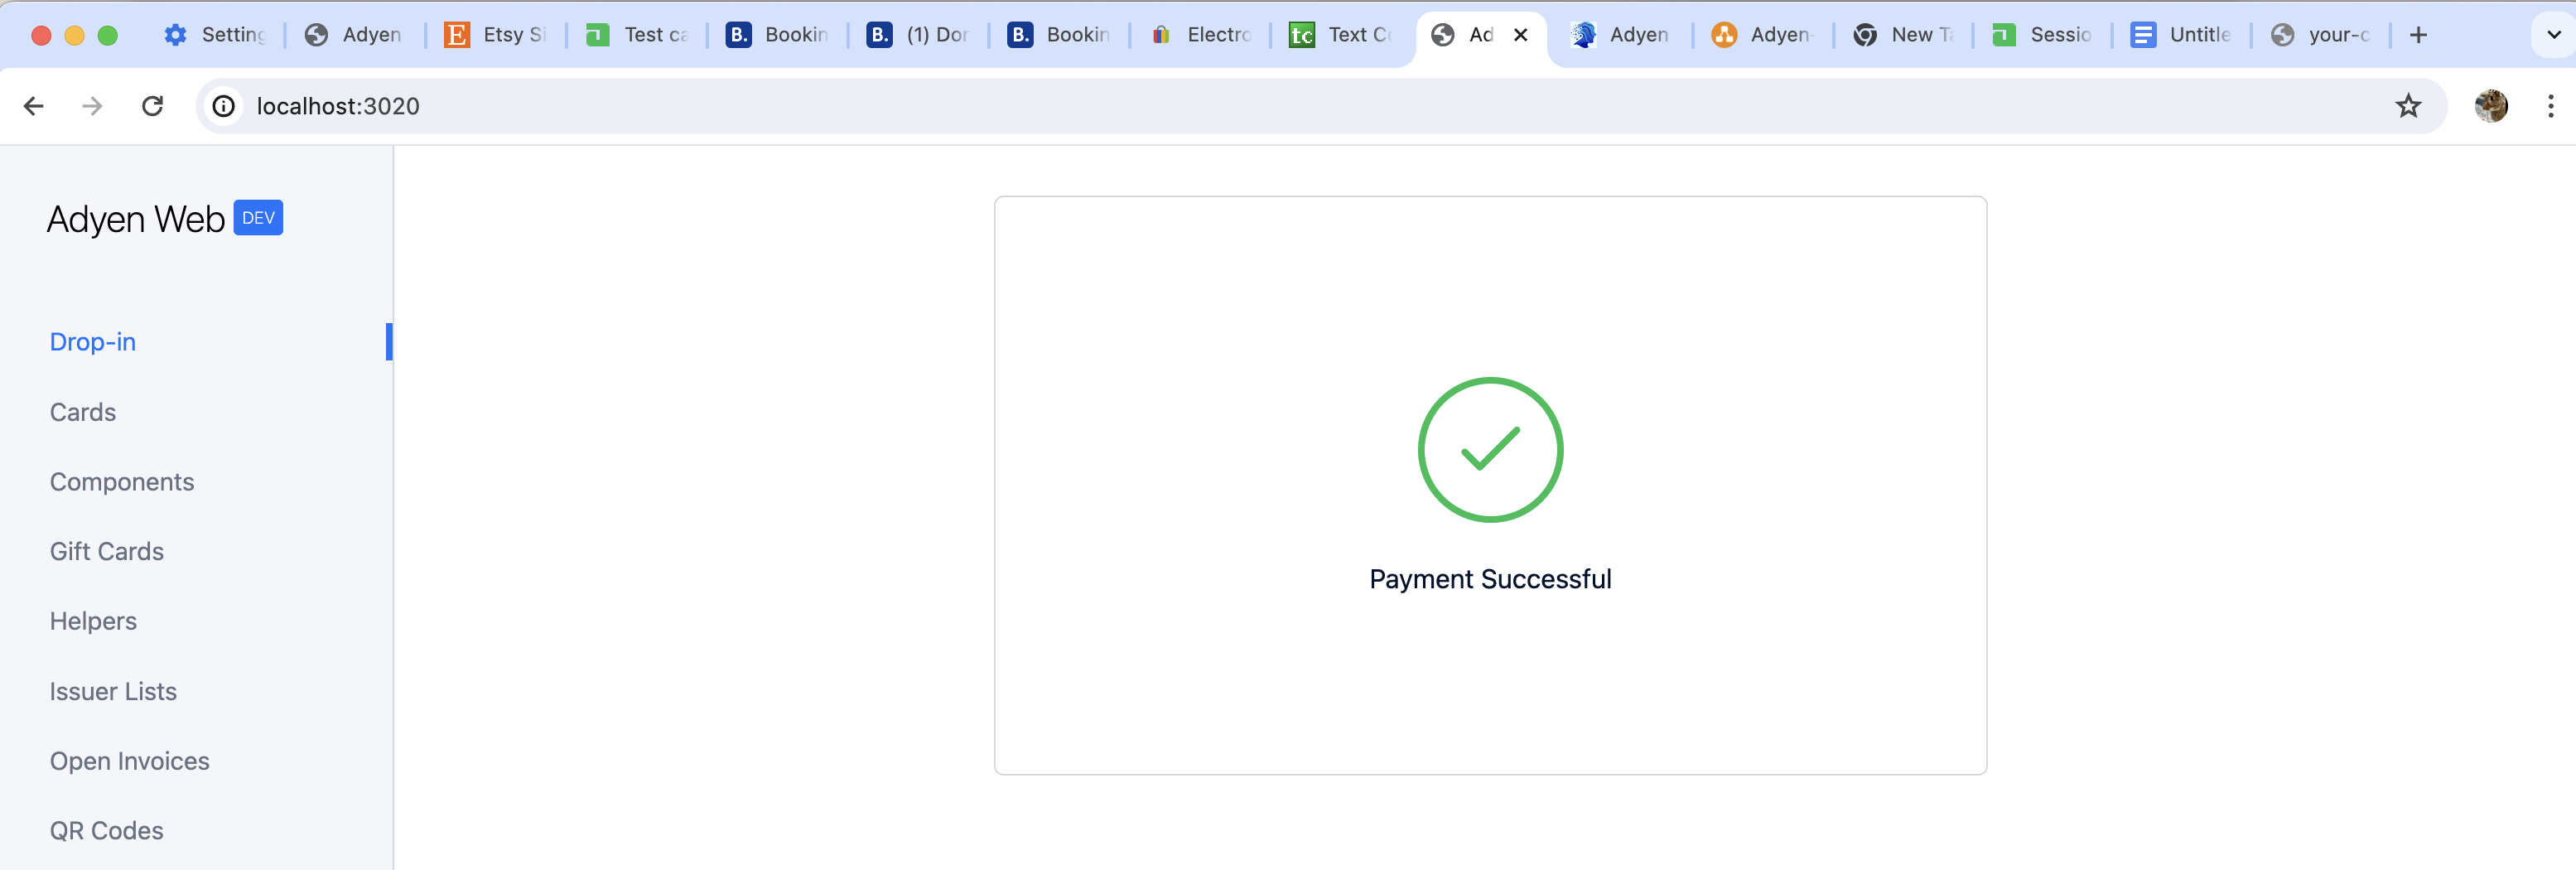
Step #4: Shopper Enters Credentials and Submit Details
Here, we step down what happens when the Shopper enters their credit card details and submit:
- Enters credit card details based on Adyen Test Cards
- See screenshot of entering adyen test cards details and subsequently hitting submit
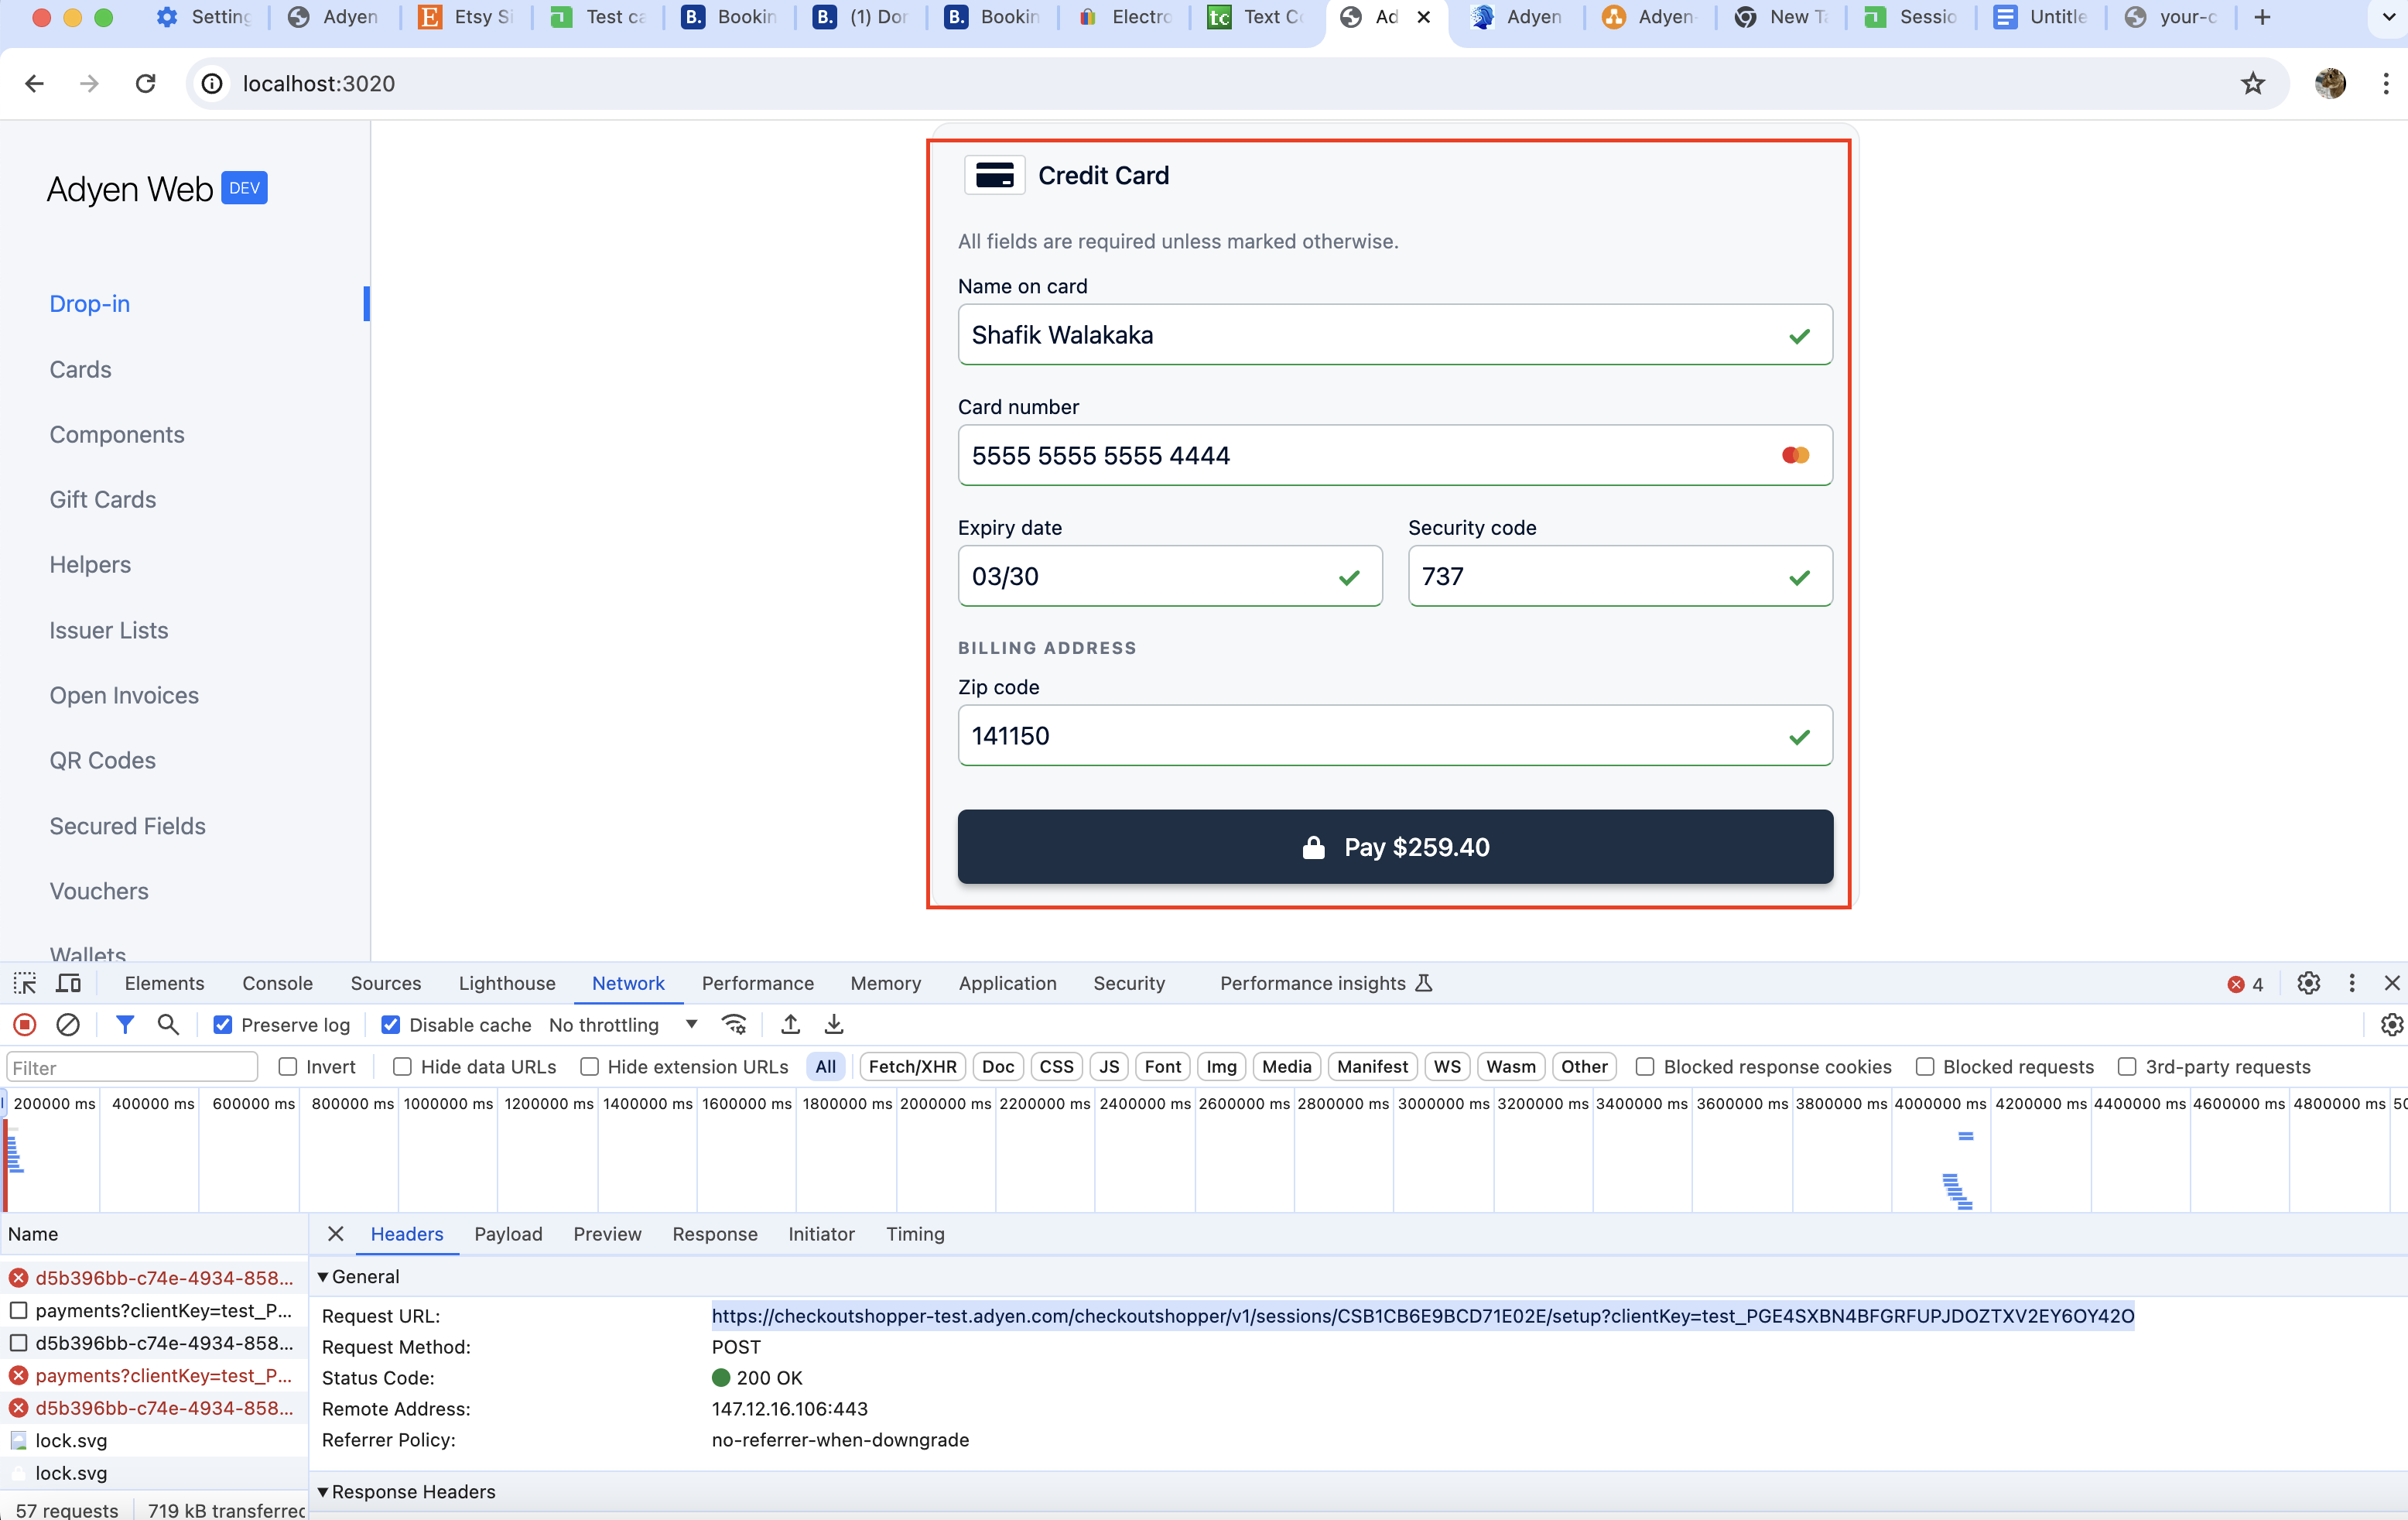
- When can see that the details are posted includes the session data from the second call to adyen
- See screenshot of entering adyen test cards details and subsequently hitting submit
- Afterwhich a success message is showned
Step 5: Webhook Confirmation
Similar to the hosted checkout flow, we always trust the server-to-server call (as far as I’m aware). This comes in the form of a webhook
- See Adyen’s logs for webhooks that is initiated for the successful payment:
- Checking the Pet Coach SG logs, we can also see that the callback has reached our site:
Related: Adyen In-Person / POS Payments
Everything above covers Adyen’s online checkout flow – a shopper on a website, entering card details into a hosted page or UI component. Adyen also has a completely separate integration surface for card-present, point-of-sale payments – a physical (or simulated) terminal instead of a checkout page, a different message format (SaleToPOIRequest/SaleToPOIResponse instead of Sessions), and its own set of gotchas around cloud vs. local architecture. If that side of Adyen is more relevant to what you’re building, Adyen POS / Terminal API — Architecture and Background is the starting point for that series.
Conclusion
Understanding the online payment flow and its implementation can significantly enhance the efficiency and security of your e-commerce operations. By leveraging Adyen’s comprehensive payment processing solutions, businesses can provide seamless and secure payment experiences for their customers.
Whether you’re an e-commerce entrepreneur, tech recruiter, or payment technology enthusiast, integrating a robust payment system like Adyen can streamline your operations and improve customer satisfaction.
Ready to take your e-commerce business to the next level? Dive into the world of seamless online payments with Adyen today. Explore their offerings and see how they can transform your online payment processes.
Stay tuned for more insights into the fascinating world of online payments and fintech!
Peace and Love
Shafik Walakaka